
You are using an out of date browser. It may not display this or other websites correctly.
You should upgrade or use an alternative browser.
You should upgrade or use an alternative browser.
Weekend Photofun 16-17-18
- Thread starter jeffrey-wimberly
- Start date
ModelRailroadForums.com is a free Model Railroad Discussion Forum and photo gallery. We cover all scales and sizes of model railroads. Online since 2002, it's one of the oldest and largest model railroad forums on the web. Whether you're a master model railroader or just getting started, you'll find something of interest here.


And the gunports
Seriously, great job on the armored truck Josh")


Affiliate Disclosure: We may receive a commision from some of the links and ads shown on this website (Learn More Here)
jbaakko
Diesel Detail Freak
Yeah, I forgot taillights, oops! Shhhh!
The truck is a Boley International 2 axle semi cab. I removed the Boley wheels, and replaced them with Dennis Aust low profile wheels. I cut the cab roof & doors off with a Dremel, leaving just the Boley hood.
The body is all styrene sheet, including the window. Quite simple to build when the body is angular like it is, and not rounded at all. The rear bumper is cut from a .060" x .188" styrene strip, I cut it in a "T" shape to hold the rear of the truck, under the frame. I'll take a pic later & post it to show you.
The interior is Boley, and the driver is modified from a Proto 2000, out of a GP60. Fender mirrors & tread plate are Plano, cab mirrors are Boley, with the plastic arms cut off & replaced with .015" brass wire.
Decals printed by ELS Trains.
SigfanUSAF
Gunsmith
Yeah, I forgot taillights, oops! Shhhh!
And the gunports
Seriously, great job on the armored truck Josh

Selector
Well-Known Member
I have enjoyed all the images posted so far. Thanks for sharing.
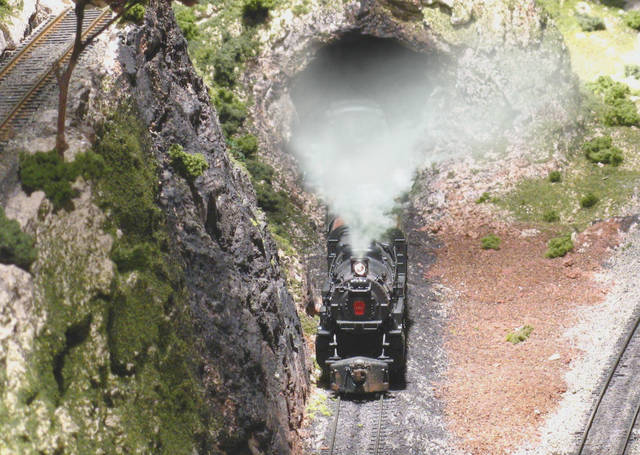
What follows is a photoshopped image of a Pennsy K4s 4-6-2 thundering up the grade just out of a natural rock portal. I think I posted the original a few weeks back, but this one has the smoke added. My thanks to RRCanuck on modelrailroaderforums.
-Crandell
What follows is a photoshopped image of a Pennsy K4s 4-6-2 thundering up the grade just out of a natural rock portal. I think I posted the original a few weeks back, but this one has the smoke added. My thanks to RRCanuck on modelrailroaderforums.
-Crandell
Rotorranch
MRR Refugee
Not much to show off yet.
I've had this kit for a couple of years. I liked the looks of it, so I bought it.

I opened the box a month ago to start building it. I found out it would be a little more involved than I thought. Instead of precut pieces, it's just wood and brass etchings. It did have die cut cardstock patterns however!
I glued the sheets of siding together that evening. The next night I cut the siding to size, then boxed the kit back up.

Tonight, I got the kit back out, and cut out all the doors and windows. 4 hours, 3 exacto blades, one blister and no wounds! []

Maybe I'll get the walls together tomorrow.
Rotor
I've had this kit for a couple of years. I liked the looks of it, so I bought it.
I opened the box a month ago to start building it. I found out it would be a little more involved than I thought. Instead of precut pieces, it's just wood and brass etchings. It did have die cut cardstock patterns however!
I glued the sheets of siding together that evening. The next night I cut the siding to size, then boxed the kit back up.
Tonight, I got the kit back out, and cut out all the doors and windows. 4 hours, 3 exacto blades, one blister and no wounds! [
]Maybe I'll get the walls together tomorrow.
Rotor
jeffrey-wimberly
Dr Frankendiesel
Boilerbuster
Member
Just love Tunnel Motors. Heres another for your viewing. A newer on of my, I already have weathered it like any of my RG units.


those locos look good. I don't think I will be doing any weathering on any of my locos or rolling stock. Hands shake too much. A guy I work with told me about a local guy that does painting and weathering for pretty cheap, and does a heck of a job. That is probably what I will do. Good pics everyone. Can't wait to get some good ones of my own.
Boilerbuster
Member
I just use Testors modeling paint and some thinner. I also got some of dr. bens rust formula off ebay. Weathering like I do dosnt take much of a steady hand. Mine turn out like they do almsot by accedent. Like my SW1500 I just started off with the rust and went back over it with flat black. It turned out great. The great part about weathering is that it never happins uniformly. so you dont have to be a really good painter to do it. That is unless you wish to do prototype work and match what you see in the photos. I frankly like to do my own in my own way. I will buy the really good work from others.
I see what you are saying. I guess what I mean is if I do it, I will be too concerned with rust coming out looking like someone took a dump on my train rather that it looking like rust....lol. Maybe one of these days I will get brave enough to try it. Yours look really good though. Thanks for the insight.
Hey guys, awesome stuff! I can finally post something now of my modelling progress.
This doesn't look near as good as all of ya'lls stuff here, but bear with me - it's my first attempt at weathering freight, as well as modelling a one off locomotive.
It was a totally undecorated Atlas MP15 (this is N scale) which I painted, and kind of scrounged up dry transfers and waterslides. Not prototypical to the exact real one, but close enough in my book... and dang these things are small! LOL - you can see my other models behind it - that's a 1/700 scale U.S.S. Alabama.

Kyle
This doesn't look near as good as all of ya'lls stuff here, but bear with me - it's my first attempt at weathering freight, as well as modelling a one off locomotive.
It was a totally undecorated Atlas MP15 (this is N scale) which I painted, and kind of scrounged up dry transfers and waterslides. Not prototypical to the exact real one, but close enough in my book... and dang these things are small! LOL - you can see my other models behind it - that's a 1/700 scale U.S.S. Alabama.
Kyle
rhoward
S.L.O.&W. Trainman
Lookin' gooooooooooood!
I've been finishing up the farm scene (hope you folks can take a couple more quick snapshots of the area..... promise I will do some good high quality photos as soon as I get a chance.)
The pasture across the road from the farmhouse is basically done.

A close up (with a tiny little area actually in focus...LOL)

Also been busy assembling the coaling tower. This is just a test fit. once finished the whole thing will get a coat of dullcoat and some heavy weathering to het rid of the plastic look, although the basic colors Walthers used aren't really bad......


And an overview of the whole yard area. (Sorry about all the junk in the photo, but I didn't want to take the time to clean up as I am still working there.)

I've been finishing up the farm scene (hope you folks can take a couple more quick snapshots of the area..... promise I will do some good high quality photos as soon as I get a chance.)
The pasture across the road from the farmhouse is basically done.
A close up (with a tiny little area actually in focus...LOL)
Also been busy assembling the coaling tower. This is just a test fit. once finished the whole thing will get a coat of dullcoat and some heavy weathering to het rid of the plastic look, although the basic colors Walthers used aren't really bad......
And an overview of the whole yard area. (Sorry about all the junk in the photo, but I didn't want to take the time to clean up as I am still working there.)
Last edited by a moderator:
martin_lumber
Air Horn Guy
This weekend, driving home from work I spotted a WCTR transfer crossing the Rock Island Bridge outside of Inver Grove Heights. He was just sitting there waiting for clearance onto the UP "Spine Line", so I decided to grab a few shots of him.


After about an hour of Photoshop, I decided to not do the last picture...

Enjoy!
Phil
After about an hour of Photoshop, I decided to not do the last picture...
Enjoy!
Phil
Last edited by a moderator:
tcwright973
Member
Ray, always enjoy your photos and your close ups of various scenes. How about a photo someday of that 3 story building on the right hand side of your last photo. The fire escape looks pretty nice.
Tom
Tom
Ray, that's great looking coaling tower. That's one thing I miss about running diesels - a coaling tower Somehow, that pipe with a hose for diesels just doesn't have the same majesty. I like the overview evin with all the junk. The different levels really add a lot of interest and that bandstand looks perfect where it is.
Kyle, the boxcar weathering looks fine to me. I think I built that same model in my younger days but it was the South Dakota, with only eight five inch turrets.
BB, that looks like a typical filthy Rio Grande unit from the last days before the SP then the UP took over.
Smoke, that will be interesting to see a tunnel motor in modern Southern colors.
Jeffrey, someone left a big hunk of gold for you in that B unit.
Rotor, have fun with that building. It looks like way too much work for my skills.
Crandell, that's a very believable Photoshop job on your engine. He must be very talented to get the transparency so good as the smoke rises.
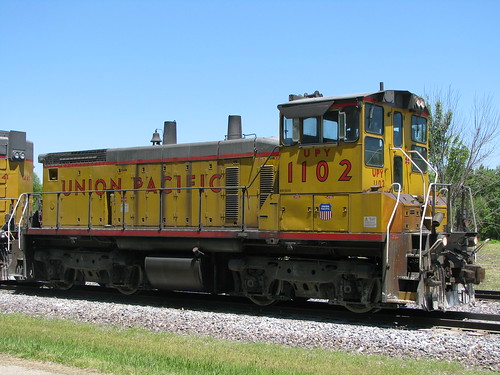
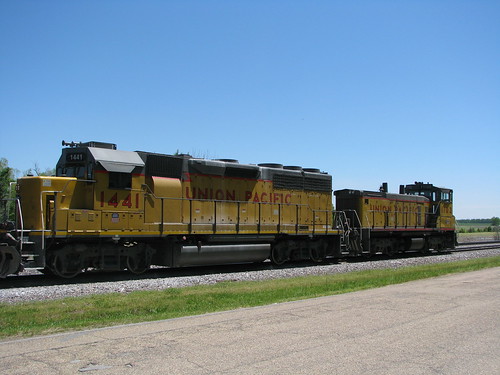
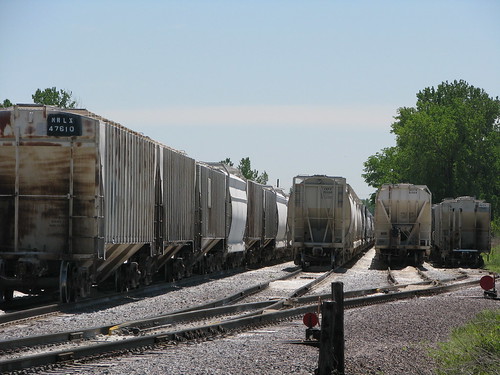
Michael, nice shots of that UP power. I miss not being able to see them in person now.
I like the overview evin with all the junk. The different levels really add a lot of interest and that bandstand looks perfect where it is. Kyle, the boxcar weathering looks fine to me. I think I built that same model in my younger days but it was the South Dakota, with only eight five inch turrets.
BB, that looks like a typical filthy Rio Grande unit from the last days before the SP then the UP took over.
Smoke, that will be interesting to see a tunnel motor in modern Southern colors.
Jeffrey, someone left a big hunk of gold for you in that B unit.
Rotor, have fun with that building. It looks like way too much work for my skills.
Crandell, that's a very believable Photoshop job on your engine. He must be very talented to get the transparency so good as the smoke rises.
Michael, nice shots of that UP power. I miss not being able to see them in person now.
Affiliate Disclosure: We may receive a commision from some of the links and ads shown on this website (Learn More Here)