
You are using an out of date browser. It may not display this or other websites correctly.
You should upgrade or use an alternative browser.
You should upgrade or use an alternative browser.
Running Bear's January 2020 Coffee Shop
- Thread starter bnsf971
- Start date
- Status
- Not open for further replies.
CambriaArea51
Well-Known Member
Nice job on the weathering of the caboose. Mine as well send that with the loco to get sand blasted and painted.")
kbkchooch
"retired" conductor
The Mrs. got a laugh out of this!
Trussrod
Well-Known Member
Hello fellow track-gang workers, a belated Happy New Year to all.
Hi Flo, Francine, How about Hot Pastrami with a slice of Swiss cheese on Rey bread and coffee. Some Sour Kraut and a Dill pickle on the side would be great too !
Time to check the fire again, go on a broom call and fix a sandwich. Oh, sorry Flo.
To fill in a bit about Bern happening with me, on Jan 2, 2020, I went down to Fresno to Sierra Pacific Orthopedic where they took more x-rays of my left knee & hip which the Dr's. PA showed me and it was fairly plain to see what It showed the hip ball&socket were basically bone against bone and the ball is deformed. Not what I wanted to hear but tnow I know what I up against.
For several past years I was taking Glucosamine and Chondroitin which was supposed too help the situation but just prior to going to Sierra Pacific I thought I'd double up on that pill figuring it should help more. Well, it didn't as it made my joints stiffer. So I quit taking that pill.
I did a little research about joint cartledge repair and found that a Dr. Hoffman listed four ingredients to help allow the joints freeier movement as it contains colligen which the joint cartledge is made up of. So far, I ordered the ingredients from Amazon and it seems to be helping, which I'm greatful for but still I move fairly slow
- - -
Railroading:
I saw a video of a BNSF stack train that was 16,000 ft long and required ten locomotives to move it !! That's 3.03 miles long. Wow !!
IronBeltKen
Lazy Daydreamer
Hi Shop Dwellers, condolences to all you Packer fans! I've been in "deep-sea-diving" mode these past two weeks - using every spare minute of free time to sneak out to the trainroom and work on the scenery. Didn't leave me any time for chit-chatting here, sorry about that..!
I haven't posted any photos here in a while, so I figured I should pause from working on the scenry project and share what I've done so far. IIRC, the last pics I posted were of the foreground area having been cleared of all the tools, materials and miscellaneous clutter and transferred to a makeshift tabletop across the aisle. Now, I'll show you all what I did with the cleared area.
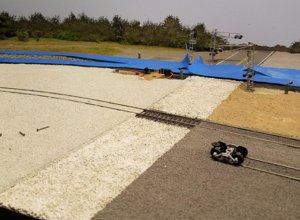
First thing on the list was to get solid "earth" under the highway surface. I started by making a few sheet styrene templates that were identically shaped like the two long halves of the asphalt road. (I learned a painful lesson a few years ago on another crossing, that contaminating the acrylic-painted asphalt surface with isopropyl alcohol and/or white glue will ruin it irreparably!) I then took the templates and put some WS Mold-A-Scene plaster mix under them, shaping it until everything was the exact shape and slope I wanted:

Now I was ready to tackle the rest of the foreground area. Starting at the leftward side, I applied WS white [actually light gray] ballast as a gravel "parking lot" over the entire area occupied by the Houghschnaegel Pipe & Duct Company. But first, I had to spend a couple evenings clearing away the medium gray ballast from beneath the spur track to make room for the white stuff; since this was an embedded track, the ballast had to be the same color as the surrounding white surface. (I didn't waste time shooting any pics of that unpleasant diversion!)
Next, it was time to cover the undeveloped so-called "wild" area between the main line and the spur tracks with earth terrain to eliminate the artificial-looking flat surface. I used Mold-A-Scene for this; but, since it has a short "working" time (~5 minutes after mixing in water), I had to apply it incrementally in small areas:


While the Mold-A-Scene was curing, I covered the so-called "team track" with medium gray ballast. This was a much quicker job since the original track ballast was already the same color. By the end of the first weekend (Jan. 11 & 12) that area was done, and I spent the next few evenings applying earth-colored paint over the "wild" area...

...and test-fitted the painted asphalt segments onto the new roadbed, I was quite pleased to see that they fit like a glove:

It's incredible how someone can spend 12 hours working on a project, and barely have anything to show for it...but that's the way things worked out this past weekend!
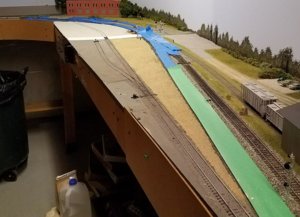
My original plan was to make the pipe company's spur lead-in track look like it had sunk into the mud over the years, then apply static grass over that and the "wild" area. The fly-in-the-ointment was the team track turnout - I had to use a pin-point brush to carefully apply "dirt" paint between each of the exposed ties, without messing up the moving parts. That used up all of Saturday afternoon; later that evening I noticed that the painted track roadbed seem a lot darker than the adjacent wild earth terrain, so I slapped-on a coat of dark gray latex over the entire wild area and left it to dry overnight.
I was feeling slightly nauseated on Sunday so I didn't get back out there until later in the afternoon, at which time I put down the remaining "sliver" of Mold-A-Scene along the edge by the aisle, and applied the second coat of earth-colored paint over the dark gray surface. Once it dried, I discovered that the repainting had been a waste of time...it STILL appeared lighter than the track roadbed because of its smooth surface, ARRRGH! So in the end, the only thing visibly different about this whole foreground area was the new aisle-facing earth sliver, and that the spur run-thru track roadbed was earth-colored:


Here's hoping I'll have enough free time next weekend to do the static grass. Dang, it's already bedtime!
I haven't posted any photos here in a while, so I figured I should pause from working on the scenry project and share what I've done so far. IIRC, the last pics I posted were of the foreground area having been cleared of all the tools, materials and miscellaneous clutter and transferred to a makeshift tabletop across the aisle. Now, I'll show you all what I did with the cleared area.
First thing on the list was to get solid "earth" under the highway surface. I started by making a few sheet styrene templates that were identically shaped like the two long halves of the asphalt road. (I learned a painful lesson a few years ago on another crossing, that contaminating the acrylic-painted asphalt surface with isopropyl alcohol and/or white glue will ruin it irreparably!) I then took the templates and put some WS Mold-A-Scene plaster mix under them, shaping it until everything was the exact shape and slope I wanted:
Now I was ready to tackle the rest of the foreground area. Starting at the leftward side, I applied WS white [actually light gray] ballast as a gravel "parking lot" over the entire area occupied by the Houghschnaegel Pipe & Duct Company. But first, I had to spend a couple evenings clearing away the medium gray ballast from beneath the spur track to make room for the white stuff; since this was an embedded track, the ballast had to be the same color as the surrounding white surface. (I didn't waste time shooting any pics of that unpleasant diversion!)
Next, it was time to cover the undeveloped so-called "wild" area between the main line and the spur tracks with earth terrain to eliminate the artificial-looking flat surface. I used Mold-A-Scene for this; but, since it has a short "working" time (~5 minutes after mixing in water), I had to apply it incrementally in small areas:
While the Mold-A-Scene was curing, I covered the so-called "team track" with medium gray ballast. This was a much quicker job since the original track ballast was already the same color. By the end of the first weekend (Jan. 11 & 12) that area was done, and I spent the next few evenings applying earth-colored paint over the "wild" area...
...and test-fitted the painted asphalt segments onto the new roadbed, I was quite pleased to see that they fit like a glove:
It's incredible how someone can spend 12 hours working on a project, and barely have anything to show for it...but that's the way things worked out this past weekend!
My original plan was to make the pipe company's spur lead-in track look like it had sunk into the mud over the years, then apply static grass over that and the "wild" area. The fly-in-the-ointment was the team track turnout - I had to use a pin-point brush to carefully apply "dirt" paint between each of the exposed ties, without messing up the moving parts. That used up all of Saturday afternoon; later that evening I noticed that the painted track roadbed seem a lot darker than the adjacent wild earth terrain, so I slapped-on a coat of dark gray latex over the entire wild area and left it to dry overnight.
I was feeling slightly nauseated on Sunday so I didn't get back out there until later in the afternoon, at which time I put down the remaining "sliver" of Mold-A-Scene along the edge by the aisle, and applied the second coat of earth-colored paint over the dark gray surface. Once it dried, I discovered that the repainting had been a waste of time...it STILL appeared lighter than the track roadbed because of its smooth surface, ARRRGH
! So in the end, the only thing visibly different about this whole foreground area was the new aisle-facing earth sliver, and that the spur run-thru track roadbed was earth-colored:Here's hoping I'll have enough free time next weekend to do the static grass. Dang, it's already bedtime!
Attachments

Trussrod
Well-Known Member
Cold monday morning here in WV. Some snow flurries but nothing extreme. Didnt do anything on the layout yesterday as I was doing dad duties. Normally I'd run trains for my kids. However I'm still working maintenance on my layout. So I just camped out on the couch and got in some tv time. More than likely I'll work on the layout some more tonight. My efforts have paid off in a very big way. The performance from my locomotives is something I've never experienced. So hopefully I can stay on top of my track cleanliness. It's been hard to stay on top due to me having to take long breaks away from the layout. Its perks to having kids. If I can work time in where I can itll be easier to stay on top. If not well I know what to expect going forward. Anyways that's all I have for now. I'll try to stop by later.
View attachment 43285View attachment 43286
Nice shots Justin
Thanks again for all the photos.
North winds have arrived. Temp. now [10:45] at 44* and will slip down to 39* High tomorrow near 55 but will fall to 34*.
Murphy has been showing his butt again. Nothing major but a bunch of expensive little things. That's life
Wish all warmth and staying well. Prayers for us with health problems
Goodnight and pleasant dreams.
Phil
BORN TO BE WILD........TILL 9 PM
PNKFLOYD
Mikey
Jim-Are you wanting to see the box with the Christmas tree in it?Mikey said - "I guess I will take down the christmas tree and build some more flatcar loads while she is gone".
You understand by that statement, you'll have to post some photos?
BTW, like your structures!
Beady
Well-Known Member
Visit enough roadside rest areas and you could swear you were at Walmart.BEADY Here's one for you. I took this pic in a casino/truck stop in Winnemucca NV a few years back. Truck drivers have to be told thisView attachment 43296
Last edited:
max diyer
Well-Known Member
Since this isn't a Christmas storage box forum, maybe we ought to stick with the flat car load photosJim-Are you wanting to see the box with the Christmas tree in it?
BTW, like your structures!
lol
Last edited:
Boris
Beach Bum
Good morning, y'all. 16° at dawns early light. Weather outlook for the balance of the week is "seasonable" and dry.
Again, thank y'all for your prayers and kind words. MIL came through her surgery and the prognosis is good. The "mass" on her spine turned out to be a large herniation of her spine. With proper rehab, she should be able to again walk with a walker. Meanwhile, the wife seems to be doing quite well after the latest treatment, with fewer side effects. Ultimately time will tell. Me, well PT twice more this week, and one more injection.
There are no scheduled activities for today...possibly, some time to work on the layout.
Beady
Well-Known Member
I have a 1 pm appointment with my orthopedist about my shoulder (hopefully it'll just be another cortisone shot), then a run down to Detroit to be present when BIL closes up MIL's apartment and hands in the keys. There's still a few things left to do, like sort through old photos and settle the estate's finances (MIL didn't have any debts when she died), but the high-pressure jobs are done. There will be a small internment ceremony for her ashes in a couple of weeks and a memorial service in the Spring. Not sure why there will be two separate ceremonies, but that's not my problem.
Anyway, the initial track layout is finished. I'll be tinkering with all of it from now on, but now I'll be turning most of my attention to the scenery. I've got a lot of it, houses and such, premade via the Used market, but I'm puzzling out how to make portable scenery such as forests and roads that will accommodate a changing layout. The one thing Hobby Lobby doesn't appear to sell is thin plastic sheeting and strips, which would be ideal; my idea would be to mount trees and road surfaces onto the sheeting, which would make all my scenery movable. Wonder what stores like Michael's or maybe even Home Depot have? I'm not going for a realistic look, rather something more representational; think cubism v romanticism.
Anyway, the initial track layout is finished. I'll be tinkering with all of it from now on, but now I'll be turning most of my attention to the scenery. I've got a lot of it, houses and such, premade via the Used market, but I'm puzzling out how to make portable scenery such as forests and roads that will accommodate a changing layout. The one thing Hobby Lobby doesn't appear to sell is thin plastic sheeting and strips, which would be ideal; my idea would be to mount trees and road surfaces onto the sheeting, which would make all my scenery movable. Wonder what stores like Michael's or maybe even Home Depot have? I'm not going for a realistic look, rather something more representational; think cubism v romanticism.
chadbag
Well-Known Member
The one thing Hobby Lobby doesn't appear to sell is thin plastic sheeting and strips, which would be ideal; my idea would be to mount trees and road surfaces onto the sheeting, which would make all my scenery movable. Wonder what stores like Michael's or maybe even Home Depot have? I'm not going for a realistic look, rather something more representational; think cubism v romanticism.
I plan on doing something similar using thin foamboard. Granted I am in N-scale but maybe a few mm thick foamboard?
santafewillie
Same Ol' Buzzard
Good Morning All. 32° and clear. Another beautiful day in store for us today, sunny and mid-50's, turning to cloudy in late afternoon bringing a chance of rain overnight and into tomorrow. Looks like a trip to the county tax office this morning or tomorrow to get our handicapped parking permit renewed. Got some time in the garden yesterday with the hoe for some pre-emergent weed control after last week's rain. Still too wet to plant, and about a week too early for onions and radishes. I had company while I worked in the garden.

They were taking a break from their offspring in my barn loft.
Hash browns, bacon and sunny side up eggs for me this morning Francine.
Thanks for the likes and comments yesterday (and this morning) regarding the various progress photos; Sherrel, Tom, Justin, Jim, Phil, Chad, Garry, Bill, Hughie, David, Bob, Joe, Johnny.
Moving out to the train shed, while I had the small grain elevator off the layout for cleaning, I added some signs. It.s one of the few plastic kits from American Model Builders called "Silex Grain Elevator"; Kit # 121.

I am not ready to weather it yet, but that won't be far behind. Workbench is too occupied to bring out the weathering powders right now.
Moving left (south on the layout) we come to Midtown Consolidators. This is a Walther's "Red Wing Milling" kit without the large chimney.

I use it as a freight forwarder. I picked it up at a garage sale and had to completely disassemble and reassemble it.
Next to it and also across the tracks is the next pair of structures, the old reliable Atlas Switch Tower and a small farm scene.

The farmhouse is a Branchline laser cut kit, everything else is scratch-built.
This scene has a family burial plot behind the shed.

Here's a close-up of the shed.

Jim - There is a downside to spring coming as you pointed out. Here, I am looking at mowing next week as the native winter grasses (oats and rye) are beginning to get a bit scrappy. I should be doing it today, but while the tractor won't get stuck in the wet ground, it will leave ruts!
Nice progress on the layout.
Greg - That is one decrepit looking caboose. Other than SP, most railroads that I rail-fanned on (ATSF, MKT, KCS, UP, SLSF, BN, SSW, MP in this area) didn't ever let them get that bad.
David - My wife went the Glucosamine and Chondroitin route for several years before finally going to the orthopedist. It offered some limited relief, but it only allowed the inevitable knee replacement surgery to be delayed.
Everybody have a great day.
They were taking a break from their offspring in my barn loft.
Hash browns, bacon and sunny side up eggs for me this morning Francine.
Thanks for the likes and comments yesterday (and this morning) regarding the various progress photos; Sherrel, Tom, Justin, Jim, Phil, Chad, Garry, Bill, Hughie, David, Bob, Joe, Johnny.
Moving out to the train shed, while I had the small grain elevator off the layout for cleaning, I added some signs. It.s one of the few plastic kits from American Model Builders called "Silex Grain Elevator"; Kit # 121.
I am not ready to weather it yet, but that won't be far behind. Workbench is too occupied to bring out the weathering powders right now.
Moving left (south on the layout) we come to Midtown Consolidators. This is a Walther's "Red Wing Milling" kit without the large chimney.
I use it as a freight forwarder. I picked it up at a garage sale and had to completely disassemble and reassemble it.
Next to it and also across the tracks is the next pair of structures, the old reliable Atlas Switch Tower and a small farm scene.
The farmhouse is a Branchline laser cut kit, everything else is scratch-built.
This scene has a family burial plot behind the shed.
Here's a close-up of the shed.
Jim - There is a downside to spring coming as you pointed out. Here, I am looking at mowing next week as the native winter grasses (oats and rye) are beginning to get a bit scrappy. I should be doing it today, but while the tractor won't get stuck in the wet ground, it will leave ruts!
Nice progress on the layout.
Greg - That is one decrepit looking caboose. Other than SP, most railroads that I rail-fanned on (ATSF, MKT, KCS, UP, SLSF, BN, SSW, MP in this area) didn't ever let them get that bad.
David - My wife went the Glucosamine and Chondroitin route for several years before finally going to the orthopedist. It offered some limited relief, but it only allowed the inevitable knee replacement surgery to be delayed.
Everybody have a great day.
Raincoat2
Well-Known Member
Good morning everyone. 15 and mostly clear out there. Starting tomorrow, three days of wintry mix coming our way, lows in the single digits and teens, highs maybe upper 20s and 30s. Winter's back.
Mornin,', Flo - - I'll have two eggs over medium, some really crisp bacon, and a short stack of pancakes. And a pot of coffee!!
Took me an hour to read all the posts from this long weekend. Back at work this morning.
Jim, Tom, Patrick, Sherrel, BurlingtonBob, and anyone I may have missed - thanks for the likes and comments from last Friday's post.
Willie - nice photos of your track maintenance process.
Curt - Sincere condolences.
Sherrel - nice truck
Jim - nice photos from Saturday
Had time this weekend to run trains and do some scenicking. Here are a couple of updated photos of the baseball game. I added a long-overdue fence for the first house, the owner of that house leaning against a tree to watch the game, and added some trees. Looks like the engineer slowed the train down to watch the action on the field!!


That's it for today. have a good day everyone.
Mornin,', Flo - - I'll have two eggs over medium, some really crisp bacon, and a short stack of pancakes. And a pot of coffee!!
Took me an hour to read all the posts from this long weekend. Back at work this morning.
Jim, Tom, Patrick, Sherrel, BurlingtonBob, and anyone I may have missed - thanks for the likes and comments from last Friday's post.
Willie - nice photos of your track maintenance process.
Curt - Sincere condolences.
Sherrel - nice truck
Jim - nice photos from Saturday
Had time this weekend to run trains and do some scenicking. Here are a couple of updated photos of the baseball game. I added a long-overdue fence for the first house, the owner of that house leaning against a tree to watch the game, and added some trees. Looks like the engineer slowed the train down to watch the action on the field!!
That's it for today. have a good day everyone.
montanan
Whiskey Merchant
Good morning - 31 degrees to start off the day with a high expected in the mid 40's. Last year at this time we had a lot of snow on the ground and cold temps. No snow so far.

Willie - Excellent photos as usual. I look forward to seeing them every morning.
Justin - Like the proto photos also. Nice.
Jim - Like your photos also. Adding structures usually got me moving ahead at a steady pace.
Greg - The weathering photos you posted are nothing but incredible. Outstanding work.

Garry - Nice shot of the F units.
Beady - That class line up must have been written by a woman. I can related to being drifted in. Years ago we had some weather that drifted us in and the only way we could get out for almost a week was on snowmobile.
IBKen - Excellent scenery work. Waiting to see the finished scene.
Joe - Happy that your MIL came through the surgery with a good prognosis.
Johnny - Like the job on the baseball players, nice work.
I have been able to get down to the train room over the past few days but still can't stand for any length of time. Going to get down there again today.

Later
Willie - Excellent photos as usual. I look forward to seeing them every morning.
Justin - Like the proto photos also. Nice.
Jim - Like your photos also. Adding structures usually got me moving ahead at a steady pace.
Greg - The weathering photos you posted are nothing but incredible. Outstanding work.
Garry - Nice shot of the F units.
Beady - That class line up must have been written by a woman. I can related to being drifted in. Years ago we had some weather that drifted us in and the only way we could get out for almost a week was on snowmobile.
IBKen - Excellent scenery work. Waiting to see the finished scene.
Joe - Happy that your MIL came through the surgery with a good prognosis.
Johnny - Like the job on the baseball players, nice work.
I have been able to get down to the train room over the past few days but still can't stand for any length of time. Going to get down there again today.
Later
Greg@mnrr
Section Hand
Good Morning Everyone with a sunny day here in Wisconsin.
Going down to the layout after lunch and install a DCC system in a Life Life 0-8-0 switcher that I purchased when they were first released years ago. The decoder and speaker is from Soundtraxx and it is one one of the early DCC sound decoders I have a similar decoder in my three truck Shay, a Spectrum by Bachmann and while the sound is not of the high quality of today's sound decoders, its not too bad. It should be an easy install with drilling the sound release holes in the tender the most time consuming effort. I'll do a template for the holes so they are in a neat arrangement. I believe the speaker came with a baffle box that the modeler has to construct to fix in the speaker.
I like steamers and other than the Shay, I don't have any other steam locomotives. A friend of mine has a Challenger with a sound decoder and system and the quality is excellent.
Thanks everyone for enjoying the pictures of my rusted SOO LINE caboose. I have another SOO caboose that's equally as bad and two well used Milwaukee cabooses, the rest of my Milwaukee and SOO cabooses are NIB. Doing the caboose was fun since weathering the ore cars is sort repetitious. My next weathering project will be weathering additional ore cars, but I'll weather them in a assembly line fashion doing six at a time.
Nice photos everyone!
I do a lot of my RR planning when trying to fall asleep. Last night I figured out how to handle an area on the layout that remains unfinished that I'll. turn into a material holding area and use "Real Dirt" by High Ball as the base and then add piles of coal, ballast and logs and perhaps a small building and a vegetation. The area is approximately five feet from the nearest viewing spot requires attention. Perhaps a Woodland LED lamppost as well.
Time for a email or two and then read the news.
Later....
Greg
Patrick
Alien Attitude.
Morning all,
Ok, closer to lunchtime anyway...Reuben on Rye with chips and a pickle today, Thanks Flo.
Started to look over all the new posts and said I'll look later. I did get a little time for the trains this weekend. I'll post most of the pictures to My Layout thread, but here's a tease:

This is the replaced part of the outer loop.
Anyway, I'm almost back to where I was before I pulled the rise out. I still need to get it wired back up.
Thanks for sharing all your pictures on here. They were nice for motivation....
Ok, closer to lunchtime anyway...Reuben on Rye with chips and a pickle today, Thanks Flo.
Started to look over all the new posts and said I'll look later. I did get a little time for the trains this weekend. I'll post most of the pictures to My Layout thread, but here's a tease:
This is the replaced part of the outer loop.
Anyway, I'm almost back to where I was before I pulled the rise out. I still need to get it wired back up.
Thanks for sharing all your pictures on here. They were nice for motivation....
- Status
- Not open for further replies.
