Alcomotive
Grandson of an ALCO Builder
TomO I hope all goes well with the 2nd opinion etc. You are in my prayers. tty soon.

No second opinions until Tuesday 9/24 but gee I did fail a Sleep Apnea test last night!TomO I hope all goes well with the 2nd opinion etc. You are in my prayers. tty soon.
Are you really model railroading without this, though? Covering my layout with stuff makes me forget that I haven't really started the big stuff yet. Track is laid and trains are running, but not much else has been started, LOL.
Working on 3 projects at the same time, as usual.
I've decided I'll leave the Tichy stuff for the die-hard builders. I had fun building the #4022 Boom Car kit; all 5 hours of it. However, I'd like to spend more time painting, weathering, and running trains, so unless I buy some already built, think I'll pass on those kits. Not a complaint in the least; the kits and builds are phenominal. I'll post pics of that soon, after painting and starting to weather.
Onto what I came to post.
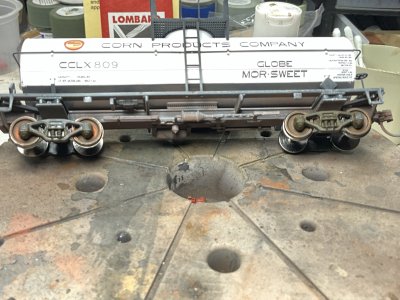
Tamiya panel liner - Brown. A demonstration.
Bachmann USAF Missile Depressed Flat Car - I'm in the process of converting this to a slightly more prototypical, albeit loosely, depressed flat car. It's a nice runner, and I wanted more realistic than the missile load (I converted the trailer and missile to an actual trailer to use with a Conrail Truck). I'll be 3d printing a large transformer load, covering the sides like the protoype photo, and adding the newer brake wheel stand and brake parts to the deck, and add stirrups.
View attachment 199338
Photo credit - Joe Jack and CRHS. 1979
So, this is the plastic wood deck, in the middle is untouched, on the left is one coat of panel liner, straight from the bottle, with the brush. On the right is two coats.
View attachment 199331
Single coat
View attachment 199333
Two coats
View attachment 199332
Light is oversaturated; it's darker in person, and looks way more like real wood, with 2-3 coats of the brown panel liner.
As an added bonus, here are pictures of a Bachmann Santa Fe maintenance car I patched out to Conrail and weathered. Currently working on this car again, cleaning up old glue, swapping the plastic pile of ties for real wood ties, and the plastic rails for some real rails, along with adding some small stuff to fill it in. I use this car as the Boom Car. The Tichy boom car is too small for the 250 ton crane, so I'll most likely turn it into a work car to go with the MOW/Wreck train.
View attachment 199335
View attachment 199336
View attachment 199337
Lots of panel liner, brown and black, and Tamiya weathering powder, soot and rust. Bogies were done with only rust and orange rust weathering powder. The red lenses were done with Red 3d puffy paint.
Also have these two waiting to be weathered. The covered hopper is for a personal friend, and will have my third, from scratch graffiti done on it.
View attachment 199334
And some additional weathering inspiration for you all.
View attachment 199339
Photo credit - Grant Lowry and CRHS
-RC
No second opinions until Tuesday 9/24 but gee I did fail a Sleep Apnea test last night!
Thanks James and everyone
Thank you, I am home and a bit worn out from airplanes. I really do not enjoy flying.Tom what ever you are going through, I'm wishing you all the best dude, we all kind of have our own struggles to deal with.
Z
Hey Tom,I have been to the bench both yesterday and this morning. No pictures but a bit of progress on the S-2 diesel and 5 of the 11 freight cars for 1 commission.
I did stop at the LHS and purchased some needed micro brushes and an impulse buy. A Walthers Proto Coil car.View attachment 200147View attachment 200148
I have been very good not to do impulse buys since Covid. It’s a happy fail today.
After I finish the 11 freight cars and that S-2 diesel, I will work on this one! My coil cars and center beams have all been sold and for my layout a total of 3 coil cars and 5 center beams would be nice
")
Thanks. I’m doing wheels and truck frames today. Slowly getting back into the weatheringHey Tom,
Glad you're back and hopefully doing better.
Just an FYI, there are 12 freight cars with that S-2.
I vote for in the middle, but know you'll lean into the heavier side.View attachment 200560View attachment 200561View attachment 200562View attachment 200563Nothing to show on wheels and trucks.
I started this car a Gulf and Shrimp Island, covered hopper private road name, a few months ago. Faded normally with Tamiya white and IPA. The year is 2015 and this car is entering its final years. But I had not intended it to be a rust bucket just dirty. I added a light rust wash with Vallejo Air and a dirt mix after of Pan Pastel charcoal. Now I’m not sure what I want to do with it. It’s one of my cars and it’s not sealed. One of my RR buddies said yesterday to destroy it. Make it into a heavy rust bucket. My wife says find a middle between what I have and the rust bucket. No matter where it ends up, I don’t like it like this. Seems like it’s too orange
Thoughts please
Less is more is written in 2 places on my bench. Sometimes I still forget it.I vote for in the middle, but know you'll lean into the heavier side.
If it's truly at the end of it's life, but you still plan to run it, instead of leaving it on a siding, I'd vote for "just heavy enough to still be on the rails".
I'm facing a similar dilemma; The Erie gondola I purchased has a build date of the 1930's. Modelling a mix up of the 80s and 90s, it should be pretty bad, If not already scrapped by that point. So mis-matched panels and heavy rust should be prevalent.
Whatever you choose, remember, less is more
-RC
Edit to add - A few dents may pay homage to it's many decades on the rails.
That's why I reminded you too LOL!Less is more is written in 2 places on my bench. Sometimes I still forget it.
I got some interesting feed back on my personal FB weathering and layout page. To show how personal weathering is to people one of my weathering buddies loved it and every thing he mentioned he loved about it, I don’t. It is why prototype pictures are so important as inspiration for me. I am someday before Xmas going to remove most of the rusting effects on the side panels as they are too even. I need a better mix of darker and light
This car and its companion will be in regular service on the layout. If it was a shelf queen I would create a full rust bucket. Model railroading is fun!
Thank you RC.That's why I reminded you too LOL!
I can relate. Sometimes when I'm not all that impressed with a car, still unsure how to feel about it; I'll post it on the model train sub on Reddit, and wind up getting a crazy amount of upvotes (means they like it, if you haven't used reddit), and comments saying they thought it was a real picture, and some saying how well the weathering looks.
Sometimes we are just kind of burnt out on a car, and can't really step back and truly look at it. It happens. I'd just put it down for a bit, and revisit it later. It may grow on you sitting off on a distant siding.
-RC
Just remember, two identical railcars can wind up with wildly different weathering.Thank you RC.
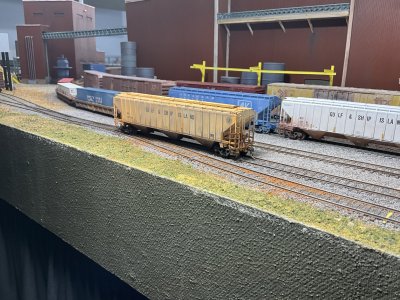
I can’t explain what I like or dislike on a personal car. I really like the dirt and heavy grime found on rail cars. I seem to be able to easily find them in videos online. But when I can get up close and personal to a railcar I’m not finding in my area of Wisconsin too many of those cars. I know not every car is heavily weathered by nature. It’s the same with graffiti and tagging. When I visit the Long Beach harbor area I can find hundreds of car after car heavily graffiti. In Wisconsin out of. 150-200 car trains there might be 10% that are heavily covered on the side that passes me.
Basically on this car I turned a pure white car
View attachment 200713View attachment 200714
into what I see as yellow, not orange rust. I think it should be streaked darker or rusted high on the car sides with some rust bleeding down. Sitting at my bench 20 minutes ago I took the car off the bench and put it on a shelf for another day. My feeling is this car has maybe 10 years left of operating life and should be reflecting that. I need to determine how to get there…
I am home and tonight I have a couple, actually 11 cars, that I finished the wheels and truck frames. Cars are from the early 1960-70’s and will have no graffiti, tags or heavy weathering. I have faded them already and will be looking at working on a couple highlighting seams and things
RC, I use the pictures for inspiration and guidance. I like your ideas here. I have a feeling this car may not stay on the shelf too long. It’s on my mind and that means I’ll have to do something.Just remember, two identical railcars can wind up with wildly different weathering.
I did a few ore cars several months ago that I didn't feel too keen on. It was a post as a demonstration of what you can do with only Tamiya Weathering powders. I wasn't too crazy about it; but the internet loved it!
I think we view them differently because WE make them the way they are. And often I find frustration in trying to match the prototype. So I choose a middle point; Close to the prototype, but with my own twists and turns.
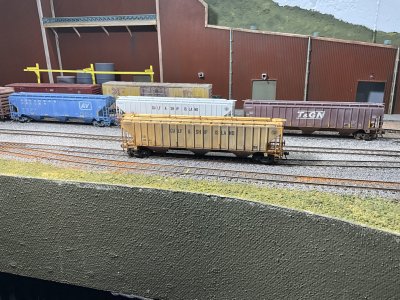
FWIW, I like the difference between this car, and the one behind it. A good demonstration of how wildly the same car can weather. More streaks sound good. Should break up the mostly uniform coloring, and hopefully guide the eye into seeing orange, and not yellow, rust.
-RC
Adding - A couple ideas crossed my mind; A few "replaced" sections of upper walkways, and as you said, more rust up top streaking down to the sides. The top is what looks off, to me anyway. Needs to be a bit darker than the rest of the car maybe?
YES!!! That's exactly what it needed! Some variation on the top to show it's been serviced at some point. Love the idea to offset the ages on the newer hatches. I like how stripping most of the car made that rust stand out. I agree a re-fade would look good, but maybe much lighter/more rust highlights. The fade before wouldn't have been so bad if it wasn't as uniform; I know it wasn't, it was just the way it caught my eye..I have the 12 car and the S-2 diesel weathering project for Dave and I do not have any other projects going until these are completed and approved. BUT, while things are drying and curing I have time. I have no desire to run trains or work on the layout so I pulled back off the shelf the covered hopper for the Gulf and Ship Island.
Overall if you look back in the posts I am dissatisfied with what I did as too much of the same coloring. I put it aside to concentrate on commission work. But a little bit of 91% IPA from the spray bottle, wait 10 seconds and remove with a sponge
View attachment 200855
It already looks better in my eyes as it has more color variations! Now I can also see where the heavier rust streaking will be applied. While I don’t want to lose the white car color look entirely it is in the last 10 years of road use.
RC, mentioned to work on the roof and I agree. Here I just removed the rust from 2 hatches. I will leave the inside hatch as it is now but will grime up the end hatch to indicate while both are replacements they were done at different times. I will use a darker grime under the roof walks.
View attachment 200856My wife thinks I should do a fade over the whole car again! I’m thinking on that…
When I did my grain train not only did I look at a lot pictures but watched many video's. What I found interesting is the overhead shots showing the grain spillage and the black mold streaks it causes. Rust follows as the soaked grain rust the metal.Thank you RC.
I can’t explain what I like or dislike on a personal car. I really like the dirt and heavy grime found on rail cars. I seem to be able to easily find them in videos online. But when I can get up close and personal to a railcar I’m not finding in my area of Wisconsin too many of those cars. I know not every car is heavily weathered by nature. It’s the same with graffiti and tagging. When I visit the Long Beach harbor area I can find hundreds of car after car heavily graffiti. In Wisconsin out of. 150-200 car trains there might be 10% that are heavily covered on the side that passes me.
Basically on this car I turned a pure white car
View attachment 200713View attachment 200714
into what I see as yellow, not orange rust. I think it should be streaked darker or rusted high on the car sides with some rust bleeding down. Sitting at my bench 20 minutes ago I took the car off the bench and put it on a shelf for another day. My feeling is this car has maybe 10 years left of operating life and should be reflecting that. I need to determine how to get there…
I am home and tonight I have a couple, actually 11 cars, that I finished the wheels and truck frames. Cars are from the early 1960-70’s and will have no graffiti, tags or heavy weathering. I have faded them already and will be looking at working on a couple highlighting seams and things