Crazy idea what do you think


I think that overlapping the street material in those areas will work well

How about making the street sections to include the bits right up to the tracks, sort of like, tabs, so there's no break in the road surface.

That would make the cleanest joint. My fear of having such an overlap run right up to the tracks is that there would be no room for error. If the lift out section didn't line up perfectly every time, or if it got bumped or if the overlap warped over time, then it could cause derailments. Derailments are my second least favorite part of the hobby (first is loss of power to a difficult to reach section of track).
 
Seems a shame to have to remove buildings etc to lift this section out and I've been trying to think of ways to accomplish this. A hoist from the ceiling has the problems (apart from the actual ceiling) of needing eyes to hook into which would have to be hidden by removable buildings. Any chance of using a hydraulic garage trolley jack with a custom built, lift platform attached and once the layout section is raised sufficiently, remove the whole lot manually?
 
I actually feel like I accomplished alot over the last week. I attached some printed Walthers backdrops I've had for years to two walls in the room on the left. I still need to get two or three mirrors cut to the size I need for a couple walls.

The biggest problem on the layout is, in the room on the left, visually separating three separate communities which are merely inches apart. Yesterday and today I spent much of the day cutting leftover foam scraps to make mountains to visually isolate my coastal village. It takes alot longer than I expected to build a couple mountains (hills) with left over scrap foam using a hot wire foam cutter. I think maybe I need a new foam cutter. The mountains and foam will still need to be trimmed and shaped to a more realistic appearance. Once scenery and trees are installed, the hills will do a pretty good job of screening the towns from each other. If the layout had been at a more standard height, the hills would have been useless as a visual break. Only the higher elevation of the layout, putting it close to eye level, makes it possible to use the hills to visually separate the towns on the layout.

The picture showing the tunnel entrance is one area that will need a lot of trimming. There is a switch right befor the tunnel, and I wanted two separate tunnel portals. I'll need to cut back the mountain a bit to get enough clearance for two separate portals.
 

Attachments

  • mountain4.JPG
    mountain4.JPG
    35.2 KB · Views: 196
  • mountain5.JPG
    mountain5.JPG
    36.8 KB · Views: 179
  • mountain6.JPG
    mountain6.JPG
    35.5 KB · Views: 180
  • mountain3.JPG
    mountain3.JPG
    41.2 KB · Views: 205
Last edited by a moderator:
Since I had the hot wire cutter out, I worked a bit on the terrain on the coastal village. There will be a small dam or waterfall just beyond the covered bridge so that any viewer looking under the bridge won't see the wall.
 

Attachments

  • coast3.JPG
    coast3.JPG
    38.7 KB · Views: 208
  • coast1.JPG
    coast1.JPG
    33.4 KB · Views: 182
  • coast2.JPG
    coast2.JPG
    38.7 KB · Views: 209
Last edited by a moderator:
One of the foam mountains comes right up to the edge of the liftout section that will have a town built on it. Heres a picture with the lift out section and town removed and another that shows how the town will come up to the foot of the mountain. A more gradual transition would hve been preferable, but I didn't want to extend the mountain onto the lift out section.
These pictures were taken from the top of a step stool/ At eye level the lighthouse in the coastal village won't be nearly as noticable in the background.
 

Attachments

  • mountain2.JPG
    mountain2.JPG
    38.3 KB · Views: 180
  • mountain1.JPG
    mountain1.JPG
    35.5 KB · Views: 186
Last edited by a moderator:
A week or so ago I finally cut the two holes in the wall to connect the track in the two rooms. In the blue room, there is a large mountain against the wall making tunnels a natural choice for that room. On this side, a town runs right up to the backdrop on the right where the holes go through the wall. I did not really want to create another mountain and more tunnels, so I've made a decision for this side of the wall. I attached a Walthers printed backdrop on the wall and cut holes in the backdrop. I will install a bridge to the wall over the openings. The bridge to nowhere will run from the leading edge of the layout along the wall to the window at the back. The bridge abutments and the bridge itself will visually hide (as much as possible) the track going through the wall. I will use the bridge as a display shelf for a HO collectible Chrysler Corporation themed train (recieved as a gift), that I would never actually use on the layout.
 

Attachments

  • holeinthewall1.JPG
    holeinthewall1.JPG
    38.9 KB · Views: 194
  • holeinthewall2.JPG
    holeinthewall2.JPG
    33.7 KB · Views: 196
  • holeinthewall3.JPG
    holeinthewall3.JPG
    36.6 KB · Views: 182
Theres one thing I don't understand after all this cutting and shaping with blue and pink foam insulation board. I had been saving all my pieces and scraps for just such an occasion as all this terrain building. After I finished building the mountains and terrain around the coastal village, the floor was cluttered with Styrofoam bits. I filled up three big Hefty trash bags, figuring I would only save the largest pieces for future projects. But, after filling up the three plastic trash bags, I found my "save for later" pile of Styrofoam scraps was just as large as the pile of scrap Styrofoam I started with.
 
A bit late on this post, however; I don't think it is a crazy idea at all! In fact, when I built my first layout, the idea was to do pretty much the same as what you are contemplating - building my son a four poster and using that as the support for the layout. The ONLY thing that stopped that from happening was the end height of it. You'd have to be 6' to see the thing and access was virtually nil. If yo can get around that issue, then go for it :)

DARN! That is looking great to say the least and sorry for being behind the 8 ball on this.

Cheers,

wombat457
 
Last edited by a moderator:
After looking at your painted desert (hills), all you need now is Pecos Bill to grab a stick and dig the Rio Grande.
 
Could you use the sidewalks to hide the seams in the lift-out area of the town? Seems to me that would be the ideal place. You would see a gap at the lower edge of the sidewalk. But that would be better than a big gap going down the middle of a road or something.
 
Could you use the sidewalks to hide the seams in the lift-out area of the town? Seems to me that would be the ideal place. You would see a gap at the lower edge of the sidewalk. But that would be better than a big gap going down the middle of a road or something.

I ended up making the entire town site removable. The sidewalks wouldn't have lined up with the edges of the lift out section anyway, but I do appreciate the suggestions.
 
After looking at your painted desert (hills), all you need now is Pecos Bill to grab a stick and dig the Rio Grande.

Well, the "painted desert" wasn't quite the look I was after, but I think I see your point.
 

Attachments

  • rr1.JPG
    rr1.JPG
    26.3 KB · Views: 193
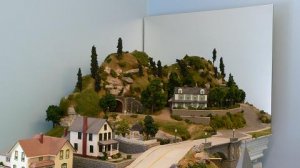
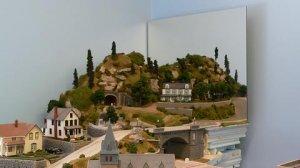
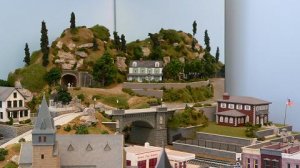
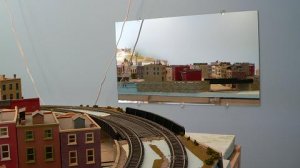
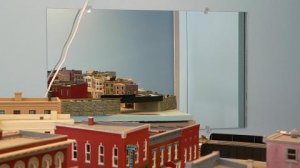
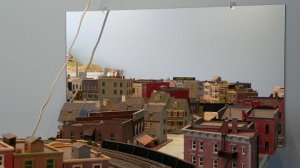
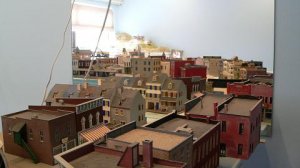
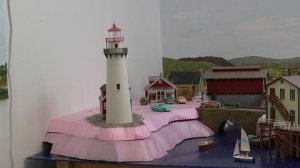
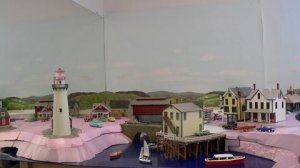
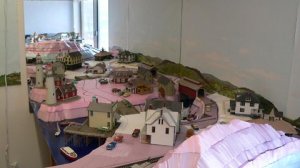
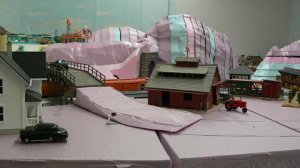
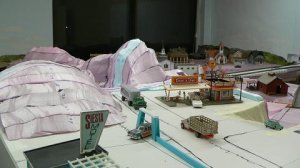
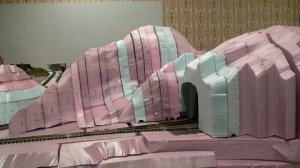
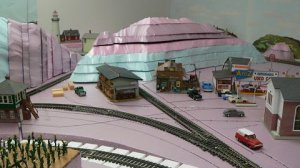
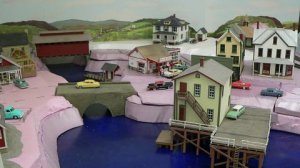
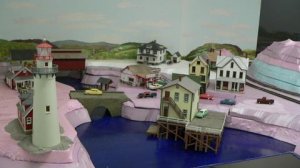
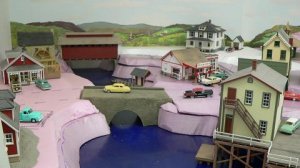
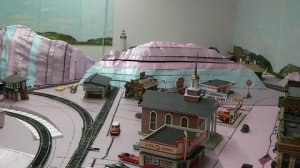
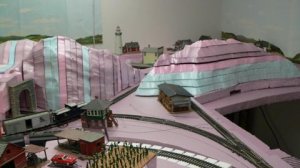
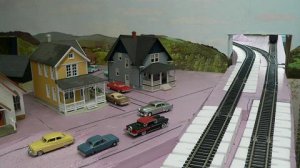
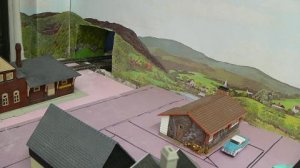
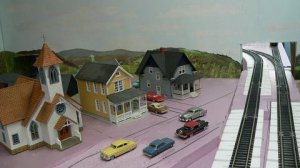
No pictures this time, but I have been busy on the layout. I have added additional bracing under the layout around the removable access panel I cut in a few weeks ago. I glued the blue foam back together where I had cut the original layout apart for moving. When the glue is dry, I'll attach an additional piece of wood under the joint for additional bracing at that point. I have cut and fit more foam in the blue room around the mountain top with the contemporary house on it, in order to clear the track in the foreground. This pretty much finishes roughing in the terrain for the entire layout, so I was able to throw away another two large Hefty trash bags full of scrap foam pieces. The foam over the guest bed extends past the wood frame work, so I'm installing a piece of angle iron along that section, to prevent damage if a guest decides to pull himself out of bed holding on to the edge of the layout. By using the metal edge rather than adding to the wood framework, I was able to maintain the existing amount of head room for someone sitting on the edge of the bed. Finally, I dismantled, painted and reassembled an old HO scale Revell Barn to make a stable for a few horses. Now the last step, before going back and attaching the track, is to get a couple mirrors cut to size and mounted as back drops in a couple corners.
 
Mirrors were part of the original layout, so once the layout was moved I knew mirrors would be needed for the reconstruction. Earlier this week I picked up three mirrors from a local glass shop that I had them cut to size.
This first corner mirror is sharply angled towards the corner. There is no way that anyone would be able to see themselves in the mirror. Previous pictures show a mirror in this location, but I wanted a larger mirror so that the entire hill would be visible in the mirror from a normal viewing angle. The only real problem, is that there is a section of the layout, to the right of the mirror and in front of the stone bridge that has a school built on it. The mirror doesn't extend past the school, and it would look better if it did. Originally this removable section of scenery with the school, was built to hide the edge of the layout past the bridge from views down Main Street. Still, I'm happy with the result since pretty much the entire hill shows up in the mirror. The last picture (though taken from a higher elevation than normally viewed) pretty much shows how the hill shows up from a normal viewing position. The hill, including the road that wraps around the front of the white house shows up in the mirror.
 

Attachments

  • mirror1a.JPG
    mirror1a.JPG
    33.1 KB · Views: 253
  • mirror1b.JPG
    mirror1b.JPG
    32.1 KB · Views: 255
  • mirror1c.JPG
    mirror1c.JPG
    42.1 KB · Views: 211
Last edited by a moderator:
The second mirror is mounted on the wall so that it will be a back drop for a section of town that was originally permanant consruction but will now need to be removable. This section of town was originally built so that the mirror went down the middle of a street. That allows a row of town houses extending down one side of the street to be reflected in the mirror as more town houses across the street. I needed this mirror to complete the scene, but viewers will see themselves in this mirror.
 

Attachments

  • mirror2a.JPG
    mirror2a.JPG
    30.4 KB · Views: 180
  • mirror2b.JPG
    mirror2b.JPG
    29.5 KB · Views: 166
  • mirror2c.JPG
    mirror2c.JPG
    31.4 KB · Views: 309
  • mirror2d.JPG
    mirror2d.JPG
    34.5 KB · Views: 171
The third mirror I installed today was in the other room in the corner to the left of my little coastal community. This one is the largest mirror. From a normal viewing angle viewers will not be able to see themselves in the mirror, and the light house tower would also not be visible in the mirror. Careful placement of trees and other scenery items will help disguise the mirror. The first picture shows the wall before the installation of the mirror. One of the pictures here is taken from atop a step stool from across the room and clearly shows the placement of the mirror (the lighthouse shows up in the mirror from this angle).
 

Attachments

  • mirror3a.JPG
    mirror3a.JPG
    27.1 KB · Views: 178
  • mirror3b.JPG
    mirror3b.JPG
    28.6 KB · Views: 192
  • mirror3c.JPG
    mirror3c.JPG
    33.6 KB · Views: 199
Last edited by a moderator:
As you know, John Allen used mirrors on his layout. For one, he built half a structure, and butted it up against the mirror, so the building appeared to be whole. For this situation, IIRC, he used a "front surfaced mirror", (I think that is the technical term), meaning the reflecting material was on the top surface and not the bottom surface, so there wouldn't be a "gap" in the middle of the structure, as you looked at the reflection and actual structure. Neat trick.

You've done very well with the mirrors you're currently using. Good Job!!:D


Back
Top