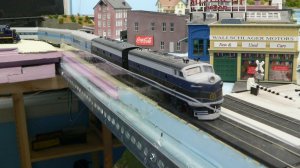
Top Town USA there Jim! Should win the Tidy Town title too. Good to see the Vitamin C E49 taking the corner honours at the car dealers (also known as "Souped Up Sam's"?)

You are using an out of date browser. It may not display this or other websites correctly.
You should upgrade or use an alternative browser.
You should upgrade or use an alternative browser.
Crazy idea what do you think
- Thread starter Jim 68cuda
- Start date
goscrewyourselves
I'm the one
Have to agree with Toot'n - all of your towns deserve the title of "Tidy Town", very neat clean and realistic looking. Have to add that you have a huge amount of buildings and structures, all of which look spot on to me.
Jim 68cuda
Well-Known Member
Thanks guys. I do like the "clean" and "tidy" look of a "Mayberry" or "Pleasantville" type of town, but once trees, street signs and people are added, and once I weather the roads and a few of the structures, then maybe it won't look quite so "tidy". But the entire rest of the layout needs to get to the same stage before I move on to weathering and cluttering up the town.
And yes, that's a die-cast 1/87 scale Australian Chrysler Charger by Road Ragers on the corner in the used car lot. I like those Aussie muscle cars, but I've only seen 3 or 4 of the 1:1 versions myself here in the US (only a few have been imported by collectors).
And yes, that's a die-cast 1/87 scale Australian Chrysler Charger by Road Ragers on the corner in the used car lot. I like those Aussie muscle cars, but I've only seen 3 or 4 of the 1:1 versions myself here in the US (only a few have been imported by collectors).
Last edited by a moderator:
DairyStateDad
Mumbling in the corner
Jim, really good work. I haven't read all the way through the thread, but I am interested in the mechanics and structure of the removable sections. If that is in there, I will find it, but if not, I suggest a "how to" thread or post. Very nicely done!
From the DairyStatePhone
From the DairyStatePhone
Jim 68cuda
Well-Known Member
Jim, really good work. I haven't read all the way through the thread, but I am interested in the mechanics and structure of the removable sections. If that is in there, I will find it, but if not, I suggest a "how to" thread or post. Very nicely done!
From the DairyStatePhone
Since theres no track on my removable sections, there really wasn't much to engineer. After I built my framework (Ikea Shelving), I put layers of 2" thick Styrofoam on top to form the base of the layout.In the case of this removable town, I realized right away that I would need an access opening. Before gluing the foam together, I cut a hole in the bottom layer of foam for access, and a larger opening in the top layer of foam. The bottom hole is smaller than the top hole so theres a lip to support the upper layer of foam when the town is in place.
The other removable sections sit over top of (and hide) the tracks and are basically just boxes made out of foam core board. If I had to do that part again, I would have used Gatorboard instead. Gatorboard would have been more rigid and would have eliminated the problem of warping that I had the resolve, yet would have still been lightweight. Then hills made from layers of foam (attached to the base) were built up to the edges of the lift off box sections.
Last edited by a moderator:
Jim 68cuda
Well-Known Member
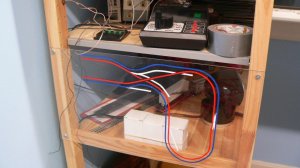
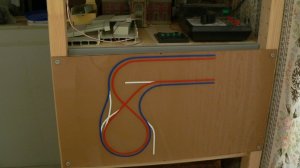
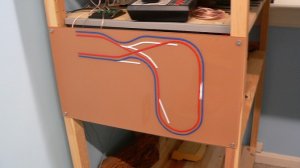
Just did a bit of cutting on some Plexiglas today. I made a guard rail for a section of track the runs right along the edge of the layout. I also made a piece for each room and applied tape for each room's track plan. One main line is in red, and the other main line in blue. I will likely paint the back side of the Plexiglas before drilling holes for the switches.
Attachments

Jim 68cuda
Well-Known Member
Things looking good Jim! Like your towns! How's the IKEA Ivar bed doing?
While the shelving is from Ikea, the bed frame and box springs were part of the original bed in that room. The new mattress came from a mattress store that was having a sale.
So far the bed has only been used for one three day period. My nephew and his wife stayed in the room and found it very comfortable. The bed doesn't touch the Ikea shelving that supports the layout, and there was no evidence of the layout getting bumped.
When my friend came over to help with the wiring, he was working under that part of the layout. He said it was the most comfortable he had ever been while doing wiring under a layout.
Jim 68cuda
Well-Known Member
Today I turned my attention to the scenery on the old part of the layout that I'm repairing and reusing. This part of the layout which was originally built in the attic storage room in the mid 1990's is now in the blue guest room.
Of course the first order of business was to remove 20 years of dust from the roofs of the structures, roadways, and other flat, unsceniced areas. I did vacuum what I could when I moved this large section of layout, but that didn't really remove the stubborn dust. Tonight, armed with Q-tips, a sponge and a small bucket of water (changing the water frequently), I wiped as much of the dust away as possible from roofs, roads etc. I did find that on a section of road I had colored using Woodland Scenics Asphalt Top Coat, that the slightly damp sponge wiped some of the pigment right off the road. Otherwise my cleaning efforts worked as well as could be expected on textured surfaces and surfaces painted with flat or dull coat paints. That is to say, that they looked clean while damp, but dried looking only somewhat cleaner than they started. In all I "cleaned" about 45 structures plus roads. I'm kind of inclined to think that this is as good as it will get, unless I use some kind of cleaning solvent. But, I don't want to repaint buildings, so I'll quit while I'm ahead.
I'm curious though, how does everyone else deal with stubborn dust that can't be vacuumed away or blown away?
Last edited by a moderator:
Jim 68cuda
Well-Known Member
The main reason I moved the layout out of the attic storage room and ripped up all the trackwork that I had put down years ago, was that the track was buckling. I had originally attributed that problem to my stupidity at that time. You see, I had attached the track to the foam with double sided carpet tape, and then glued ballast over it. years later, the track was coming up in places and buckling. But as it turned out, the tape wasn't the problem. Over the course of 12 or 15 years, the foam had shrunk a bit. This was confirmed by some of the plastic streets and sidewalks buckling as well (Walthers Street System). I also didn't allow space for contraction at rail joints.
Despite the shrinkage problem, I had decided to continue with foam figuring I probably won't stay in my house another 12 or 15 years before moving. Besides, I kind of doubt, that the old part of the layout will continue to shrink now, 20 years later.
So, when I removed the track and moved the the old part of the layout into the blue guest room, I also ripped up streets, sidewalks and other scenery that had been a victim of the buckling issue.
The entire part of the layout that's over the bed, is a town. So there are a lot of streets and sidewalks. This weekend I re-laid streets and sidewalks. This ended up being a much more lengthy process than I expected. Partly it was because, the pieces I removed were all mixed together in a box. Because I had modified the original street system parts for different angled intersections and narrower streets in places, it was like putting together a jigsaw puzzle. But also, it took extra time because there were places I had to trim the street and sidewalk sections, sometimes only the thickness of the cutting wheel on the dremel, just to fit the pieces back together as they were before.
Originally, in the attic storage room, this part of the layout was only viewed from one side. Lucky for me, I had mostly done scenery so it could be viewed from the opposite side as well. Now this large part of the layout can be viewed on three sides.
The only other thing I did on the layout this weekend, was to spray paint the back side of the Plexiglas control panels. Since my track markings on the panels are red, dark blue and white, I needed a color that would provide a suitable contrasting color to all three. I ended up using a tan color, and the red, blue and white show up well. I had hoped it would come close to matching the color of the Ikea Ivar wood shelving that the layout is built on, and on which these control panels are mounted. Instead, it looks more like Plexiglas sitting on top of a cardboard box. Oh well.
I'll try to post some pictures in the next couple days. Meanwhile, my friend who wired part of my layout, is coming by one evening this week to help me with wiring the rest of the layout.
Last edited by a moderator:
Jim 68cuda
Well-Known Member
Here are pictures of the Plexiglas control panel with back sides spray painted tan. It does provide contrast for the red, dark blue and white tape, but it looks like the color of a cardboard box.
Attachments

Jim 68cuda
Well-Known Member
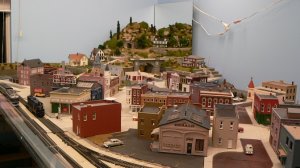
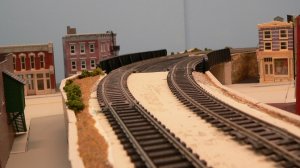
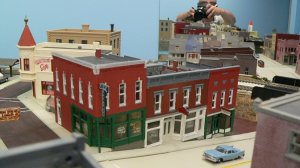
After spending a few days repairing the streets and sidewalks on the old part of the layout, here's what it looks like now. There is still a lot to do, and the foam that forms some of the alleys and parking lots isn't even attached yet. All that will come after the track is fully wired, glued down and hopefully free from derailments. This old part of the layout sits on Ikea shelving over a full size bed in a room that doubles as a guest room. The view in the first picture is the view point of visitors as they enter the room.
The Arnolds restaurant sits where a gas station used to be. This required a slight enlargement of the parking area. The parking area had been sheet styrene, and it was glued down very securely twenty years ago. Though you can now plainly see where I spliced in extra styrene to extend the parking area, I decided that was preferable to risking damage trying to replace it completely. From most viewing angles, its not very noticeable, but its clearly visible in this picture taken from the top of a step stool. I may try to make the joints look like cracks in the pavement, but the car hops on roller skates that will be added to the scene later may not appreciate cracks in the pavement.
In the picture of the passenger station, you can see the edge of a mirror. The row of town houses in the background are on the a removable section, and from this angle, their reflection is cut off in the mirror. From the tracks by the passenger station to the wall, there is a 20" wide walkway for access to the far side of the bed underneath as well as for access to that side of the layout. In the first picture the edge of the mirror in the other corner is also visible, but once you're all the way into the room, the entire hill will be visible in the mirror, so it will be less noticeable.
Attachments
Last edited by a moderator:
Jim 68cuda
Well-Known Member
When I built the layout 20 years ago, I didn't like the view down Man Street, as the street ended at the edge of the layout just across the tracks at the other end of town (see pot #97 of this thread to see what I mean). There is an extension of scenery in the corner with a house up on a hill. But this scenery started at the top of a bridge over the tracks. That meant the view down Main Street was ruined by the blue Styrofoam stacked up to support the hill. The track along the wall to the left of the house on the hill is difficult enough to reach, so I made the little extension of Main Street with the school on a hill, removable. It currently sits on a small stand alone Ikea shelf unit, but eventually I will have what is basically a couple of legs from a folding table fold out to support this little section.
There will always be a fault line between the tracks and this small removable section, but the view down Main Street is definitely better with this removable section in place.
There will always be a fault line between the tracks and this small removable section, but the view down Main Street is definitely better with this removable section in place.
Attachments

Last edited by a moderator:
Jim 68cuda
Well-Known Member
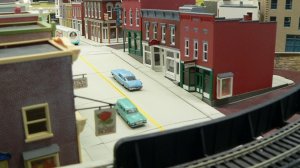
Another removable section will be supported in the same way. In this case it will be removable to provide somewhat easier access to the far side of the bed when guests are sleeping there. This removable section extends the scenery to a mirror on the wall. In this case the fault line will be hidden from view from most viewing angles as its at a lower elevation than the tracks and the bridge over the street before the fault line will make it less obvious as well. The fault line extends across the street at a concrete expansion joint between Murray's Drug Store and the building next door.
You'll see the mirror runs right through the intersection. The town houses are reflected in the mirror so they look like another row of town houses.
The VW bus is cut in half and placed against the mirror. The blue sedan has tail lights painted on the front, so it looks like the back of another car a block away in the mirror. Technically the old Ford on the street in front of the townhouse is on the wrong side of the street, but only it's reflection is visible making it look like it's on the right side of the street.
The removable section starts at the bottom of the retaining wall to the left of the tracks in the last photo. I know that retaining wall at edge of the main layout really isn't very straight. But that wall was built 20 years ago with this part of the layout not visible to visitors. For now that wall will stand. At some point in the future, I may replace it with a better looking wall.
Attachments
Last edited by a moderator:
Jim 68cuda
Well-Known Member
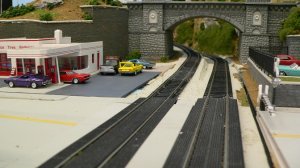
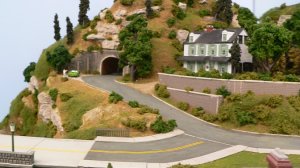
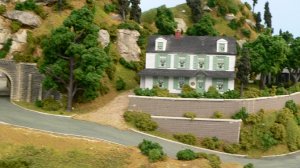
While I'm on the subject of mirrors, there are a couple others on this part of the layout. The house on the hill has the window trim on the back and side painted black so it looks like a different house in the mirror. The tunnel just to the left of the house has a mirror at he end so you can "see a light at the end of the tunnel". Also, not visible in the picture, but the under pass just to the left of the Route 22 Diner has a mirror so that viewers won't see the wall if they look under the bridge.
Attachments

Last edited by a moderator:
Jim 68cuda
Well-Known Member
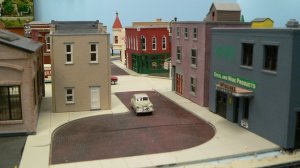
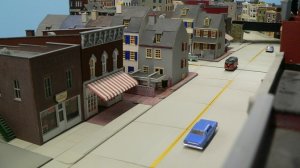
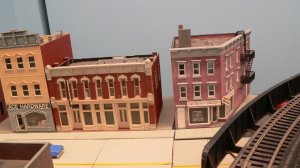
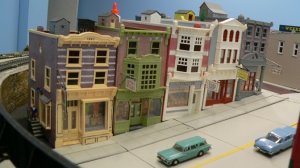
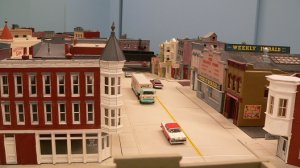
Here are a few pictures of the businesses lining the street that slopes down to pass under the tracks. This part was the most difficult in repairing streets and sidewalks. Nothing wanted to fit back together again after moving this part of the layout out of the attic storage room. Mostly the problem was probably because of slight shrinkage in the foam the layout was built on 20 years ago. There was a lot of trimming and test fitting, trying to get it all back together again. I'm still not totally happy with the results, but I'll worry about tweaking a better fit for the buildings later.
Attachments
Last edited by a moderator:
Jim 68cuda
Well-Known Member


Jim 68cuda
Well-Known Member
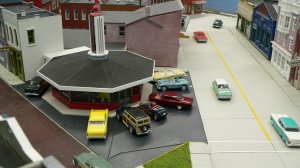
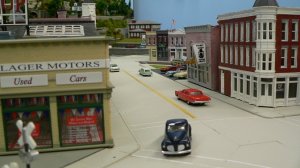
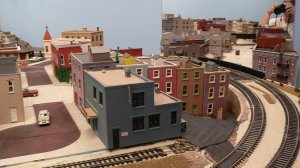
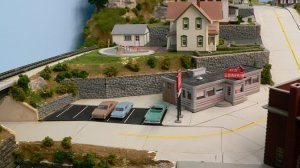
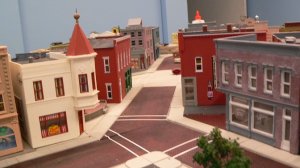
And here are just a few more pictures from around town on this part of the layout. Theres still a lot to be done on the layout before going much further with the scenery on this section.
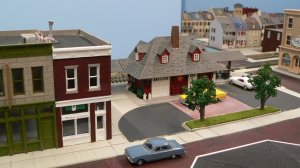
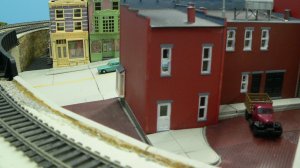
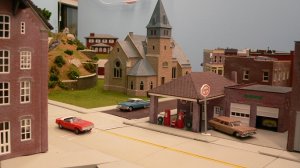
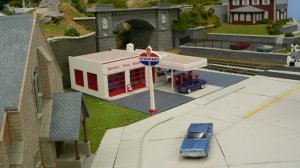
This is a new location for the Standard gas station. I moved the structures originally in this spot to the removable section of town by the mirror. The painted 1/8" thick foam that the gas station sits on to bring it level with the top of the sidewalks has not yet been glued down.
This is a new location for the Standard gas station. I moved the structures originally in this spot to the removable section of town by the mirror. The painted 1/8" thick foam that the gas station sits on to bring it level with the top of the sidewalks has not yet been glued down.
Attachments


Last edited by a moderator:
Jim 68cuda
Well-Known Member
It's looking really good Jim. I really like your selection of buildings and the way you laid them out. I do see a few that also call my Fox Valley RR home also.
Thanks Gary.
