Crazy idea what do you think


Fantastic town, great collection of buildings. A real attention puller, specially where it is. If it wasn't for the red tail/head lights on that Ford, would never have guessed it's on the wrong side of the street.
And I see we got a pic of you taking a pic of you to boot.
 
If it wasn't for the red tail/head lights on that Ford, would never have guessed it's on the wrong side of the street.
And I see we got a pic of you taking a pic of you to boot.

Thanks for the complement.
I guess right side of the road and wrong side of the road are all relative when I'm in the U.S. and you're in Australia. Maybe I should have said right and left instead. The old Ford is out of sight on the left side of the street (around the corner) in front of the town house and is reflected in the mirror on the right side of the street. The blue Dodge in the foreground is on the right side of the street and it's front end is painted to look like a car's back end on the right side of the street a block away in the mirror. In the mirror, its far enough away to not really be identifiable as any particular type of car. This car by EKO actually looks pretty accurate for a 1966 Dodge Dart from the back, but its so poorly molded in the front, that it's front end could pass for any generic front or back end of a car, even up close. That's probably because EKO models are made in Spain where Chrysler built the 1966 Dart well into the 1970's with only changes to the front ends. Maybe the front end more closely resembles a 1:1 car that was only available in Spain.
And yes, sometimes when trying to get a picture of a reflection in a mirror you happen to get a picture of the photographer as well.
 
Last edited by a moderator:
Another step complete, but another step not worthy of photographing. My friend came by tonight to help (actually he did all the work) wire my second main line (divided into blocks). I can now run two trains at one time on two separate main lines and control them from either room. Mine is DC operation, and I have two power packs, one in each room. I can now control either main line from either power pack from either room for just the one room or for the entire main line extending through both rooms. We also powered some of the sidings. Next step will be to power the remaining sidings and power the switches, and then I will be able to start attaching the track (semi-) permanently.
I'm pretty excited but somehow don't think that pictures of wires connected with speed-nuts and temporarily taped to the bottom of the layout would generate enthusiasm.
 
Last edited by a moderator:
In one of the towns I had a small triangular shaped lot that would be difficult to find a suitable building for. Its towards the back of the layout and is mostly hidden from view by the structures in the foreground. I tried cutting down a DPM structure I had built long ago. It was still too big. I started looking at options for kits I could cut down to size. Meanwhile, I built an illustration board mock up of a structure that would be the ideal size. The front and the roof would be the main things visible. I wanted it to be tall enough to be noticed over the foreground buildings, but its small size pretty much limited it to a maximum of two stories.
I was looking at the Bar Mills Salena's Tavern as a possible starting point to make a triangular structure from.
 

Attachments

  • P1160005.jpg
    P1160005.jpg
    87 KB · Views: 191
  • P1160006.jpg
    P1160006.jpg
    89 KB · Views: 191
  • P1160002.jpg
    P1160002.jpg
    104.3 KB · Views: 178
Last edited by a moderator:
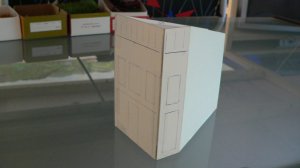
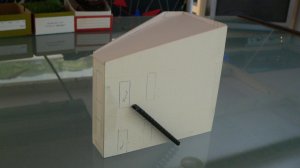
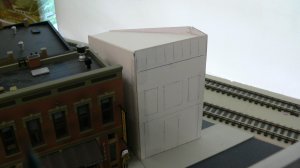
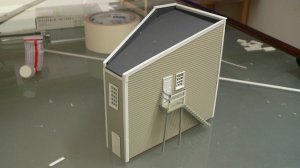
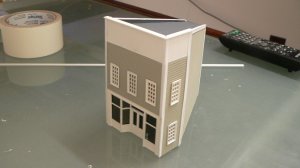
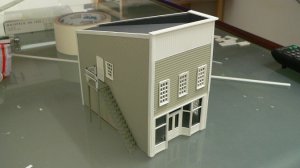
I didn't want to spend $50 on a structure to cut down and only have the roof and part of the front visible. After watching Dave's build thread on Tuxedo Dave's Formal Wear, I decided to try scratch building a structure myself. I found spare windows and doors in my parts box, ordered a Smalltown USA storefront piece for $3.45, and picked up some Evergreen clapboard siding, and Evergreen styrene strips and covered the mockup structure with styrene to construct my first scratchbuilt structure. The original illustration board mock up structure had to be cut down a bit so the Smalltown USA storefront (first floor front windows with recessed entry) would fit. The illustration board mock up was about 1/8" too wide to accept the store front, so I narrowed the entire structure about 1/8". Here's what it looks like now. It needs some detailing and touch up but so far its not too bad for a total investment of about $12.00 and a starting point of a thrown together cardboard structure I never intended to use. Measuring and cutting the openings for the windows and doors in both the styrene and the illustration board was the hardest part. That's why there is only one window and one door on the side facing the alley and no windows at all on the angled wall facing the track ( that side is also the side facing the wall so it won't be seen by viewers).
Now I truly have no room anywhere on the layout for even one more structure, so this is the first and the last scratch built structure for my layout.
 

Attachments

  • triangle 1.jpg
    triangle 1.jpg
    78.3 KB · Views: 192
  • triangle 5.jpg
    triangle 5.jpg
    72 KB · Views: 184
  • triamgle 4.jpg
    triamgle 4.jpg
    104.6 KB · Views: 198
  • triangle 2.jpg
    triangle 2.jpg
    79.5 KB · Views: 192
Last edited by a moderator:
Mr. Jim, sorry in advance if I missed this but where did you get your plexi-glass and is it flexible?
 
Mr. Jim, sorry in advance if I missed this but where did you get your plexi-glass and is it flexible?

Gary,

I picked up the Plexiglas at Lowes and Home Depot. They have multiple sizes and thicknesses. There is some flex to the Plexiglas depending on the thickness. For the small pieces I'm using for my control panels, they are not overly flexible. But, the longer pieces I'm using in a couple places along the edge of the layout, there is more flexibility which will allow it to bend a little along a curved edge of the layout. I like the Plexiglas, but it is a pain to cut, and I've managed to destroy more pieces than I was able to make usable.
 
Last edited by a moderator:
Thank you, Sir. I need to figure out what I'm gonna do about that before I start running trains. My tracks are pretty close to the edge in some places and that's a 45'' drop to the concrete floor
 
10845952_777269608986758_2861174675745102435_n.jpg10430881_777268252320227_6811925593173534493_n.jpg10847770_777269708986748_2220045865614863964_n.jpg10421093_777268115653574_7013384672614324992_n.jpg

Really need to get back to work on the layout. Been busy reviving a 1:1 1968 Plymouth Barracuda that had been sitting dormant in my driveway for seven years (runs great now), and busy with other 1:1 projects. I expect to have more time for the layout in January. Meanwhile, the Classic Metal Works 1/87 scale 1955 Ford sedans are finally available, and mine showed up on the door step last week. Decided to swap out a building on the layout (temporarily) to put a Ford dealership in place for the arrival of the new cars.
 
Neat idea buying the cars in the various color offerings for a dealership. Building works well as a dealership, just needs more signage.
 
Okay, its been a couple years since I've done anything on the layout. I love the layout I've created. But Now it looks like I will be moving this summer. Yes, the layout will be dismantled, and the holes through the bedroom walls will be patched. This summer I will be moving to a house with a basement. The layout will be getting a new home, but I'm not sure how to make it fit in the partially finished basement. I may end up putting each section along two separate walls in the basement and then building a center section where the wall currently divides the layout. The center section could just be a shelf around a corner in the basement to connect the two halves. The objective will be to keep the existing layout unchanged and only change the part that connects the two halves that are currently separated by the wall.
The Ikea shelving it sits on will be easy to take apart and reassemble. The layout itself is built on foam which sits on the shelving. The foam will need to be cut into sizes small enough to fit through doorways and around a corner going down the stairs.
 
Last edited by a moderator:


Back
Top