Crazy idea what do you think


As you know, John Allen used mirrors on his layout. For one, he built half a structure, and butted it up against the mirror, so the building appeared to be whole. For this situation, IIRC, he used a "front surfaced mirror", (I think that is the technical term), meaning the reflecting material was on the top surface and not the bottom surface, so there wouldn't be a "gap" in the middle of the structure, as you looked at the reflection and actual structure. Neat trick.

You've done very well with the mirrors you're currently using. Good Job!!:D

Thanks. The mirrors I'm using are the normal type with the reflective surface on the back side of the glass. They are 1/8" thick, so there is a line where the street meets the glass, but I don't think it will be very noticeable from the normal viewing angle once trees and other scenery is in place. In my case I don't have any structures directly up against the mirrors. I've heard that the mirrors with the reflective surface on the front are very expensive and way too easily scratched or damaged. I didn't even consider those mirrors.
 
spackle1.JPGspackle2.JPGspackle3.JPG

Finally, the layout is not just temporarily pieced together. I cut holes in the top layer of foam where tortoise switches will go. I then used caulk to glue together layers of foam, and to glue the Woodland Scenics inclines in place. I left the pieces of foam I cut out for the tortoise switches in place for now, but didn't glue them in. I only screwed the foam into the Ikea shelving framework in a couple of places to keep things from shifting if it gets bumped.

I then went to Home Depot and got a bucket of "lightweight" spackle. I used the spackle to fill in the open areas of the inclines. It doesn't look pretty, but I just want to be sure I have a solid surface to build on when I lay track and ballast. Since everything is built on foam, I don't feel I need to lay a foam roadbed over the foam, and I need every bit of clearance I can get in two areas. I've tested my tallest and longest rolling stock and everything works, but adding cork or foam roadbed would make clearances too tight for tall rolling stock.

I also did some additional trimming and shaving of foam terrain. My foam wire cutter finally died. Lately its not been working well or consistently. This time it stopped working altogether and I couldn't get it working again. But, almost all the cutting and shaping is done already, so I expect little or no need for the foam cutter in the future.

The next step will be to get a base coat of paint down where the tracks will be, so pink, blue, and white won't show if the ballast isn't thick enough (especially concerned around moving parts on the turnouts). After paint, I will be ready for laying track and wiring. A friend of mine has volunteered to help with the wiring, which is my least favorite part of construction. I will be looking at some options for wire management since wiring will need to be kept hidden or at least needs to be kept clean looking since house guests will be sleeping under the layout.

But, now everything will be on hold for a week or so as I prepare for a house full of guests. The new bed in the guest room/train room will be used for the first time as several family members come for a short visit.
 
Last edited by a moderator:
So today, without actually having the track attached and before starting any of the wiring, I decided to hook up a controller (power pack) to the track. One power source hooked up to all the track in both rooms. I didn't have much hope that it would run, or stay on the track. Much of the track needs cleaning, and a lot of the rail joiners are very loose. If it ran on the loose track at all, I would expect derailments and a lot of dead sections of track.
I started with an old Athearn F7 on the outer loop. With a little coaxing here and there, it slowly made its way around the entire outer loop that extends between the two rooms. There is one section of track where I occasionally experienced a derailment. It ran, but very slowly, even at full power. On the inner loop. it moved, but not far.
Next, I tried a newer Atlas Master GP38. It ran well around both the inner and outer loops, but I experienced a derailment at one turnout on the inner loop, and at a dip I hadn't noticed on a section of track halfway across a bridge I'm re-using from the old layout.
For loose old track in need of cleaning, I was actually pleasantly surprised by the performance (at least the performance of the GP38).
One thing though, since I was concerned about the possibility of an locomotive derailing and falling 4 1/2' to the floor, I found myself running back and forth from room to room to be there if the train fell. When the trains are running, I know now for certain, that I will never sit down. I will be constantly moving from room to room.
 
If your track runs that close to the edge of the layout, I'd suggest making a barrier to prevent such a mishap. To keep from obscuring the view of the layout, I use 1/8-in. plexiglass screwed to the edge of the 3/4" plywood base. If such a barrier interferes with the swing of rolling stock, you need to move the track enough for clearance. Another thing you could do would be to use a rerailer in that area, or at least install guard rails inside the stock track (similar to what is done on bridges).
 
If your track runs that close to the edge of the layout, I'd suggest making a barrier to prevent such a mishap. To keep from obscuring the view of the layout, I use 1/8-in. plexiglass screwed to the edge of the 3/4" plywood base. If such a barrier interferes with the swing of rolling stock, you need to move the track enough for clearance. Another thing you could do would be to use a rerailer in that area, or at least install guard rails inside the stock track (similar to what is done on bridges).

Although the track is close to the edge in a couple places on the original part of the layout that is being reused, the track in those areas is straight and I expect it to be trouble free. I do plan on clear Plexiglass "guards" in those places once the track s attached and wired.
My main concern is in the part of the blue room/guest room, where I had to make compromises to allow access to a window. The track is curved and is right at the edge in that spot. I can't move the track away from the edge, and I need every inch to wedge myself between the edge and the window at that point. I do like the suggestion of the inside guard rails (like a bridge). I'll probably come up with some other method as well to save any falling trains from reaching the floor at that spot.
 
One thing though, since I was concerned about the possibility of an locomotive derailing and falling 4 1/2' to the floor, I found myself running back and forth from room to room to be there if the train fell. When the trains are running, I know now for certain, that I will never sit down. I will be constantly moving from room to room.

It is great to see the progress on your railroad. Ever thought about using a microphone near the track to detect a derailment? I have been able to catch mine by hearing that the smooth wheel sound is replaced by the sound of something not being right. And the stakes are high on my railroad, which is 7' above ground.

So far one locomotive did fall off, but amazingly it was not damaged. It was a cheap Model Power F-7. DC and no flashy handrails or anything. Kid tough.

lasm
 
I think the main issue is transfer of movement... CbarM's comment amuses me, but just normal tossing-and-turning is gonna be hard on the layout.

My first thought was simply an around-the-walls layout at sufficient height (60"?) that a normal bed, dressers, etc. would easily fit underneath...
 
paint1.JPGpaint2.JPGpaint3.JPGpaint4.JPG

Last weekend I had the extended family visiting and the blue train room was pressed into service as a second guest room. My nephew and his wife slept on the bed under the train layout and report that it was very comfortable and kind of like sleeping in a bunk bed. The bed frame does not touch the Ikea shelving supporting the layout, so there was no transfer of movement to the layout. I checked after they left and there was nothing on the layout that appeared to have been bumped, moved, or knocked over. I had a concern that they might hit their heads on the bottom of the layout when sitting on the edge of the bed, but apparently that didn't happen. All in all, I would say the train layout over the guest bed was a success.
After the family left, I again removed all structures and removable sections and painted a base coat on much of the exposed foam. On my old layout I had skipped this part, and over time, ground cover and ballast wore thin in areas exposing blue and pink foam underneath. I mainly wanted to get the paint down where the track will be attached, but while I was at it, I painted much of the rest of the new construction even though cutting and shaping the terrain is not yet complete. For $2 per quart can, I picked up a couple paint rejects at Home Depot. One I picked up was a light brownish tan, the other I thought was a light concrete gray color. I started with the gray, but as I was painting it appeared to be more of a canary yellow. When it dried it appeared to be a grayish green. Depending on the lighting it looks more gray. That's the color I ended up with where all the track will be. I guess it will be blend in better than pink or blue foam if it shows through the ballast in places.
Now, the layout is finally ready for wiring and attaching the track permanently. The pictures show the room with the new expansion of the layout with the base foam painted with and without the removable sections of scenery.
 
Last edited by a moderator:
Nice! Definitely agree with you on basecoating the foam. Made that mistake myself too - and stripping the ground cover to paint it after the fact is no fun.

I'm definitely a denizen of the "leftover paint rack" at Home Depot, BUT for basic ground-cover of foam, I really like the "suede" texture paint. Gives you built-in offset to the smoothness of the foam, even before you start adding cover. Never have found a can of dirt-brown suede paint on overage, so have to pay full price... but worth it IMHO.
 
If your track runs that close to the edge of the layout, I'd suggest making a barrier to prevent such a mishap. To keep from obscuring the view of the layout, I use 1/8-in. plexiglass screwed to the edge of the 3/4" plywood base. If such a barrier interferes with the swing of rolling stock, you need to move the track enough for clearance. Another thing you could do would be to use a rerailer in that area, or at least install guard rails inside the stock track (similar to what is done on bridges).

I learned this one the hard way... I do put a lot of time and effort into having really, really good trackwork... so I got cocky and decided that I didn't need the guards. Didn't account for ham-handedness and such, and one day "brushed by" a train sitting 1.5" from the edge and kablooey. Layout room at that time was concrete floor, and the loco was toasted. Luckily it was "only" a Spectrum K-4 and not one of the BLI's... But it was still not a good day.

I still, honestly, don't like guards (even plexi which seems to attract fingerprints and smudges from thin air...), so simply decreed that track shall not runneth closer than 3" to the edge... Had to make a few compromises for that, but worth the peace of mind and un-smudged view.
 
Since I had the hot wire cutter out, I worked a bit on the terrain on the coastal village. There will be a small dam or waterfall just beyond the covered bridge so that any viewer looking under the bridge won't see the wall.

I think behind that covered bridge would be a perfect spot for another mirror... Looks like you could put it straight-across to "extend" the water and enough site-blocks nobody would see themselves... You could angle it a bit to avoid the stone bridge showing up even...
 
FWIW, I got trackage rights from the 'train room' through a winto the 'family room' next door for a staging yard... I did so by agreeing to build it as a "furniture-grade display case" along one wall... It's staging, so fine - I wasn't going to really "scenic" it anyway... It's built out of 1x2's stained mahogany to match the room's decor. Dadoed out the front and lift-up lid for glass, lined the bottom with green felt, and now have a great way to display the trains that also lets me "drive them right in" to the layout. Went with hand-throw turnouts there to avoid ugly wiring and control panel... The "treaty of mechanicsburg" has held for some time with no further conflict...
 
I learned this one the hard way... I do put a lot of time and effort into having really, really good trackwork... so I got cocky and decided that I didn't need the guards. Didn't account for ham-handedness and such, and one day "brushed by" a train sitting 1.5" from the edge and kablooey. Layout room at that time was concrete floor, and the loco was toasted. Luckily it was "only" a Spectrum K-4 and not one of the BLI's... But it was still not a good day.
I still, honestly, don't like guards (even plexi which seems to attract fingerprints and smudges from thin air...), so simply decreed that track shall not runneth closer than 3" to the edge... Had to make a few compromises for that, but worth the peace of mind and un-smudged view.

Sorry to hear about the demise of your Spectrum K-4. My floor is carpeted, but if the train falls, its a long way down. I will likely install a Plexiglas guard rail in four places at some point. But during construction, before a guard is in place, I'll just do my best to be careful (and continue running from room to room in readiness to catch a falling train).


I think behind that covered bridge would be a perfect spot for another mirror... Looks like you could put it straight-across to "extend" the water and enough site-blocks nobody would see themselves... You could angle it a bit to avoid the stone bridge showing up even...

That's a great idea. The mirror only needs to be as high as the bottom of the covered bridge, so I don't need to worry about the covered bridge showing up in the reflection. If I can hide the bridge abutments from the mirror with terrain and vegetation I may go that route.

FWIW, I got trackage rights from the 'train room' through a winto the 'family room' next door for a staging yard... I did so by agreeing to build it as a "furniture-grade display case" along one wall... It's staging, so fine - I wasn't going to really "scenic" it anyway... It's built out of 1x2's stained mahogany to match the room's decor. Dadoed out the front and lift-up lid for glass, lined the bottom with green felt, and now have a great way to display the trains that also lets me "drive them right in" to the layout. Went with hand-throw turnouts there to avoid ugly wiring and control panel... The "treaty of mechanicsburg" has held for some time with no further conflict...

That's great news! Now don't do what I did and procrastinate for a year in hesitation of putting the holes through the wall. You better put the holes through the wall right away, before the "Treaty of Mechanicsburg" is revoked. If you don't move fast to get into the space allowed by the treaty, then the chances are that the other party to that treaty will violate the treaty by occupying the specified area.
 
Welcome to Retroville (until a better name for this town comes up)

I haven't coordinated with my friend yet to come help with the wiring, so I started doing a little work on the scenery for Retroville.

For those who haven't been following this thread, Retroville, is one of four towns on my layout and its not the largest. But, its built in two large removable sections that sit over top of one third of the track in one of the rooms(roughly one sixth of the total amount of track). Since the town is built up over the track, it dominates the room as you enter. It creates a large flat area with no track at all.
There are turn outs on the layout that allow trains to move from the inner loop to the outer loop (and back) that are completely hidden underneath the town.
Even though I've explained that I'm the type that is more into the scenery than the realistic operation, I know the logic behind this setup needs a little explaining.
First, with the exception of two Woodland Scenics structures and a City Classics gas station, Retroville consists entirely of structures I had as a kid in the 60's 70's and early 80's. If the structures were damaged or lost, I found replacement kits on e-bay and built them for this section. These were fondly remembered structures from my early model railroading experience and though they are not up to today's standards I wanted them included on the layout.
The residential section that has already had the basic scenery done except trees, fences etc), was created to replicate a section of Railroad K "Berkshire Valley Route" in the Atlas King Size Plan Book that I wore out as a kid. The second removable section was added to make room for a business district for the other favorite old structures, and creates a nice little small town along RT 66 kind of atmosphere. You can look down Main Street at one end of the town and see the road disappear into the hills in the distance. But this section hides the turnouts. As a kid, visiting a club layout somewhere, I remember being fascinated when a train went in one tunnel and I didn't know which tunnel it might emerge from. I have recreated that experience with the removable town of Retroville. But, I know that I may not always like that aspect, so I will one day create alternate scenery that is either removable or which would be hidden under the town, to provide options for running the trains without hiding so much track.


Meanwhile I started working on the basic scenery for the business district. Keep in mind that this entire section needs to be easilly removable. Because of some flex in the section, I will not use joint filler, lightweight Hydrocal or anything else that is susseptable to cracking. For the most part, I'm going "old school" on the scenery as well. In the Atlas King Size Plan Book, the construction of the ttown base was cardboard and was permanantly attached. I used foam core board and made it removable. But the "old school" way to make roads and sidewalks, was to use illustration board. I went that route for the roads, even painting them Grimy Black as all the books instructed back in the day. For sidewalks though, I used plastic sidewalks that were included in the kits, along with plastic sidewalks from Smalltown USA and from the Walthers Street System kits (all painted Camouflage Gray). For yards and alley ways and driveways I used either illustration board or sheets of Balsa that matched the height of the sidewalks. Driveways, parking areas etc were painted Concrete Gray, Dark Aircraft Gray, Grimy Black or Camouflage Gray. One driveway is a section of brick pavement from a Walthers Street System Kit, and one alleyway is illustration board painted Camouflage Gray that will be covered with Woodland Scenics Fine Buff Ballast to make a gravel drive matching the height of the Walthers sidewalk.
Painting of the illustration board and the balsa is complete, and a foam hill that will be attached has a base coat of paint. Next I will glue the illustration board and balsa down and fill in ditches and terrain with caulk (as it must remain somewhat flexible). Then it will be time for ground cover.
 

Attachments

  • retro1.JPG
    retro1.JPG
    49 KB · Views: 161
  • retro2.JPG
    retro2.JPG
    39.7 KB · Views: 159
  • retro3.JPG
    retro3.JPG
    37 KB · Views: 152
  • retro4.JPG
    retro4.JPG
    36.1 KB · Views: 152
Last edited by a moderator:
So I had cut and test fitted the foam hill side, the illustration board roadways and and balsa wood base for the grassy areas on the removable town section in Retroville. Last night I was ready to start gluing the pieces to the removable foam core board base the town sits on. It was time for one last look to see if I wanted to make any changes.

The Motel is one of the familiar Plasticville motels thats been around since the 50's. Its the only HO scale Motel I know of that has a little bit of that "Do-wop" 1950's-60's architectural style that once was common (and now only seen in quantity in Wildwood, New Jersey). I painted the motel turquoise and surrounded it on the front and sides with a low wall (made of strips of styrene), painted to match, to tie it into it's surroundings with a period look, and to help imply that the motel property, with additional units, continues beyond the edge of the layout. A pool comes with this kit, but it would look more at home in a back yard than a motel. So, with modification, that pool was used long ago on another part of the layout. With the impression that the motel has additional units behind the 4 room section and office, I had figured a pool could also be assumed to be out of sight off the edge of the layout.
Looking at the town last night, it occured to me that the scene just didn't look complete without a pool. There was room for the styrofoam hill and that could be cut back to make room for a pool. So, last night I started looking for swimming pools in HO scale on the Walthers website, ModelTrainStuff (MB Klein), and E-bay. The pools I saw were either way to large for the space available, way to small for even a small back yard, or not even close to looking like I think a swimming pool should look. But, they all had one thing in common, They were all well over $20, which seemed expensive for what you get.
I searched my parts boxes and found, a piece of styrene strip that matched the low walls around my motel, a Plastruct diving board, a piece of unused ripple plastic tinted blue (I think it was from Noch), some molded concrete stairs from Pikestuff, concrete sidewalks from SmalltownUSA, and some leftover light blue spray paint. Since the pool will be built into a cutaway of the hill, I decided it would be cool if the pool were at a little higher elevation than the motel, and then the low wall, could double as one side of the pool. The pool size was dictated by the amount of leftover styrene strip I had to make the remaining three pool sides out of. I spray painted the styrene strip (including the pool side of the low wall), and the foam core board base, with the light blue paint. I cut the low wall for a stairway up to the pool deck. The pool deck surrounding the pool on three sides, is made from the sidewalk material.
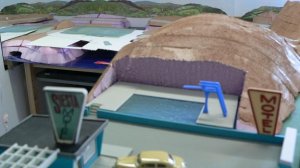
This is not assembled yet, but you can see in the picture what the pool will look like. I still need to paint the diving board. I may cut the diving board down a bit first though, so that its not a high dive. I will cut the styrofoam hill down a bit surrounding the pool so that retaining walls won't overpower the scene. Using the rippled plastic for the water surface, I will be able to add a figure or two in the pool by cutting them in half and glueing them back together on either side of the plastic water. Some railings will be added later as well, where the pool deck meets the top of the low wall, so no one falls into the parking lot.
 

Attachments

  • pool1.JPG
    pool1.JPG
    38.6 KB · Views: 270
  • pool2.JPG
    pool2.JPG
    42.1 KB · Views: 310
  • pool3.JPG
    pool3.JPG
    41.3 KB · Views: 328
Last edited by a moderator:
I'm still waiting for someone to come with a model of the "coral courts" motel in St. Louis on Rte. 66... It doesn't get much more doo-wop than that...
 
I'm still waiting for someone to come with a model of the "coral courts" motel in St. Louis on Rte. 66... It doesn't get much more doo-wop than that...

I went on line and looked up the Coral Courts motel. It is very cool, but it looks more 1930's -40's Art Deco than Doo Wop to me. I'm thinking more along the lines of the 50's or 60's mid century modern style architecture, or something that looks like its right out of "The Jetsons" cartoon TV show. Wildwood, New Jersey is pretty well known for the Doo-wop style. I have never been there, but actually wouldn't mind taking a road trip to go see it.
http://www.doowopusa.org/district/index.html

Meanwhile, I did a little more work on the pool. I shaved down the hill and added a cinderblock wall painted turquoise to match the motel. I've cut down the diving board a little as well. Theres still more to be done, but its starting to have the look I was after. The diving board needs detailing, a concrete cap on the retaining wall, and some additional railing is still needed.
 

Attachments

  • pool4.JPG
    pool4.JPG
    46.7 KB · Views: 163
  • pool5.JPG
    pool5.JPG
    41.3 KB · Views: 164
I'm loving it Jim. Love the motel. I got one here I want a second to stack up. Your Retroville is simiair to the Town of Bachmann I'm working on in floor tile sections. It includes a developement called Plasticville Estates. Hope to be starting my own thread soon on it. The idea is what I would might have envisioned my old layout as a kid. Nothing like a double flashback, to a point in time and to our childhood.
 
I'm loving it Jim. Love the motel. I got one here I want a second to stack up. Your Retroville is simiair to the Town of Bachmann I'm working on in floor tile sections. It includes a developement called Plasticville Estates. Hope to be starting my own thread soon on it. The idea is what I would might have envisioned my old layout as a kid. Nothing like a double flashback, to a point in time and to our childhood.

Looking forward to seeing your Town of Bachmann and Plasticville Estates. I suggest that for Plasticville Estates, you also locate the old built up Tyco Colonial House and Ranch House. These were reissues of early 60's Aurora kits and look great along side the Plasticville split level house. More recently, they may have been rereleased in kit form by AHM.
I like your idea of stacking the Plasticville Motels. I can't find it now, but I once saw a picture, on line, of a very well made Plasticville motel kit bash. It used the Plasticville Drive in Hamburger Stand as the Motel office. With its large windows, there was room for lots of detail in the lobby and you could see several tropical potted plants in the lobby window. Attached to the side of the office were two 4 unit Plasticville Motels stacked to form a two story motel with a balcony for the second floor. The next part made it visually interesting. At a right angle to that and sticking out in front of the two story motel (forming an "L"), were two more stacked motels. These had been cut down to two or three units on each level. The upper level of this last section was connected to the balcony of the first unit with a bridge, and the stairway to the upper level balcony was located between the two sections. In the middle of all this was a rectangular pool that all the rooms looked out on. I was tempted to do something similar, but just didn't have the room. The depth of the lot its built on was the road block that prevented making that happen on my layout.
Meanwhile, I'm liking how the scratchbuilt pool is turning out. All I need now is a couple of swimsuit models, a few potted palm trees, and a photographer, and it'll be the perfect setting for a photo shoot for a magazine ad for a new convertible, like this 1941 Lincoln Continental.
 

Attachments

  • Lincoln.JPG
    Lincoln.JPG
    34.7 KB · Views: 142
Last edited by a moderator:


Back
Top