ModelRailroadForums.com is a free Model Railroad Discussion Forum and photo gallery. We cover all scales and sizes of model railroads. Online since 2002, it's one of the oldest and largest model railroad forums on the web. Whether you're a master model railroader or just getting started, you'll find something of interest here.
Speaking of natural product- one idea that I came across and seems to work is to spray glue on a surface (where you plan on adding grass) and sprinkle filtered dirt on it. Nothing simulates dirt better than real dirt.
The problem that I have encountered though is that perhaps I either didn't use enough glue or need to paint the surface brown first.
rr, Painting the "undercoat" is really a must for realistic final results. Back in the thread this was explained. Woodland Scenics makes a color call Earth Undercoat. I always use it. Some folks use simple latex paint and seem happy with their results. I don't use it because it covers too good and gives the surface below our ground covers a strange unreal final look.
I've had very good luck with watered down acrylics for the undercoat. By watering acrylics down you create a better 'look' than latex. Trust me, no mater what you put down with spray glues and shake on some of the undercoat will show through. (Just like real ground) A solid latex just doesn't work right. imho, Jim
Chris, I've been looking over your layout photos. One thing that comes to mind is the old saying, "There are no straight lines in nature." Let's look at your photo of the stream coming out from under the bridge. Dead straight. The stream that is in the front of the layout also is straight. Are you too far into building that you can't redo these streams and put some bends in them? Also, all the rocks in the streams are essentially the same and very unrealistic. I can help you with all this.
Also in the first pictture in the second group showing the straight stream I'm reminded of ancient Egyptian architecture and not not Mother Nature.
Unless this stream is actually a manmade storm drain with retaining walls then I think you should redo this section.
I figure if you posted your layout here you wanted my input as well as others. I hope I got that right? Jim
JPIII, There are exceptions to every rule. Your columns are correct. Find me that straight stream entering the Columbia and I'll disappear for ever. Jim
An observation from an old modeler to Silverton. There is no transition from the flat to the hills. All the outcroppings are at the same angle. Even when the foliage, grass, dirt, and structures are added it will still look stiff and uniform.
Jim, let start off by saying that I was taking your advice about keeping the thread going and setting a dialog about your layout and helpful hints that you might have about mine. So the answer is yes about input. The scene you mentioned about the stream coming out from under the bridge, that scene is the only one of the sections that I was actually trying to copy from a magazine article. That photo is included here. You mentioned the stream along the front edge of the layout. I did plan it that way to increase more viewer interest than nothing at all in the front. Another words, instead of just a straight track in the front, I included the stream. From the track centerline to the edge of the layout, is 6”. I think I know what you going to say about why I didn’t make the track and stream with more “S” curves in the first place. And I do agree that the rocks in the stream are too symmetrical or predictable in their placement. What do you suggest?
I would rephrase the "no straight lines..." bit to "Wherever mother nature finds a straight line, she does her level best to eliminate it". She is pretty relentless about it and her tool bag is the envy of all modellers.
Contest will begin at 1700 this Wed. PST here on the West Coast.This contest will celebrate 75,000 views in a year. Well done.
This contest will be much more difficult than the other two. No one came up with another idea so I expanded upon our previous ones. See you Wednesday. Jim
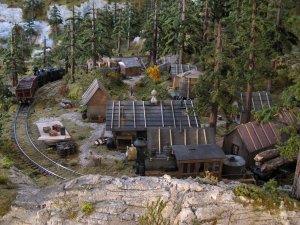
Chris, I certainly know why you put the front stream the way you did. I'm including a couple of photos that show some of my streams.
In this first photo you can see a fairly straight stream and how I've made it meander a bit here and there. Check out the rocks along the sides of the stream.
Another stream:
Lastly another way to do the front stream:
I like this way as curving it is easy. You still have the bank. And you can lean against it if need be. Jim
Jim, Thank you for posting the additional photos. I have down loaded them so I can study and see what I might need to do. Like I said, the scene with the creek coming down is the only one of my scenes that the idea was taken from a Gazette article. Hopefully that photo will appear in an attachment. In the other photo, I just set some of the cabins and mining things around to give some perspective. Scale wise, the creek is know more than a few hundred feet long, but still there is enough room for some contour changes. Talk with you later. - Chris
Also, how do you get your photos to post as pictures and not (attached thumbnails) like I seem to be doing?
Steve, Even the stream photo in the mag is curved. Here is the deal. I realize your stream is not very long. One of the special skills in model railroading is have a 100 foot long stream but make it seem longer. Longer is more interesting.
By meandering your stream you take the first step in making longer and adding depth to your scene without adding inches. Notice in the mag pic how the boulders are realisticly placed to "curve" the stream. This modeler has used all the tricks and done very well. Curving a stream is easy. Dump boulders, have a big rock, anything that will curve a water course will do. Real streams curve, trust me.
About the photos. I use a photo hosting service. Photobucket works for me. There a some others that can do the job. You get larger photos by transfering your hosting service photos using the IMG code to this or any other site that allows photos in posts. Jim
Below are two photos. Much like the other contests you will be required to find the differences between the two photos. On top is photo 1. Compare it to photo 2 and explain clearly and concisely the differences.
To make this contest a bit more difficut this time there are four 'differences.' You will probably have to refer back through the thread and study photos to come to the correct answers to two of the four 'differences.'
Do not mention lighting, trimming, or movement of any object in the two photos. These answers are wrong and get you nowhere. I will post a photo of the prize later. I hope you like it. First correct answer wins. Don't help your fellow competitors my posting answers you aren't sure are correct. Good luck and good hunting. Jim
Well, so far I've picked 1 I'm certain of. A second is a maybe (I think it is, but it may fall under the heading of "The unmentionables"). We could be in for a long contest.
Just to clarify something Jim. When you say we may need to refer back to previous pics to find missing differences, you're not saying there are 2 items missing from both pics 1 and 2 that can only be found elsewhere ?
Toot, Very good question. I said this would be tough. In actuality two things are different in photo 1 from photo 2, that's the easy part. In each photo there is the same "different" thing in each photo that will take some referring back in the thread to find what is "different" if that makes more sense? Maybe this will help to. Only two things are different, but show up the same in both photos. You will have to search for those two items in the thread. The other two differences are the same as the last contest. ie. two things are out of place or changed in some manner. How's that? Jim
I’m probably not sharp enough to win this thing, so I don’t mind venturing a guess, at least on one aspect. On photo number one, it appears that sunlight is coming through the first window just to the right of the large entre door and casting a shadow on the back of the inside of the building. On photo number two, there is no sunlight glare off of the window. Also, the second window to the right of the first window, is slightly different in both photos.
Photo number one is taken a bit closer than the second photo. All landscape in both appear to be the same. Anyway, it’s lunch time, so I will say goodbye. -Chris

")


")
