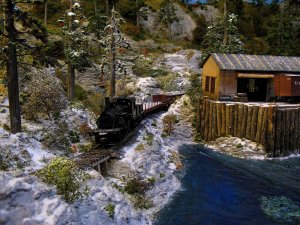
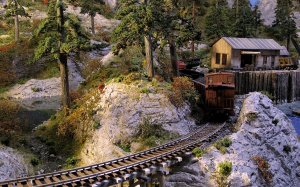
Building the Pinnacle Creek Mining & Timber Co. RR


Wow! First Toot and now Steve from Down Under! I'll try and bear up. Steve, welcome and trust me I've checked everything ten times.

The layout is in a small bedroom, but I lucky to have one wall sized closet for all my goodies, so no plastic storage boxes. The closet has the sliding mirrors for doors. I've been asked how I get the good lighting effects on the layout, well, sometimes I shine the lamp into the 'mirrored' wall and bounce the light. What ever works.

I figure the problem is the NCE PowerPanel as power goes in and none comes out?????????????? Jim
 
Toot, The tree came into the pier and was off loaded. Rumor has it that it came all the way from Australia! Jim :D
 
I'd watch out for Wood Borers if it came from Queensland:D
Must admit this is a wonderful layout and the scenery reminds me of our trip to Alaska in 2007 with all the Pine forests.
 
Hi Steve, Thank you for the compliments. Glad you liked Alaska. Nothing like it in Oz.

The trees on the PCM&T are a hybrid type. Using Caspia you are sort of automatically pushed toward an 'average' tree. When you went to Alaska you probably did not see any pine trees. The ones you saw were probably varieties of Spruces and Hemlocks. Pine trees grow around the world but only in a scrub variety in Alaska, and not many of them. Pines don't care for all the rain and do well in drier areas. Jim:)
 
Merry Christmas from the Pinnacle Creek Mining & Timber Co. Jim

13-09-04_070333_M=B_R=8_S=4.jpg
 
Last edited by a moderator:
Hope you had a fine Christmas and that you and your family have a great New Year Jim. And thank you for this thread it has been a journey of discovery full of help hints and some fantastic scenery, can only hope that I can achieve similar when I return home in the New Year.
 
New Year almost world wide now. Here's a photo best viewed in early morning sunrise. Something early to get the New Year going. Jim:)

caboose33.jpg
 
Last edited by a moderator:
Gang, With your help this thread has been around for one year now. I've tried to give information and answer questions that you may have had. It has been a great success. Again, if this thread is going to be of use to modelers down the road then we all have to come up with some ideas.

The well has pretty much run dry here as far as new ideas from me. You on the other hand can help in a number of ways: ask me questions; ask other members of the thread questions; be a contributor of work based upon something you may have learned in all these pages. That sort of thing. So I encourage you all to keep this thread alive.

We are closing in on 75,000 views. Contest coming soon. Thanks, Jim:)
 
Sorry I have not posted on your thread in a long time. Its all looking great. I just read through your super tree tutorial and was impressed on how they came out. The only thing that I would do is add snow. I love mountain railroading in the snow. But thats just me. :)
 
I feel like you do about keeping this thread alive. I have read and reread it several times. On my layout I am just entering the scenery faze and consult this site for technical information all the time. Let me ask you a question about the base ground cover. Everyone is a little different, so I am just experimenting with some new or not so new ideas. I’m making the base ground cover out of three different things. I am combining: Potting Soil, regular Dirt, and Sawdust. The potting soil is from a large bag of commercial potting soil, the dirt is from the back yard, and the sawdust is from a saw mill just down the road that cuts almost exclusively Eastern Red Cedar. All three are sifted through a wire strainer, and then mixed together in equal amounts. I brush on the board a mixture of equal parts wood glue and water. Sprinkle on the ground cover mixture and wait for it to dry. Then tomorrow I will put some diluted glue over the ground cover with a syringe or eye dropper, or maybe spray bottle. Then I will add some other type of ground turf. I believe as you that a layered effect can be more convincing. - Chris
 
Charles, I like snow, on my model railroads, to. Somethings I've discovered about snow scenes are: 1. Modelers should decide whether their snow scene is in the middle of deep winter, ei. all snow; 2. Whether their snow is early winter, ei. more on the trees than on the ground; or 3. late winter, ei. patches of snow on the ground and less on the trees.

Just 'dumping' your snow product is not enough. Unless the the module, diorama, or layout is completely buried in February snow provisions have to be made for areas below the snow line.

One thing I've done, even on the PCM&T layout, is try to portray elevation from one end of the layout to the other without actually going 'up' much. This is done by modeling fall or early spring at one end of the layout and subtly changing the color or amount of vegitation on the bushes or deciduous trees at the other end. Visitors actually notice that the colors are changing on my fall season layouts.

By changing colors, adding less or more springtime vegitation you also can create an addition illusion of depth to our layouts. For example trees on my layout are less detailed toward the back than near the fromt of the layout. I've gone so far as to make the 'middle' trees in between the front and back ones detail wise. Ultimately it is these small details, these extra steps, that make our layouts different from the guy's down the block. I beleive in "sweating the small stuff." Jim:)
 
Chris, I've never used chopped leaves, dirt, or that sort of 'live' thing. Not that it is wrong, but when I started the hobby in 2006 I lived on a sailboat. My first layout was built there. Dirt and Mother Nature's ingredients were not allowed on the boat.

If it doesn't come in a package I don't use it. I've always wanted to, but somehow never got around to it. Do you bake it to kill any critters? I think I read about that somewhere.

Naturally if something could not be store bought then trust me, I would be first in line digging and collecting to make my model as close as prototypical I could. We look forward to some photos. Jim:)
 
Yikes, over 75,000 now. So another contest is on the way. With the holidays and the quick number of views I'm not prepared. I will think something up quickly. Do we want the same type of photo difference contest or something else? Jim :D
 
Ok Jim, I’m taking your challenge to show some photos, I’ve never done this before.
My layout is HO, a rectangle of 4’x 11’6”. It is basically a simple dogbone with the track on both ends making the loop and all the other spur track instead of just ending at the particular scene, I have them dead ending through a tunnel of some kind, to give the allusion of more space. The scene scenario is a division into five different scenes or vignettes up front and a sixth scene in the back. The layout is set in Colorado around 1927, with a western town (the sixth scene) maybe 1890 to around 1920.

From Left to Right: the first scene is the town of Silverton with larger brick type buildings, the second scene will be more of a mining scene with a 10 stamp mill and larger silver/gold mine operation, the middle scene has a creek with pan mining and cabins and a small mine at the top, the fourth scene is the turntable, engine house, train station, coaling tower, the last or fifth section is another town but with smaller wooden buildings, and then the western town in the upper section in the back.
I’ll post more later - Chris
 
Jim, these are the middle section, the turn table section, the smaller town section, and the one in the back is the western town. The western town does have some ground cover down, but is darker because it is still wet - Chris
 
Chris, I like the idea of sidings disappearing to nowhere. Not used enough frankly. This layout seems to only be accessible from the front and not the back? No problem if you can make the 4' reach.

Some questions:
Is the layout beneath the brown color a foam of some kind?
Is the layout now ready for scenery?
I can't tell but are the water courses filled with water product? Jim:)
 
Jim thank you for your comments and your questions. To the layout accessibility: the layout framing is mounted on rollers, so if I need to clean track or there is a derailment behind the two dogbone mountain corners, I can wheel the layout out from the wall to access the back. Also because of the sloping ceiling and the fact of locomotive headroom or smoke stack clearance the back loop track radius was moved forward to allow for that. After your question, I did measure and from the front of the layout to the middle of the western town scene is 3 feet. So it is manageable.

The framing of the layout is fairly typical, except for the fact that I do have a 4’x11’6” wooden shelf (the same size as the upper modeled section) for storage, that sets right above the wheels. But setting on the 1”x4” framing is a sheet of polyurethane that is 3 ½” thick. That stuff is so strong that I can stand on top it, and it doesn’t move. I used the foam for the added feature of carving the streams instead of having to cut into a sheet of plywood framing.

Is the layout now ready for scenery? I think so. But like I did in the first or Silverton scene, I would like to elevate or arrange the western town and the smaller town on the other end with some sort of a (Malcolm Furlow) type of raised building effect or something to make the scene a little different.

The water streams do not have the water product in them as of yet. But that does bring up a question that I was going to ask. At our local material outlet store, and also trying to find something that would save some money, I found a product by Tile Lab, called Gloss Sealer & Finish. This is supposed to leave a high-gloss finish, and the best thing about it was the fact it only cost $4.00 for a gallon. It is recommended for use on tile, flagstone, or slate, but it might work!


Back
Top