ModelRailroadForums.com is a free
Model Railroad Discussion Forum and
photo gallery. We cover all scales and sizes of model railroads. Online since 2002, it's one of the oldest and largest model railroad forums on the web. Whether you're a master model railroader or just getting started, you'll find something of interest here.
Chris wants more hobby time!!!
Need some rolling stock trucks and couplers advice please…. Replaced wheels with 33” metal, already tell the difference. But my new couplers don’t fit the truck’s pin in the gear box, pin is tiny, coupler hole is big. Is there an adapter piece that solves this? Or because gearbox is part of the truck I need to replace trucks to update them? I don’t think I have come across any couplers that would fit on the tiny pin, is my stock that outdated? Been looking at parts, so many options I get confused, guess I ain’t all that bright lol Hmph, I still got a lot to learn…
Chris wants more hobby time!!!
Looks like I need to get body mounted gearboxes, cut off gearbox from trucks…. Evidently means I got some cheap rolling stock, but less expensive doing this than buying new for now…. If I am making a mistake please let me know lol
When I upgrade a car from the older train sets, I cut the coupler box off the truck and use Kadee coupler boxes and body mount them. This sometimes requires some shimming. If you're not up to doing that yet, the Kadee 20 series couplers can be installed in truck-mounted boxes and they have a small washer to go over the pin. Check out the Kadee web site and these two pages in particular.
Coupler list
Coupler conversion list
Just saw your new post. Yes the stuff is cheap, but it is salvageable. I have over 800 freight cars and at least a dozen are "cheapo's" that I have converted both ways. Mostly by mounting a box on the body. Note that the boxes are mainly available in the "two pair" sets, not in bulk packs.
Chris wants more hobby time!!!
Seems the opinion is body mount looks more realistic and offers better train operation, gonna do that. Got a few dozen freight cars, but only enough wheel sets to do 25, so I will start with that, gives me something to test track with at least…. As always, your replies are appreciated

Here's an example of one that I did.
Chris wants more hobby time!!!
Bench work started finally!!!
View attachment 134672Bench work started finally!!!
Looking good. That benchwork looks so solid that it ought to be able to support an elephant!
Chris wants more hobby time!!!
lol Old owner of the house left a bunch of lumber in the attic, half inch sheets of plywood and all kinds of 2x6 and 2x4s…. Yes, will be a well supported model
Truck Mounted Couplers
You may want to avoid these, or realize you need to convert them to body mounts. The flaws will really show up when you try to back-up these truck mounted couplers (particularly on long cars).
But hey the price can be good on these used cars,..just have to learn to modify them....its a learning process...this model railroading....ha...ha (I'm still learning after 10 years re-entering the hobby,...really starting anew as I only had a few trains when i was a kid)
Chris wants more hobby time!!!
Anybody else here do a bridge gate for entrance to the interior of the model? Got some ideas, did some research of course, but hearing from others the do’s and don’ts might help me in final install…. Was kinda thinking long truss bridge over a valley would look kinda cool, but will take some serious planning….
Chris wants more hobby time!!!
Is it better to do backdrop before laying track? Anxious to start laying track but don’t want to make something harder than it has to be…
If you're just going to lay track, then it doesn't really matter much. If you are adding structures and trees, then it's better to do the backdrop first. I laid track first to get something running.
Anybody else here do a bridge gate for entrance to the interior of the model? Got some ideas, did some research of course, but hearing from others the do’s and don’ts might help me in final install…. Was kinda thinking long truss bridge over a valley would look kinda cool, but will take some serious planning….
Chris:
I have a "U" shaped bench that I use a lift off bridges to complete my 2 oval loops, that way I don't have to duck under to get to the inside of my layout. I'll try to get some pictures in the next couple of days.
Chris wants more hobby time!!!
Willie - Really want to start some track so guess I will do that and consider my backdrop as I imagine my scenery….
Think I can model the bridge below as an entrance point, think it can work?
-
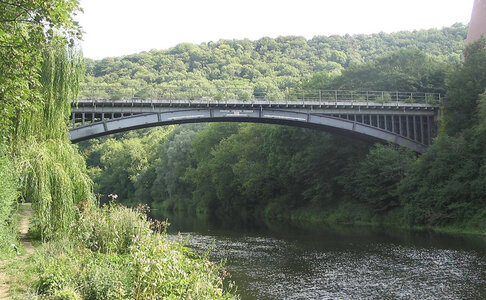
E75401CA-AC5F-491E-96A8-514B481BE94C.jpeg
597.3 KB
· Views: 195
Chris wants more hobby time!!!
Might be able to finish up bench work tonight, get it cleaned up tomorrow and post some pics in a new thread for track laying project…
Chris wants more hobby time!!!
Did get finished with bench work (exception of gate or lift out section), but a little late to get presentable for pics, major clean up tomorrow evening
Chris:
Here are pictures of my setup: (Sorry for the fat finger in the first picture. It's only hiding the tv I watch while working on the layout.)
The opening:
Closer look:
Bridges in place:
Bridge detail:
Bridge connected:
I simply slide the joint connectors on the tracks to make the electrical and alignment connections on the lift offs. I've not yet had any issues with this working. At least that's how I engineered it. The pink gap in the bottom is the actual edge where the bridge and benchwork meet. Track on the bridge overhangs onto the benchwork.
The bridges fit into "shelf" locks on both ends. I overdid this bridge as it's a 2"x4" attached to a 1"x4". The other bridge is a 1"x4" with the 2" foam that the track is attached to. You see a glimpse of it in the 3rd photo.
I caught this design at a train show where a club had a hinged bridge and connected it by sliding the connectors in a similar fashion.
Chris wants more hobby time!!!
Looks like a good connection to stable track, not a noticeable gap…. Been considering the lift out or the gate, thinking gate is my option…. Thanks for the pics, does give me some ideas should I do the bridge lift out idea
Hi Chris, looks like the layout is coming along nicely. I thought I'd give you my experience with a lift-out. I wanted to come up with something relatively fast so I could get trains running. I took two pieces of plywood & made a T with them and then laid three plate girder bridges across it to keep any derailments off the floor. I didn't want to use rail joiners for power so I used a couple of stereo plugs (or what ever they are called,) to power the lift-out and enough track on both sides of the lift-out so when the lift-out is removed, there is enough dead track on both sides to prevent a train from making the plunge into the abyss. (probably a little over cautious, but that's just me....

.) The wiring goes up through the plywood, soldered to the track.
Here is the lift-out installed, power plugs hanging down. The lift-out rests on two posts on each end, with the holes in the facia were they attach, enlarged to allow for adjustment. I was surprised on how far out of alignment the lift-out could be and trains would still make over it. Anyway, the biggest draw back to this assembly is expansion, (not so much contraction.) The room is fully insulated & heated, but with the lift-out being wood and the bench work were it is attached being wood, there is still expansion enough to cause issues. You can see in the top pic the bare wood were I had to sand the end to make it fit. Maybe if I hadn't made the top T piece so long......ahhh, the learning curve

Chris wants more hobby time!!!
Wish these Victoria Secret ads would quit popping up, distracts me for a moment or two… Another great idea, thanks


Affiliate Disclosure: We may receive a commision from some of the links and ads shown on this website
(Learn More Here)
