You are using an out of date browser. It may not display this or other websites correctly.
You should upgrade or use an alternative browser.
You should upgrade or use an alternative browser.
A new beginning inspired from my old Central Midland Layout
- Thread starter Ericsauto
- Start date
logandsawman
Well-Known Member
Hi
I really like your numerous scenes throughout the layout. However, I am not a fan of your new drive in movie.
I used to go to these, and the parking lot is in the correct place. There would be rows of cars viewing the screen, with little posts that had the speakers (connected to the post with a long phone cord) on them, you would hang the speaker somewhere in your car.
They would landscape the parking area so the cars were tipped up in front so you wouldn't get a sore neck. You were supposed to make out during the movie, however as a teenager most of us did not have girlfriends back in 1970. Just the really cool kids.
The bottom of the screen was about 10 feet high of lattice, with whatever beams supported it, with the screen a big painted piece of plywood I think. There was a projector building. There was seating in there for the younger siblings that got kicked out of the car.
Nice layout
Dave
Ericsauto
Well-Known Member
Not really going to use all of that forward pavement for the drive -in . I can move the screen back maybe another inch but the further I move it back the bigger the picture gets and will go off the screen and not look realistic. Again Just a rough-in right now. ThanksWhy all the “pavement” behind the screen? Think it would be forward more towards the enter/exit road to allow more room for cars, bigger profit for the theaterVery cool scene!
")
Ericsauto
Well-Known Member
That is a funny . I remember these. I already have the speaker posts and plans for the humps that lift the cars up. I actually modeled this out of a Drive -In screen I saw in Missouri on route 66 . ( See Picture) I just changed mine a bit. We actually have a Drive-in still in operation here in Hamilton, Ohio. The Drive -In is my wife's idea , soooooooo ..Hi
I really like your numerous scenes throughout the layout. However, I am not a fan of your new drive in movie.
I used to go to these, and the parking lot is in the correct place. There would be rows of cars viewing the screen, with little posts that had the speakers (connected to the post with a long phone cord) on them, you would hang the speaker somewhere in your car.
They would landscape the parking area so the cars were tipped up in front so you wouldn't get a sore neck. You were supposed to make out during the movie, however as a teenager most of us did not have girlfriends back in 1970. Just the really cool kids.
The bottom of the screen was about 10 feet high of lattice, with whatever beams supported it, with the screen a big painted piece of plywood I think. There was a projector building. There was seating in there for the younger siblings that got kicked out of the car.
Nice layout
Dave
( You understand now, I believe) BigGRacing
Aka. Gary Russell
I went with buddies and they never let me out of the trunk.....lolI am not a fan of your new drive in movie
just kidding
ShermanHill
Well-Known Member
Replace the screen with an LCD display....or not. Just kicking ideas.I can move the screen back maybe another inch but the further I move it back the bigger the picture gets and will go off the screen and not look realistic.
Ericsauto
Well-Known Member
I've tried that but to me it does not give a "real" effect. The projector looks like the old days where the clarity was not as good as what you see on tv today. I have a 10 minute "Intermission" loop from the old days that I play every once in a while. It's a cool effect.Replace the screen with an LCD display....or not. Just kicking ideas.
Topherisme
Chris wants more hobby time!!!
Excellent point at keeping with realism
Ericsauto
Well-Known Member
Hey all. I started this layout in 2015 when I first moved into my new house. It has been 6 years in the making. The first 3 years I was full speed, The ones that have followed from the beginning know this. Then so much in life over the past 3 years. Lost my brother, sold my business, had twin grand daughters, ran for City Council, and lost my Dad. Covid really didn't get in the way as much as these items did. I had quite a few of you following and I haven't done much with the layout. I just cannot get motivated and today I think I figured out why. When I was building this layout, I keep everything in order and picked up after every work session.Well with everything over the past 3 years I quit doing that every time. So every time I tried to get started , I quit because I was always looking at the mess that needed to be cleaned up. I have been cleaning today for about 4 hours. I have a few hours left but I can't believe the difference it made. I used one of the Micro Mart mini vacuum attachment set which I have had, unopened , for the past 4 years. This thing works great. I have cleaned every inch of this layout. Tracks , landscape buildings, etc. All those little white plaster fragments are all gone. I am now organized again and I may even finish spraying the rest of my track tonight. I will start the ballast right after that. I'm also writing down a check list of the projects that need to be done and in the order they need to be done.
Moral of this story: Keep it clean and so the dirt doesn't overwhelm you.
You guys have been great and you deserve to see progress on this. I'm going to try to go at it strong in the next few weekends. Hopefully you will see some great progress.


Moral of this story: Keep it clean and so the dirt doesn't overwhelm you.
You guys have been great and you deserve to see progress on this. I'm going to try to go at it strong in the next few weekends. Hopefully you will see some great progress.
KB02
Well-Known Member
I'm kind of right there with you. Lost some of the passion, got annoyed with constant problems that shouldn't have been problems, had to walk away for a while. Now I'm feeling the love again and finding energy to re-invest in the layout.
Now I just need to find some money to invest into it.
I've always loved your gondola!
Now I just need to find some money to invest into it.
I've always loved your gondola!
Ericsauto
Well-Known Member
Thank you .I love the detail in your layout. You have so many components, and a ton of room. Your rock work is awesome.
Ericsauto
Well-Known Member
Ok here are the pictures after I cleaned the whole layout. Took me about 6 hours . I had tools , glue, scenery stuff, everything all over it. I got everything put away, I got so motivated that I just finished spraying the rest of my track. I only had about 1/2 of it done, now it is all done!
Makes a big difference. Now I am going to ballast the rest of the track before I do anything else. One thing at a time. Do yourself a favor and take a day to organize your workbench and layout.


Makes a big difference. Now I am going to ballast the rest of the track before I do anything else. One thing at a time. Do yourself a favor and take a day to organize your workbench and layout.
Ericsauto
Well-Known Member
Woodland Scenics rock molds, chucks of 2" foam I would carve, cardboard and newspaper. I found bulk plaster rolls on Amazon that was easy to work with. https://www.amazon.com/gp/product/B0796QGVCR/ref=ppx_yo_dt_b_search_asin_title?ie=UTF8&psc=1Awesome. What is your process for making your rock formations. I have completely avoided any rock work on my layout. But would like to have some rock faces on some horizontal surfaces protruding from my hills and mountains.
Saved me some money too. Watch the woodland scenics videos on YOUTUBE, they do a great job of explaining how to do it and you can't beat their paint products. I also dry brushed a lot of colors for high lights. There are videos on Model Railroader site that you can find for dry brushing technics.
gjohnston
Slow Learner
Thanks. I will check out the videos.Woodland Scenics rock molds, chucks of 2" foam I would carve, cardboard and newspaper. I found bulk plaster rolls on Amazon that was easy to work with. https://www.amazon.com/gp/product/B0796QGVCR/ref=ppx_yo_dt_b_search_asin_title?ie=UTF8&psc=1
Saved me some money too. Watch the woodland scenics videos on YOUTUBE, they do a great job of explaining how to do it and you can't beat their paint products. I also dry brushed a lot of colors for high lights. There are videos on Model Railroader site that you can find for dry brushing technics.
Ericsauto
Well-Known Member
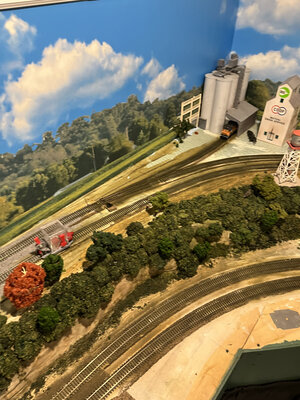
As I said in the above post " I'm going to Ballast before I do anything else. " Well that is what I am doing over the next few days. I have a heck of a lot of track left to be done. I worked for about 3 hours tonight and got a lot done. This will complete some of the major things I wanted to complete. After I get this done I will move onto the Drive -in and finish that. Then onto my downtown area. Once I get those done then I can get to detailing, one of my favorite part of this hobby.


Attachments