
You are using an out of date browser. It may not display this or other websites correctly.
You should upgrade or use an alternative browser.
You should upgrade or use an alternative browser.
A beginner's layout
- Thread starter PMW
- Start date
Smudge617
Well-Known Member
I've ordered this INOX he talks about, not cheap either, £25 for 300ml, but if it works, I'll be happyNot sure how far you've progressed with the track cleaning car idea - I purchased a CMX tank car track cleaner and found it very good to run over the track occasionally. The best advice I ever got regarding tack cleaning was via a YouTube post by Gregg of Fishplate Films - link attached
First word of advice - don't use any abrasive track rubbers or scourers if you can possibly find another way to clean stubborn spots - they destroy the smooth surface of the rail and lead to more track contamination than you started with. I have also abandoned Isopropyl alcohol where possible except to clean some stubborn wheels. I follow Greggs' advise and use a product called INOX which cleans the track and helps prevent oxidisation of the cleaned rail. Things have never run better or for longer between track cleaning sessions. There are numerous other YouTube videos from other modellers who have fully endorsed Greggs findings. Hope this helps
Well I am far from wealthy but I've always thought spending more the first time to do it right is usually the more affordable way to go. When you start using it please chime in. Anyone else have experience with this product?I've ordered this INOX he talks about, not cheap either, £25 for 300ml, but if it works, I'll be happy
Just a planner but doing some investigation now. Your doing great work. But why are there large gaps between your track sections? I’m going with Nce power cab. Is there a reference where I can get all the ar1 and other part names and numbers. All the abbreviations are too much for me!!! Thanks Frank
Have a look at Larry Puckett the DCC Guy on YouTube - he has also had some good things to say about INOX. My own layout is located in a garage, adjacent to a rolladoor in an Australian inland country town that has plenty of dust floating around. I nearly always operate the layout with the rolladoor open so it's very open to the elements. With Isopropyl alcohol, I used to clean the track every two days and even then it was very hit and miss with smooth operating. With the INOX, I give a full track clean every 3 months, and may need to touch up one little spot every couple of weeks.
Operation is as smooth as silk and I like to run my trains in the yard at scale speeds of 10mph or slower and none of my locomotives have keep alives installed.
Operation is as smooth as silk and I like to run my trains in the yard at scale speeds of 10mph or slower and none of my locomotives have keep alives installed.
Hi Frank. I’m not sure what you mean by large gaps between track sections. If you are seeing spaces between the rails I where they join it’s either because I suck or the track isn’t glued down yet and will be fixed before it is. If you’re referring to the space between track centerlines I am pretty close to NMRA (National Model Railroad Association) recommendations. If I had to do over again some track centerlines would be a little father apart.Just a planner but doing some investigation now. Your doing great work. But why are there large gaps between your track sections? I’m going with Nce power cab. Is there a reference where I can get all the ar1 and other part names and numbers. All the abbreviations are too much for me!!! Thanks Frank
A few years ago I was brand-new to DCC also. There’s definitely a learning curve involved and it just takes time. This forum is a great place to ask your questions, I’ve received a lot of help in that respect among others and I’m sure you will too.
By the way, I also started with the NCE power cab and have since expanded that system a little so I might be able to offer some help when it comes to that.
Just found this thread. Glad to hear you are home from surgery and recovering. I love the layout so far. Looks great. Keep up the great work.
Thanks VT. I found your thread too. Looks like our projects are about the same size but I stuck with HO. I know I could do more with N but I've had enough trouble with track and structures in HO so I probably made the right decision for me
") .
.Judging from your track plan alone it appears you have more experience than I do and I'm looking forward to your progress! I'll be checking in over there to follow your layout.
Paul
VTRailway
Active Member
I don't think I have more experience. I do a fair bit of research between forums and YouTube. The biggest thing I've learned about track work is patience. I built the N scale Atlas plan's scenic and relaxed. I knew this was not going to be the layout I wanted in the end but it allowed me to learn grades, turnouts, wiring, and smooth track joints. I used exclusively flex track. The brand was atlas. Not sure what the differences are to be honest between brands. The biggest things I found for smooth joints were these. Stagger the rail joints. Get the track nearly perfect in the final position with the next piece using T pins. Cut three ties off each joint. Slide the joiners onto each rail. Use a track setta template gauge. Keeps everything perfect. Make sure the rails are aligned vertically and butt to butt. Then LIGHTLY solder the rail joiners on the outside. Once cool you have basically welded the two sections together creating a smooth reliable joint. Once this is done you can then lay the track back where it was and move onto the next section. I trimmed the slip plates on the removed ties and glued back into place with a light drip of CA. Once painted and weathered you'd hardly know there was a joint there at all. Finally take a micro file and very lightly lay any bumps in the transition down so they are perfectly smooth. Burnish the top of the rail with the smooth side of a steel washer with track power off. Clean and you're ready to run. Yes it sounds like a lot of steps but if you break each one down and think why you're doing it, they all make sense and go pretty quickly.
The curves on my scenic and relaxed are tight at 9 3/4 but I can run 50' cars in any direction pushing or pulling without any derailments. I do have a car or two that needs some tuning as I have found one or two that give occasional problems. Overall I can turn it on and walk away for hours. I come back and the train is still on the track running.
Biggest thing people lack in any skill or trade is confidence to achieve their goals. Believe you can do it and you will. Your going to run into issues but having confidence to solve them will get you through the hard times.
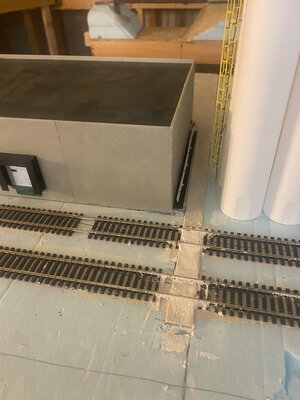
Thanks, VT. Advise is always welcome! Believe it or not my equipment runs reliably even on my track work but it's very good advise just the same. That one joint caught in that photo is the worst one on the layout and one day I'll probably get around to doing something with it .
You're right about confidence. I find diving into what intimidates me is the best thing. You can only plan so long before you have to do it. Most of my efforts are turning out well enough for me and I enjoy my layout so far.
Looking forward to following your build too!
Paul
.You're right about confidence. I find diving into what intimidates me is the best thing. You can only plan so long before you have to do it. Most of my efforts are turning out well enough for me and I enjoy my layout so far.
Looking forward to following your build too!
Paul
Amen to that. Also good work lighting and magnifier if need be. Knowing when to quit and leave it for tomorrow, too.The biggest thing I've learned about track work is patience
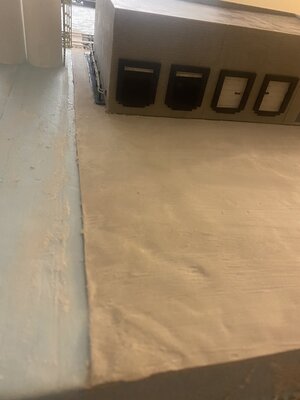
At least 2 more weeks before I go back to work but feeling better so I went to the "train store" and picked up a "WS Learning Kit" for roads It was enough to get this scene started. It's my first attempt at pavement. After the first day I think I can make it turn out pretty well. Tomorrow I'll sand, tweak, clean and hopefully paint.
Again, my first attempt at pavement so any advise is welcome! Thanks for reading
Paul
Again, my first attempt at pavement so any advise is welcome! Thanks for reading
Paul
Attachments
Wanted to get this painted today but the "Asphalt Top Coat" paint that came with the kit is junk. Completely hard. Who knows how long it was sitting on the shelf.
Looks like black paint to me, maybe a touch of grey mixed in? I have those colors and plenty of others in acrylic paints. Before I mixed something up I thought I'd ask for suggestions. How do you all paint an asphalt parking lot?
Thanks
Paul
Looks like black paint to me, maybe a touch of grey mixed in? I have those colors and plenty of others in acrylic paints. Before I mixed something up I thought I'd ask for suggestions. How do you all paint an asphalt parking lot?
Thanks
Paul
santafewillie
Same Ol' Buzzard
It all depends on the size. Larger ones get a coat of paint from a rattle can of Krylon Black Primer, followed by a very light spraying of Krylon Gray Primer. Smaller areas get a brush coat of Polly Scale Grimy Black. This is when I paint directly on the plywood benchwork. Other close to the aisle ones are made with pieces of tarpaper glued to the plywood. It fades rapidly under the lights before stabilizing to a light gray.
Thanks, Willie. I got board and just went for it before I saw your post. Ended up using a mix of more gray than black. I'll upload pics of this scene as it develops...
Some tracks there are ready for ballast. I think I'd like to paint the ties and rails with WS paint markers first. WS video shows painting inside and outside of rails. Locos pick up electricity from the top of the rails and where the wheels contact the inside rail I believe. Will painting the inside rail reduce conductivity? Will not painting the inside rail look terrible?
Any thoughts?
Paul
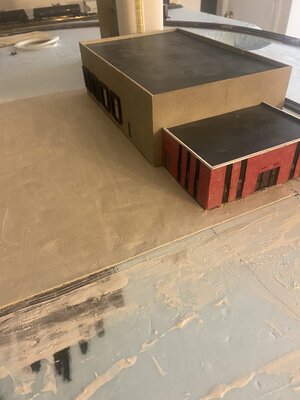
Here's the scene so far. As a beginner I usually try to learn some techniques before I start but there's no substitute for experience. I don't expect to get a call from MR mag. asking to feature my layout in an upcoming issue but it is fun to make the blue foam go away and bring the layout to life!
I'd like to paint the track and ballast tomorrow but not sure how to proceed (see post #78)
Thanks
Paul


I'd like to paint the track and ballast tomorrow but not sure how to proceed (see post #78)
Thanks
Paul
Smudge617
Well-Known Member
Here's the scene so far. As a beginner I usually try to learn some techniques before I start but there's no substitute for experience. I don't expect to get a call from MR mag. asking to feature my layout in an upcoming issue but it is fun to make the blue foam go away and bring the layout to life!
I'd like to paint the track and ballast tomorrow but not sure how to proceed (see post #78)
Thanks
Paul
View attachment 142170View attachment 142171View attachment 142172
Looks good so far, might want to hold off on the ballasting till you've laid a bit more track, and your totally happy. Have you run a train on it yet?
