Weathering Rolling Stock, a Continous thread

ModelRailroadForums.com is a free Model Railroad Discussion Forum and photo gallery. We cover all scales and sizes of model railroads. Online since 2002, it's one of the oldest and largest model railroad forums on the web. Whether you're a master model railroader or just getting started, you'll find something of interest here.


Status
Not open for further replies.
I second that....and I'm the least of the lesser mortals :)
If you go back to the start TomO's weathering thread he's kindly explained his process and how he gets various weathering effects, I copied and printed them all out and they sit next to my paint box so I have a readily available "bible" to work from.

And there is no reason you can't do this, if this idiot (me) can get half-decent results no reason you can't do the same, probably far better.


Very nice job, you'll also have to show us through your process next time so us lesser mortals can learn. 😀
I think I might have mentioned something when I first started posting here recently. The easiest and really good looking weathering job is with a wash of either of two oil artists tube type paints , just a small amount pressed in a small bottle like the kind you would buy your normal modeling paint in or if you don't have an empty bottle the the size of a whiskey glass would do. Fill the rest of the way with Mineral Spirits and you have your wash. Brush it on and immediately brush it back off. You won't remove all the wash because the oil will set in no matter what. From there you can determine if you need to do it again or not. The wash will also settle in crevices and give a nice detailed look. Anyway that's the easiest way, from there it's all about using an airbrush. :)
 
I think I might have mentioned something when I first started posting here recently. The easiest and really good looking weathering job is with a wash of either of two oil artists tube type paints , just a small amount pressed in a small bottle like the kind you would buy your normal modeling paint in or if you don't have an empty bottle the the size of a whiskey glass would do. Fill the rest of the way with Mineral Spirits and you have your wash. Brush it on and immediately brush it back off. You won't remove all the wash because the oil will set in no matter what. From there you can determine if you need to do it again or not. The wash will also settle in crevices and give a nice detailed look. Anyway that's the easiest way, from there it's all about using an airbrush. :)
Yes thanks for talking about the oil wash method. Lots of different ways that we all weather.

The original idea with this thread was to show our models, describe the way and the products used to weathered them and discuss them. Constructive criticism is #1 on this thread and very much encouraged. We don’t mind if you don’t like something just tell us why and how to correct it.

I think that philosophy has held up well.

The thing about weathering methods is if you personally don’t like the effect you created it is fairly easy to remove it and start over. The other thing is we all evolve, many of my methods have changed from ideas and discussions here on this Continuous weathering thread (TomO) and the one on CambriaArea51’s (Tom) Locomotive thread . Alan’s (espeefan) thread on passenger cars has been very helpful with ideas and I know has helped me fix some decal issues. Alan is an airbrush guru.

But we need involved readers. Show your weathered models and discuss them as you did with oil washes. Thanks for being here…
 
Rolling stock, not so much any more…
iu.jpeg

reference
IMG_9846.jpeg

bought model obviously used the reference photo too
i found it by accident
IMG_9852.jpeg

some colour and I want a view through the windows so drew sone ‘distant’ bushes
IMG_3259.jpeg

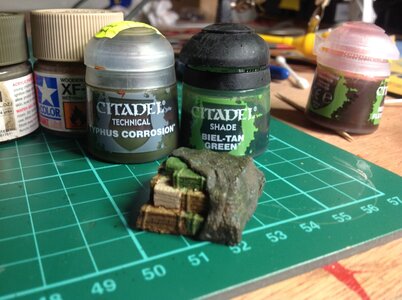
I used warhammer paints at the dirty colours work
glue added
IMG_3260.jpeg

texture added
IMG_4724.jpeg

not quite on topic, but in the ballpark if you squint hard
in a vw graveyard


added to a safari area the train passes
IMG_9864.jpeg


…strolls off check over shoulder in case Tom‘s hand appears and slaps me :) ….nope all clear whistles off key…..
 
Rolling stock, not so much any more…
View attachment 181517
reference
View attachment 181523
bought model obviously used the reference photo too
i found it by accident
View attachment 181521
some colour and I want a view through the windows so drew sone ‘distant’ bushes
View attachment 181520
I used warhammer paints at the dirty colours work
glue added
View attachment 181519
texture added
View attachment 181518
not quite on topic, but in the ballpark if you squint hard
in a vw graveyard


added to a safari area the train passesView attachment 181530


…strolls off check over shoulder in case Tom‘s hand appears and slaps me :) ….nope all clear whistles off key…..
Have we EVER worried about YOU steering off course?

What are you using for texture? What type of glue are u using?
Love the elephants and that motor vehicle is way to clean for your modeling.
 
A surprise arrival!!! A client did not inform me he was drop shipping these to me direct from Scaletrains. The reefers are starting to arrive. Scaletrains ships free if you spend more then $100 and per the packing slip shows these were $153. The cars I ordered should be here this Thursday per the ST email received.
IMG_4387.jpeg
IMG_4386.jpeg
IMG_4385.jpeg


One is sound equipped and barely rolls. The non sound car rolls with barely a touch. So 1st thing Monday is to get the Sound car rolling. Checking reviews online this evening, many others are experiencing this issue. IMO, Terrible QC!

These will be cleaned and a clear matte finish applied. These are a very bright white car, the matte finish will kill the sheen. The trucks and wheels will also be removed for cleaning and weathering. The couplers will be tossed and replaced. If you check YouTube for videos on reefer cars passing in trains even 5+ years after these cars have been on the rails they are still fairly clean. So some end panel kick up spray and some grime along the bottom frame of the car. But LOTS of graffiti and that’s what these and the others coming will get…

I will show the non sound car as I progress.
 
No no no look carefully my friend, there is dust, REAL dust on the roof grins.

I did this a while ago so ….A CITADEL (Warhammer) paint pot is in the picture typhus and I know I used several greens inc goblin green (laughs to self as I know you won’t have this lol) I love Citadel they have a section called technical that do ‘tricks’ I’ll look anyway paint aside
birch seeds, out on your trees right now free, you can colour soak them or use straight from the tree, crush sone use some
IMG_6023.jpeg

whole added the vw for clarification then other leaf effects
Wood Green grass is cheap and basic but first layer on top of paint, the finer foam stuff is more expensive and you can rub it between your fingers making it finer and clumpier would look good on abandoned wagons,

IMG_3259.jpeg


the glue is usually a type I can rub off if I over egg it (shhhh stop laughing)
I blacked the windows for depth, then choice a height for the sky behind and added blue/white/dirt then drew in a few branches maybe paint maybe sharpie
IMG_0397.jpeg

the rust is from a kit on the vw, it is a chemical process and uses iron filings so real rust
IMG_5643.jpeg

I often add a dull rust finish
IMG_1662.jpeg
IMG_1257.jpeg

I am not above using a water effect (glue) and cleaning with real water for best shine before taking a picture
IMG_4785.jpeg

oooh the deluxe rust
IMG_5667.jpeg

and having an example a painted alternative trick is finding the colour, I like a dark brown and a orange brown for rust and an oil slick paint for dirt and oil
IMG_6798.jpeg

IMG_8019.jpeg

a couple of brands for you to investigate, and my often discussed dirty water pot far left, I leave it until the water starts to stink literally because cleaning my brushes in it it makes it perfect for a dull dirty finish
…as more comes to mind I’ll do an update…hope it gives you ideas. :D
 
Ah technical paints and layers also in the range, the liquid green stuff is NOT a colour it is a texture I added hat and shoulder band he became a thunderbird character
IMG_2168.jpeg

IMG_7373.jpeg

that crellan earth dries cracked! Excellent kit
IMG_0512.jpeg

the Tamiya one is more powdery but has its own uses
IMG_0387.jpeg

the oxide turquoise dries ready rusted!
IMG_2365.jpeg

a couple of aged greens, yellow highlights
 

Attachments

  • IMG_8431.jpeg
    IMG_8431.jpeg
    385 KB · Views: 156


Mike asked a question about switching couplers on the STX reefers. There is a lot of plumbing on top of the coupler box
IMG_4396.jpeg

I used a flat head (tiny) to slip between the coupler box cover and the plumbing and pried VERY VERY gently. It’s a press fit so it does come off the cover but is still attached elsewhere on the car
IMG_4398.jpeg


One down, 3 more to go, JUST BE GENTLE
IMG_4400.jpeg


These are the only 2 tools needed
 
One side on 2 cars have graffiti and some tagging. Going slower then I had anticipated but I’m retired, so there’s no rush and if I had not reinjured my knee I’d still be on vacation golfing out west!

I am waiting for approval from the client. Last night he asked for tags on 793311 where originally he did not want any. If this was my car they both would get about 10 tags each, but…
IMG_4405.jpeg


IMG_4416.jpeg


A light weathering to come for both with 793302 getting some rusting streaks to hopefully match the prototype
IMG_4389.jpeg

793302 is credited to Donnie Lee and can be located at RailcarPhotos.com


The other side of both cars with be lightly weathered with no graffiti or tags
IMG_4392.jpeg

Photo credit to Robert Ulberg and can be located at RRpicture archives.net


Status
Not open for further replies.


Affiliate Disclosure: We may receive a commision from some of the links and ads shown on this website (Learn More Here)

Back
Top