
CambriaArea51
Well-Known Member
4 bulkhead ST flatcars will be weathered in the next few days. First I have to tape over the patch work that some of these have so they end up lighter than the rest of the car.
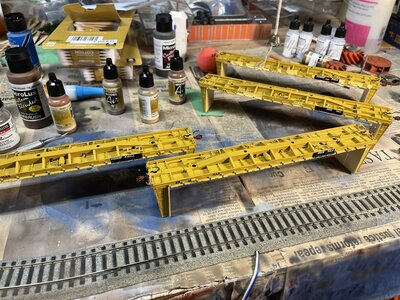


Tom are you spraying the wheel sets?The grimy black is drying and so the underside is done. Next the deck.View attachment 175795View attachment 175796
Yes all phases were airbrushed.Tom are you spraying the wheel sets?
Thought so the wheels and trucks look superYes all phases were airbrushed.
Send me a messageExactrail Evolution Combo Box Car.
I've got these on pre-order, I wonder if Tom fancies a commission?
View attachment 175797
Thank you. Try to do different methods, I'm liking this way a lot.Thought so the wheels and trucks look super


Those cars are great.“Uh-uh! I know what you’re thinkin’…’Did he weather a hundred hoppers or only twenty-five?’ Well to tell you the truth, in all the excitement, I kinda lost track myself. But being this is an internet forum that at this range could bore your head clean off, you gotta ask yourself one question: ‘Does this Manny clown know or do anything else?’ Well does he, folks?”
Well, I weathered my first car this past February, and quickly acquired an affinity for weathering wood boxcars, and branched out from there, eventually coming to grips with steel hoppers that are the lifeblood of my C&O Railroad in the West Virginia mountains. I’ve shifted my focus to the layout now, but I have taken some time to select some early cars for some upgrading/rework, and I have a couple to show now for it.
My biggest early problem was not having a really viable shading method - I ran quickly into a dead end using BoomerDiorama’s direct X-21 method, and all I really had was white/light gray pastel chalks, and hand-brushing on thinned white acrylic washes. Some successes with both, but not the general utility I wanted.
Now with an airbrush, and with approaches learned here, (Thanks again @TLOC ) I have more tools in my toolbox to work with. Without further ado:
The as-received condition of a Union Pacific wood box car, this one done in April:
View attachment 175826
Well, as close to as-received as possible, it’s got the base Dullcote on it. Not anticipating posting about it, I have no other in-process shots of it.
Both cars in this post had a exceptionally dark brown starting color for wood box cars.
Below is the original finished product, a bit of white Master’s Touch pastel for paint bleed/runoff down fron the Union Pacific lettering to the left of the door, and some sreaking with both lighter and darker brown to streak the car along the plank lines. Some dark gray/brown mixes on the roof to simulate some steam era grime:
View attachment 175828
And that’s how it stayed for over six months. I generally liked it but was perturbed by the absence of a good fade method for it.
So, here it is today: Airbrushed with Tamiya flat wthite thinned 6:1 with 99% isopropyl alcohol and some X-21 added., directly over the prior weathering, a little touchup with darker chalking to mask where I was a bit heavy with the fade coat. I also reinforced the soot & grime on the roof with more dark gray pastels.
It faded nicely, but still permitted my original chalk work details to show through (although I did touch up the grime around the hand grabs & ladders).
Final sealing on the update was with Vallejo matte varnish, airbrushed:
View attachment 175829
The other was this New York Central old-fashioned box car. I wanted particularly this one to be faded well - it is slated to run behind a 2-6-6-2 or a Shay, in the company of hoppers or flatcars running up the branch line & switchbacks ferrying tools & supplies to the coal mine or timber camp up the mountain. So, this was supposed to be a faded, well-worn piece, with a sooty and grubby roof.
(The NYC had access to the WV coal field via the Kanawha & Michigan, which the NYC owned, and interaction with the C&O about two miles from the extent of my layout.)
As originally finished:
View attachment 175830
Used the same process as described above for the Union Pacific car to improve this one (This is the other side of this car:
View attachment 175831
I also went darker on the weathering of the trucks on both cars, and the turnbuckles on the NYC car. I might walk back about half the color change on those elements.
Apart from that, I feel pleased with the improvements wrought
I like spraying the wheel set faces plus the backside and trucks. What I don’t enjoy when I airbrush is cleaning off the pointy end of the axle. I can clean the wheel threads easier than the point of the axle.Thank you. Try to do different methods, I'm liking this way a lot.
It’s fun and frustrating at times, isn‘t It?Nice work….and I like the Dirty Harry prologue…!
The weathering kinda grows on you…a little…a lot…you are the boss…
I used to build armour kits where dirt was pretty much de rigueur…
Weathering for me is a modelling extension that works as now I find kit building a vision challenge and hands are no longer what were years back…
Today in an empty XF-80A container I mixed up a jar of Tamiya Flat White and kept testing the dilution with XF-80A to get a mix I liked…spraying the mix in progress over my workbench where I had areas of green, red, black, and grime from prior work…I filled the XF-80A container with about 9 Tamiya paint jars of XF-80A…as well I added a few drops of Tamiya Paint Retarder…
I was surprised how much thinner it took… I was doing this before and mixing up tiny amounts in pill bottles for each job..
I was meaning to do this for a long time…just with the goal to get a more uniform finish on multiple cars
I really like your version. My last one was way to dark.
I really like your version. My last one was way to dark.View attachment 175864

Looks well used.I really like your version. My last one was way to dark.View attachment 175864

