
Weathering Rolling Stock, a Continous thread

ModelRailroadForums.com is a free Model Railroad Discussion Forum and photo gallery. We cover all scales and sizes of model railroads. Online since 2002, it's one of the oldest and largest model railroad forums on the web. Whether you're a master model railroader or just getting started, you'll find something of interest here.


Status
Not open for further replies.
Who knows if this is a good idea:

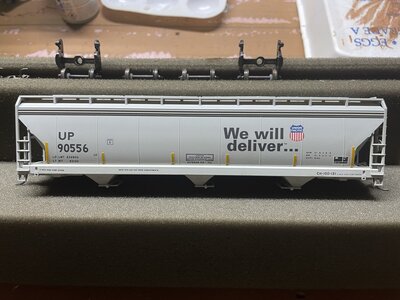
This is an Accurail hopper kit. I have many of these, so if its destroyed in the process so be it.

Loooking at photos of these online, I found multiple examples of this type of car in various stated of weathering. I chose to do a prototype that was only a few numbers off from this one that had some good photos.

1) Add KD #148 whisker couplers and check fit and operation.
2) disassemble.
3) thoroughly washed model.
4) Add conspicuity stripping from Smokebox graphics.
5) spray with Dullcote, and let dry overnight.


FD8F9177-7976-40AD-8509-92E0ED4534AD.jpeg


Here is where it sits now. I'm going to add a wash of Delta Dirt, and sponge most of it off.
 

Attachments

  • 2C3A7D78-7FC9-4D46-B766-B48A769F02A3.jpeg
    2C3A7D78-7FC9-4D46-B766-B48A769F02A3.jpeg
    555.8 KB · Views: 182
Who knows if this is a good idea:

This is an Accurail hopper kit. I have many of these, so if its destroyed in the process so be it.

Loooking at photos of these online, I found multiple examples of this type of car in various stated of weathering. I chose to do a prototype that was only a few numbers off from this one that had some good photos.

1) Add KD #148 whisker couplers and check fit and operation.
2) disassemble.
3) thoroughly washed model.
4) Add conspicuity stripping from Smokebox graphics.
5) spray with Dullcote, and let dry overnight.


View attachment 165475

Here is where it sits now. I'm going to add a wash of Delta Dirt, and sponge most of it off.
For my personal cars:

I replace all wheels with metal 33” or 36” from the Walthers Proto series.

I replace all couplers with Kadee metal whiskers either #148 or Shelf couplers for tank cars. I use the Kadee conversion page to determine the correct coupler but the #148 seems to be for everything I own

I add weight to the cars using the Penny from the USA mint.

The stripes are added to all cars, sometimes after weathering but mostly before. I use the ones from Smokebox.

So asking me if I think you have a good idea, yes absolutely.

I think the Accurail cars, especially the covered hoppers are great. Wheels, couplers and added weight make them even better. I have 3 covered Accurail covered hoppers on the other bench being converted to buffer cars


This Centerbeam is finished. Client sort of drove me nuts on this one. 1st of 12. 3 for me and 9 between 2 clients. This is the current Atlas model and it is much nicer than the IMO nice Walthers Centerbeams. But it’s a featherlight. I have another one out on the bench trying to figure where to hide the weight
C2667449-0446-4054-9215-C40B3098723E.jpeg
8A85C1B3-9B8E-463E-A9C8-755055B9C818.jpeg
72BBEF33-C0CD-4A26-ADBD-5224316800B5.jpeg
82B18BD8-74FC-4E11-811D-355D9BE1893D.jpeg
A39E89E8-17D2-4844-B42E-63B83C149EE8.jpeg
771A93AB-4EEB-4F25-A6BA-B58A2401825D.jpeg
D084D299-4AF4-4A6B-9F40-1A2C183F0374.jpeg
B2C111FE-B4D5-4D31-891B-B14CC36F7A78.jpeg
D16DD076-43B0-4010-946A-7AE8917B0CB7.jpeg
 
All these cars look so incredible. Truly masterful work everybody! Hope one day to be at the same level.

I might as well put up some photos of my own current project. My railroad had been lacking some proper Maintenance of Way equipment. While most of the high iron is still newly laid, things can still happen out on the rails requiring a crew, a crane, and some severely rusty and beaten equipment, repurposed and rebuilt in a dusty car shop in a forlorn corner of some quiet staging yard. I began with the extremely detailed and well done #2704 Wreck Train Set from the Tichy Train Group, and added a second #2701 Boom Car for good measure. For the segments of the line with catenary wire overhead, a line inspection platform was added to the roof of the tool car. After getting the crew to roll some off-white and safety yellow on the tired wood and steel, I set to work lettering and numbering them for the home rails of the Fox Creek Terminal Railroad. Livery newly applied, the real fun began. These cars haven't seen a restful day since they pulled out of that car shop, and have collected quite their fair share of rust, mud, grease and mold. Too old and tired to care, they sit idly, waiting until the next tie must be replaced or the next battered box car needs to be rerailed.

As of now, the cherry on top, 120 ton Brownhoist crane is still receiving her patina, but the other four cars are ready for the debut here for the first time.
IMG_20230324_232416275_HDR.jpg

IMG_20230326_205450996_HDR.jpg

IMG_20230326_232456205_HDR.jpg

IMG_20230326_232526873_HDR.jpg


The biggest lesson learned on this project is that you can easily go too far with weathering these tiny toy trains. This isn't my first rodeo with adding patina to scale models, but it has been a fair bit since I last got the itch to grime things up. For cars like this, the epic levels of rust and gunk fit the narrative, but other projects may require a lighter hand and a smaller brush.
 
All these cars look so incredible. Truly masterful work everybody! Hope one day to be at the same level.

I might as well put up some photos of my own current project. My railroad had been lacking some proper Maintenance of Way equipment. While most of the high iron is still newly laid, things can still happen out on the rails requiring a crew, a crane, and some severely rusty and beaten equipment, repurposed and rebuilt in a dusty car shop in a forlorn corner of some quiet staging yard. I began with the extremely detailed and well done #2704 Wreck Train Set from the Tichy Train Group, and added a second #2701 Boom Car for good measure. For the segments of the line with catenary wire overhead, a line inspection platform was added to the roof of the tool car. After getting the crew to roll some off-white and safety yellow on the tired wood and steel, I set to work lettering and numbering them for the home rails of the Fox Creek Terminal Railroad. Livery newly applied, the real fun began. These cars haven't seen a restful day since they pulled out of that car shop, and have collected quite their fair share of rust, mud, grease and mold. Too old and tired to care, they sit idly, waiting until the next tie must be replaced or the next battered box car needs to be rerailed.

As of now, the cherry on top, 120 ton Brownhoist crane is still receiving her patina, but the other four cars are ready for the debut here for the first time.
View attachment 165504
View attachment 165505
View attachment 165507
View attachment 165508

The biggest lesson learned on this project is that you can easily go too far with weathering these tiny toy trains. This isn't my first rodeo with adding patina to scale models, but it has been a fair bit since I last got the itch to grime things up. For cars like this, the epic levels of rust and gunk fit the narrative, but other projects may require a lighter hand and a smaller brush.
Really nicely done.
 
All these cars look so incredible. Truly masterful work everybody! Hope one day to be at the same level.

I might as well put up some photos of my own current project. My railroad had been lacking some proper Maintenance of Way equipment. While most of the high iron is still newly laid, things can still happen out on the rails requiring a crew, a crane, and some severely rusty and beaten equipment, repurposed and rebuilt in a dusty car shop in a forlorn corner of some quiet staging yard. I began with the extremely detailed and well done #2704 Wreck Train Set from the Tichy Train Group, and added a second #2701 Boom Car for good measure. For the segments of the line with catenary wire overhead, a line inspection platform was added to the roof of the tool car. After getting the crew to roll some off-white and safety yellow on the tired wood and steel, I set to work lettering and numbering them for the home rails of the Fox Creek Terminal Railroad. Livery newly applied, the real fun began. These cars haven't seen a restful day since they pulled out of that car shop, and have collected quite their fair share of rust, mud, grease and mold. Too old and tired to care, they sit idly, waiting until the next tie must be replaced or the next battered box car needs to be rerailed.

As of now, the cherry on top, 120 ton Brownhoist crane is still receiving her patina, but the other four cars are ready for the debut here for the first time.
View attachment 165504
View attachment 165505
View attachment 165507
View attachment 165508

The biggest lesson learned on this project is that you can easily go too far with weathering these tiny toy trains. This isn't my first rodeo with adding patina to scale models, but it has been a fair bit since I last got the itch to grime things up. For cars like this, the epic levels of rust and gunk fit the narrative, but other projects may require a lighter hand and a smaller brush.
Welcome to the weathering thread. Those are very nice thanks for showing them. I fight myself everytime I weather a car without a picture to guide me along. Less is definitively better when it comes to weathering our rails car.

I see your avatar says Chicago. Where abouts? I grew up on the southside, near the Clearing Yards at 68th and Hamlin. Went to Queen of the Universe till we moved out to the southwest suburbs, Oak Forest.
 
Welcome to the weathering thread. Those are very nice thanks for showing them. I fight myself everytime I weather a car without a picture to guide me along. Less is definitively better when it comes to weathering our rails car.

I see your avatar says Chicago. Where abouts? I grew up on the southside, near the Clearing Yards at 68th and Hamlin. Went to Queen of the Universe till we moved out to the southwest suburbs, Oak Forest.
Thank you very much! I've lived in the Northwest Suburbs all my life, near Arlington Heights. Saying Chicago is a bit of a lie as I could go for a walk and see farmland, where as it takes me well over an hour to reach down town by car or rail. Still, it's the closest city and most my friends live there. Still nice to see a local here!
 
Thank you very much! I've lived in the Northwest Suburbs all my life, near Arlington Heights. Saying Chicago is a bit of a lie as I could go for a walk and see farmland, where as it takes me well over an hour to reach down town by car or rail. Still, it's the closest city and most my friends live there. Still nice to see a local here!
Moved out of Illinois and the Chicago suburb of Oak Forest for college in 1970. Been in Wisconsin ever since except for 75-76. It is truly wonderful up here. Spent a lot of time as a kid at Crystal Lake, lots of golf in Barrington, Medina, and had a good friend in Geneva.

Post your weathering of freight cars here and locomotives in the other thread by CambriaArea51 (Tom) and how you achieved your results. We are all still learning.

Again welcome
 
Last edited:


So I did my wash last night and wasn't very happy with the results. I ended up washing it off to start over. I'm not sure if wetting the model would of helped some. The wash I'm using is Monroe Models delta dirt, Its pre-mixed, but went on very dark. I wonder if thinning it some would work out better?

I will let you all be the judge. Maybe these were OK results, and I'm too big of a critic on myself?

Here was the result of the wash: Both sides of the model.

554AD045-66FF-4DAF-89AE-0C036A959800.jpeg
DA61812A-B2A2-455E-ADFA-D6A8FB8FBE02.jpeg
 
So I did my wash last night and wasn't very happy with the results. I ended up washing it off to start over. I'm not sure if wetting the model would of helped some. The wash I'm using is Monroe Models delta dirt, Its pre-mixed, but went on very dark. I wonder if thinning it some would work out better?

I will let you all be the judge. Maybe these were OK results, and I'm too big of a critic on myself?

Here was the result of the wash: Both sides of the model.

View attachment 165479View attachment 165480
Looks ok to me, but I'll let our two resident weathering experts give you their opinion.
 
How hard would it be to replace the broken decal before going to anymore trouble? Speaking from zero experience :)
 
How hard would it be to replace the broken decal before going to anymore trouble? Speaking from zero experience :)
Actually I think that “broken” decal is kind of neat. Either chip it some more, fade it out, replace it or maybe high lite it as a rusting scratch.

Hutch, experienced or not we need your opinions. You may see something or have a suggestion the poster may have missed and the Crew haven’t said anything about. Suggestions are always welcome here
 
So I did my wash last night and wasn't very happy with the results. I ended up washing it off to start over. I'm not sure if wetting the model would of helped some. The wash I'm using is Monroe Models delta dirt, Its pre-mixed, but went on very dark. I wonder if thinning it some would work out better?

I will let you all be the judge. Maybe these were OK results, and I'm too big of a critic on myself?

Here was the result of the wash: Both sides of the model.

View attachment 165479View attachment 165480
I really like the scratched decal side. Well done.

The other side I am torn about. I like it but the it looks like there is a dabbing effect from the sponge. Or the spotting from a “acid” rain shower. Maybe another application with the same color and turn the sponge differently from the previous application.

Unless you are going for a specific effect don’t wet the powders. As I mentioned before though I have not used the Monroe powders. When I have wet Pan Pastels they have clumped and I had to wipe it off.

Are we too harsh a critic on our own work? Yes

What brand of track is that in the second picture?


Status
Not open for further replies.


Affiliate Disclosure: We may receive a commision from some of the links and ads shown on this website (Learn More Here)

Back
Top
