Almost done around the window well. I think I explained this a week or two ago but as people know the house we built is ICF -- Insulated concrete form -- construction. That is large foam blocks that you build up your walls etc and then put rebar and concrete in. For windows and doors you need to make frames that keep the concrete at bay. We have one window well in the house. and hence, one below grade window, for a future bedroom in the basement, and we used used treated wood to fill in the space in the blocks to make a window opening (well reinforced with 2x4 cross pieces up and down and side to side to keep it from being pushed in by the concrete pressure).
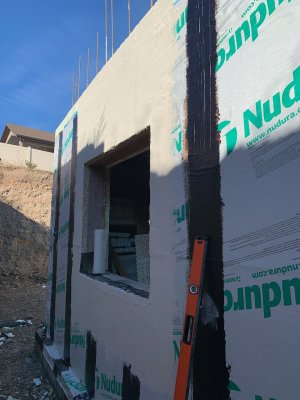
We treated the outside of the ICF below grade with this heavy duty membrane with a woven nylon facing. In this pic you can see the window, the wood frame inside the window opening (which has been water proofed with Semco liquid membrane; as has the raw foam edges where the window opening is). You can see the white membrane that was placed on the foam -- the black is a waterproofing agent used on foundations that we used to cover the overlapping seams with. You can also see a bit of flashing I put on the bottom of the window opening. That is the pliable ZIP stuff.
I used the STYRO Tuff II acrylic "stucco" coating. material on the wall and around the window on top of the membrane where the widow well would expose the wall so it would have an exterior finish.
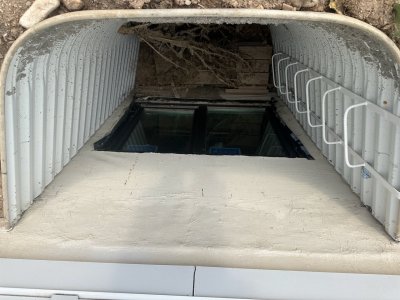
Later they put the window in, putting flashing all around, well caulked with silicone etc, so it doesn't leak. However, the flashing just was wrapped around the outside wall and didn't stick well, and the wall also suffered some damage when some pieces of wood fell into the window well when the framers were doing the roof (this is before the glass was in). I had repaired the damage below the window. This pic shows what it was like before I started a couple weeks ago on this project. There are some beam ends at the bottom to act as at temporary floor as the city inspector said you couldn't have more than 18" or maybe 12" step to th bottom of the ladder for emergency egress. Since we're on a temporary he let me use beam ends to build it up. SO you see that, and some dead weeds and stuff that had blow in. But you also see the raw form edges and the window flashing just flapping in the breeze, so to speak.
It also had to do some places where it had sagged or split or been damaged around the window. So a couple weeks ago and applied more Semco water proofing around the raw foam edges, and anywhere there had been damage or it had sagged and split. When we backfilled I had also laid up 1" foam sheets against the foundation to help avoid rocks gouging our. membrane so I glued that foam that was under the window against the wall and then caulked the seam so that no water would get behind the foam. I also liberally used Semco on that foam and on the interface where the foam sheet edge was glued against the wall.
I then used valukling and stuff to try and even out teh raw foam edge so that it was more even for when I put the final finish on. Filled in divots or cuts etc. I then stretch the black flashing ( the Vicar Plus you see in the pic above) around the edge and used a staple gun to staple it down against the wall. I then applied Semco waterproofing along the flashing edge where it meets the wall and also on all the staples. I also did another two coats of the Semco on the whole exposed wall as it seems I had missed that below grade inside the window well when I did the house foundation all around. It was over the acrylic coating for the 18-24" from the siding down to just below the lip of the window well. But not below, so I used whatever color of Semco I had to put two coats over the existing finish and one coat over the already coated at. grade part. I didn't care the color since I am putting the Tuff II acrylic coating on over it.
Since we didn't paint the house the intended more pure white, but a gray tinted off white, the linen colored STYRO Tuff II coating I had used all around theICFfoundation from below grade to above grade a foot or two doesn't look great so I bought a "concrete gray" version for my window well job. Eventually I'll add another layer all the way around the house from about 3" below grade up to the siding so that it matches. But for now just the window well gets the concrete gray.
You put a nylon mesh 1/4" or so over the surface and then spread in a thin layer of the acrylic stucco coating. I did that around the window and down to the ground and out 8-10" above the window a week or so ago. So spots it was thicker than it should be but it was hard to thin out -- some inside corners and rough spots on the wall. After it dries a day you put a second coat on so you don't see the mesh weave. I did that and then I did two good (and thicker than it's supposed to be in many places since I brushed it on due to the roughness of the surface) of the Semco waterproof membrane in a "clear" version. It is clear but if it gets on too thick when it dries it can be slightly hazy.
A neighbor with a 4 wheeler and a trailer then came over this past Saturday and moved my gravel and filled the window well up to just below the lip with gravel. Now I could stand on the gravel and finish the spot above the window up to the siding -- which I couldn't get at before the gravel since I was way down on the ground and a ladder wouldn't work since the ground was sloped and uneven.
So Wednesday I put the mesh on the spot above the window up to the siding and put a coat of the arulic stuff on and then yesterday put another coat on.
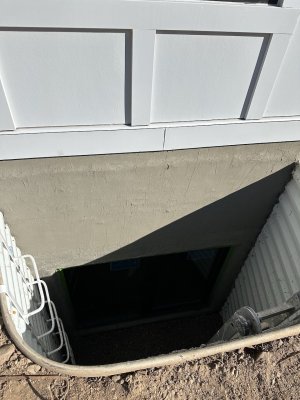
This morning I went down and put a coat of the clear Semco waterproofing membrane on from the siding down and slightly over the line that I had done last week. In these two pics you can see kind of tell where the border between last weeks and this weeks coatings are as the Semco goes on white but dries clear.
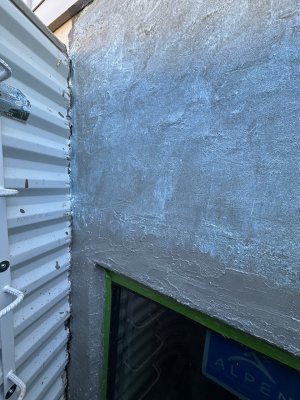
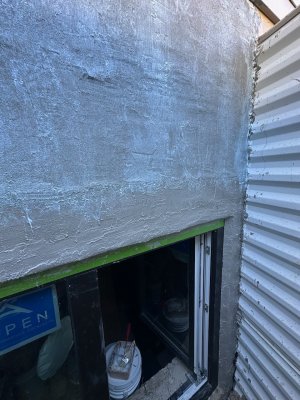
I then started to remove the tape I had used to mask off the window (the pics above were taken after I started on the tape) and the Semco is now drying. I will put the second coat of Semco on this afternoon around 4 or so so that it has a few hours of moderately warm (and with some sun) to dry and then it can dry in the cold overnight -- we're not. freezing yet and then dry more the next couple days before we get more rain. While it may take a few days to full cure its rain capable within hours as long as you didn't goop it on but rolled or sprayed it so the few days will be fine.
The acrylic stuff is dry to the touch within several hours as long as its not gooped on and I think its rain proof with 12 or 24 hours. But it actually takes like 21-24 days to cure fully, which is good, since I was cutting through it to get the tape off as well as to clear out the weep holes at the bottom of the windows and it was hard but kind of chewy consistency so I could cut it and tear it away from the window where it had encroached...
In a few weeks it will be fully cured but it's good enough to take the weather now. The stuff we put on two years ago is good and hard...