
You are using an out of date browser. It may not display this or other websites correctly.
You should upgrade or use an alternative browser.
You should upgrade or use an alternative browser.
DSD's Layout Progress Thread
- Thread starter DairyStateDad
- Start date
ModelRailroadForums.com is a free Model Railroad Discussion Forum and photo gallery. We cover all scales and sizes of model railroads. Online since 2002, it's one of the oldest and largest model railroad forums on the web. Whether you're a master model railroader or just getting started, you'll find something of interest here.

Well thought out until it collapses from analysis paralysis.


The latest is... I'm now thinking I gave up on last week's revision (moving Eagle Junction to the lower level) too quickly. I think I can develop more room on that lower level than my earlier drafts suggested. And I have just been stymied with some issues of grades and clearance problems that surface when I try to make the original plan of Eagle Junction on top work.
I've been messing around setting out loose track on the tabletop. I really do think there is some capacity there to make the yard work on the lower level.
Back to the drawing board.

Heck no! The tortoise machines are nice and all and work great. But man they are just way too much work to install.
I can attach the Peco switch machine to the switch, wire it up. And drop it into a small cut out of the foam base. This entire process takes me about 20 minutes. Then I wire up the stationary decoder. BAM done working in no time.
The tortoise machines, if your good at it with lots of practice, can take up to 2-3 hours for each switch.


LOL! "Inflation calculator"????(!!!) Oh, lordy! That way lies MADNESS! LOL! (imma hafta check that out!)



Affiliate Disclosure: We may receive a commision from some of the links and ads shown on this website (Learn More Here)

DairyStateDad
Mumbling in the corner
Hey Erik
One thing I have to say, everything you do is well thought out.
An ounce of prevention is worth a pound of cure.
thanks for sharing all this with us, I am learning too!
Well thought out until it collapses from analysis paralysis.
The latest is... I'm now thinking I gave up on last week's revision (moving Eagle Junction to the lower level) too quickly. I think I can develop more room on that lower level than my earlier drafts suggested. And I have just been stymied with some issues of grades and clearance problems that surface when I try to make the original plan of Eagle Junction on top work.
I've been messing around setting out loose track on the tabletop. I really do think there is some capacity there to make the yard work on the lower level.
Back to the drawing board.

DairyStateDad
Mumbling in the corner
One new decision made...
My plan had been to use Code 83 track in the staging area only and Code 70 on the visible line. But I have become just so pleased with the Peco streamline Code 83 track, especially the turnouts, that I've decided I will use the Code 70 ONLY on the logging branch when that is built out at the end of the construction process. (The Code 75 Peco track actually is 00 in its proportions -- larger, blockier ties and such -- so it doesn't match up so well.)
Peco also has No. 5 switches, which Micro Engineering (which would have been my go-to choice for turnouts if I had stuck with Code 70 for everything) does not have.
That also means that I don't have to be quite as obsessive about flange sizes on my current IHC 0-4-0 switcher or on other steam I might purchase in the future... I already know that my Bachman Climax and MDC two-truck Shay will run on Code 70...
I've been dithering on this question for a long time, but while fiddling around with loose track to see if I can make that lower yard concept work to my satisfaction, the decision just seemed to fall into place.
I think I will need to get some non-Peco turnouts for a few spots, either Walthers or Fast Tracks (which I will buy pre-made -- not investing in the jigs myself)... mostly for specific curved-turnout situations. The Peco curved turnouts are great, but at least a couple of places won't quite fit.
My plan had been to use Code 83 track in the staging area only and Code 70 on the visible line. But I have become just so pleased with the Peco streamline Code 83 track, especially the turnouts, that I've decided I will use the Code 70 ONLY on the logging branch when that is built out at the end of the construction process. (The Code 75 Peco track actually is 00 in its proportions -- larger, blockier ties and such -- so it doesn't match up so well.)
Peco also has No. 5 switches, which Micro Engineering (which would have been my go-to choice for turnouts if I had stuck with Code 70 for everything) does not have.
That also means that I don't have to be quite as obsessive about flange sizes on my current IHC 0-4-0 switcher or on other steam I might purchase in the future... I already know that my Bachman Climax and MDC two-truck Shay will run on Code 70...
I've been dithering on this question for a long time, but while fiddling around with loose track to see if I can make that lower yard concept work to my satisfaction, the decision just seemed to fall into place.
I think I will need to get some non-Peco turnouts for a few spots, either Walthers or Fast Tracks (which I will buy pre-made -- not investing in the jigs myself)... mostly for specific curved-turnout situations. The Peco curved turnouts are great, but at least a couple of places won't quite fit.
DairyStateDad
Mumbling in the corner
And here I thought somehow you only used Tortoise machines -- Must have confused you with someone else on that! My apologies...
-- Must have confused you with someone else on that! My apologies...
Motley
Active Member
And here I thought somehow you only used Tortoise machines
Heck no! The tortoise machines are nice and all and work great. But man they are just way too much work to install.
I can attach the Peco switch machine to the switch, wire it up. And drop it into a small cut out of the foam base. This entire process takes me about 20 minutes. Then I wire up the stationary decoder. BAM done working in no time.
The tortoise machines, if your good at it with lots of practice, can take up to 2-3 hours for each switch.
DairyStateDad
Mumbling in the corner
Just a quick update. I have decided for sure to go with the change I floated last week. The bottom line reason is, it works (I've tweaked it further from what I last posted, but I'm also going to work on it in 1:1 on the layout to be certain of how I want to arrange things). Equally important, it is a lot simpler to construct, and if later I decide it was the wrong thing to do, it's a lot easier to Undo. No need to belabor the point now -- I'll wait until I have pix to post.
DairyStateDad
Mumbling in the corner
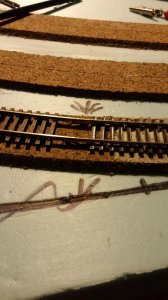
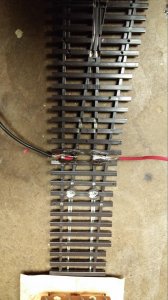
Some pictures of my feeder attachment work this weekend...
Along with the whimsical present I got from a buddy in Georgia -- I guess he found this shrink-wrapped American Flyer ad in a novelty store or antique shop or something...
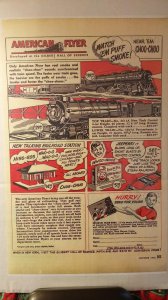
Along with the whimsical present I got from a buddy in Georgia -- I guess he found this shrink-wrapped American Flyer ad in a novelty store or antique shop or something...
flyboy2610
Loveably weird
That is cool! It was published 13 years and 1 month before I was born. My dad would have been 12-1/2.
DairyStateDad
Mumbling in the corner
Back from the dead....
I can't believe how long it's been since I posted here.
I'd been puttering along on the layout but still haven't gotten very far... And then.... in a weird sort of way, my dithering has turned out to have a useful purpose.
This past weekend, we began putting in new LED lights in the railroad room. With the first set in, DairyStateMom took a look at the old floor in the room -- easily a 20-or more year old job that was installed (badly) by a previous homeowner. "We really should put a new floor in," she said. Ummm....
To be honest, I'd been thinking that, too. And I knew she was right. And what's more... if we're going to do that, we should tear out the crappy old paneling down there and replace it with proper wallboard. So over the next couple of weeks I'll be taking apart the benchwork sections. I'm glad I built them in sections.
And while I'm at it I'm going to make some revisions to the supporting benchwork/leg systems and also install backdrops on the backside of sections that go against the walls (I don't want to attach anything to the new walls) -- things I wished I'd done from the start. I'm figuring it will be about 6 weeks before all this work is finished and the sections are back in place. In the meantime, I've got a bunch of new kits to build. When the reinstall takes place I'll post some pix of the new room.
BTW, you might notice I've changed the name of the freelance line, although that might be up for grabs again...
Greetings to everyone...
I can't believe how long it's been since I posted here.
I'd been puttering along on the layout but still haven't gotten very far... And then.... in a weird sort of way, my dithering has turned out to have a useful purpose.
This past weekend, we began putting in new LED lights in the railroad room. With the first set in, DairyStateMom took a look at the old floor in the room -- easily a 20-or more year old job that was installed (badly) by a previous homeowner. "We really should put a new floor in," she said. Ummm....
To be honest, I'd been thinking that, too. And I knew she was right. And what's more... if we're going to do that, we should tear out the crappy old paneling down there and replace it with proper wallboard. So over the next couple of weeks I'll be taking apart the benchwork sections. I'm glad I built them in sections.
And while I'm at it I'm going to make some revisions to the supporting benchwork/leg systems and also install backdrops on the backside of sections that go against the walls (I don't want to attach anything to the new walls) -- things I wished I'd done from the start. I'm figuring it will be about 6 weeks before all this work is finished and the sections are back in place. In the meantime, I've got a bunch of new kits to build. When the reinstall takes place I'll post some pix of the new room.
BTW, you might notice I've changed the name of the freelance line, although that might be up for grabs again...
Greetings to everyone...
Last edited by a moderator:
Burlington Bob
Well-Known Member
Who says procrastination doesn't pay?! Sounds like you'll have a nice train room!
That ad for the American Flyer trains from 1948 was pretty neat and a bit shocking when I looked up the prices on an inflation calculator site. That almost $40 train would be $396 now!!!!! Makes today's prices seem fairly good compared to what you got then.
That ad for the American Flyer trains from 1948 was pretty neat and a bit shocking when I looked up the prices on an inflation calculator site. That almost $40 train would be $396 now!!!!! Makes today's prices seem fairly good compared to what you got then.
new guy
Active Member
Who says procrastination doesn't pay?! Sounds like you'll have a nice train room!
That ad for the American Flyer trains from 1948 was pretty neat and a bit shocking when I looked up the prices on an inflation calculator site. That almost $40 train would be $396 now!!!!! Makes today's prices seem fairly good compared to what you got then.
LOL! "Inflation calculator"????(!!!) Oh, lordy! That way lies MADNESS! LOL! (imma hafta check that out!)
logandsawman
Northern Pacific history enthusiast
Erik--It is good to hear from you!! Thanks for the update!
DairyStateDad
Mumbling in the corner
Hello, all... So, this week the drywall guys were here. They tore out the crappy paneling and put up the drywall. They tore down the crappy suspended ceiling and put drywall there. And instead of the free lights that my son got me from his factory (totally above board, I hasten to point out), we decided to put in 6 can lighting fixtures.
This is gonna be a heck of a nice train room!
I will write more about it and post pictures when it's finished. I will also share the changes I'm making in layout framing that this has given me the opportunity to implement. But that's going to have to wait until I'm at a real keyboard, not typing on my phone.
Later, gators....
This is gonna be a heck of a nice train room!
I will write more about it and post pictures when it's finished. I will also share the changes I'm making in layout framing that this has given me the opportunity to implement. But that's going to have to wait until I'm at a real keyboard, not typing on my phone.
Later, gators....
logandsawman
Northern Pacific history enthusiast
SOUNDS good, Erik; keep us posted!
DairyStateDad
Mumbling in the corner
My New Train Room!
The renovations are finished.
Here's what the room used to look like -- not all that revealing a picture, but I don't seem to have one with the room empty.
You can see that the room was badly lit. Those white walls I had painted blue after this picture was taken, and even painted some clouds on them -- that all came down with the renovation. And the light in the room totally sucked -- one weak bulb. And the floor was coming apart.
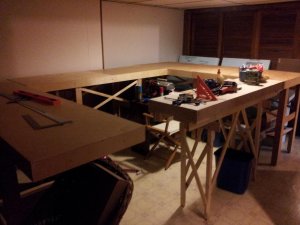
Here are some images from the renovation, which was just finished this morning.
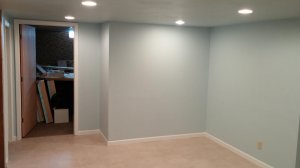
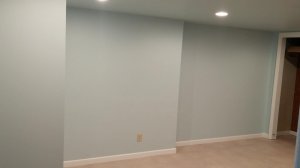
Although we selected blue paint for the walls, I'm not going to paint any backdrop right on them. As much as anything, the renovation, although it's an investment in making the space appealing to build the layout in and, perhaps someday, host operating sessions, it's also an investment in possible future sale of the house.
But taking the benchwork apart is giving me a chance to install backdrop support on the individual sections of benchwork.
So next up -- working out some tweaks in the benchwork configuration. I hope to make progress on that this weekend. I'll post more pix as that happens.
The renovations are finished.
Here's what the room used to look like -- not all that revealing a picture, but I don't seem to have one with the room empty.
You can see that the room was badly lit. Those white walls I had painted blue after this picture was taken, and even painted some clouds on them -- that all came down with the renovation. And the light in the room totally sucked -- one weak bulb. And the floor was coming apart.
Here are some images from the renovation, which was just finished this morning.
Although we selected blue paint for the walls, I'm not going to paint any backdrop right on them. As much as anything, the renovation, although it's an investment in making the space appealing to build the layout in and, perhaps someday, host operating sessions, it's also an investment in possible future sale of the house.
But taking the benchwork apart is giving me a chance to install backdrop support on the individual sections of benchwork.
So next up -- working out some tweaks in the benchwork configuration. I hope to make progress on that this weekend. I'll post more pix as that happens.
Sirfoldalot
Days Gone Bye!
Looking good there, Erik!
You will enjoy working on the layout much more with that atmosphere.
You will enjoy working on the layout much more with that atmosphere.
logandsawman
Northern Pacific history enthusiast
Hi Erik, your train room looks great! Putting the backdrop up first is going to make a lot of things easier. Really nice to see the progress!
DairyStateDad
Mumbling in the corner
Thanks. The plan is to install the backdrop by attaching it to the back side of the benchwork. I want to test an idea I have for making it easily removable but still secure when it is in place.
This weekend, though, the first priority will be to vacuum up the layer of drywall dust that's in all the adjacent rooms. *sigh*
This weekend, though, the first priority will be to vacuum up the layer of drywall dust that's in all the adjacent rooms. *sigh*
Affiliate Disclosure: We may receive a commision from some of the links and ads shown on this website (Learn More Here)