ModelRailroadForums.com is a free
Model Railroad Discussion Forum and
photo gallery. We cover all scales and sizes of model railroads. Online since 2002, it's one of the oldest and largest model railroad forums on the web. Whether you're a master model railroader or just getting started, you'll find something of interest here.
That's an awesome looking track plan!
Throw away the drawing tools before you mess it up.
That's an awesome looking track plan!
Golly, thanks! I have had a lot of help with it. But I do think it reflects the time I have put into it.
Throw away the drawing tools before you mess it up.
I laughed out loud when I saw that - - yeah, never one to leave well enough alone, that's me


From the DairyStatePhone
Oh ya that looks perfect now. Like the other guy said, put away the anyrail software, and go build this thing already!
Theres a time to design and a time to build. Now is the time to build!
Theres a time to design and a time to build. Now is the time to build!
Yes, I recall that more obscure verse from Ecclesiastes...

I think that goes into the essay I am planning on Model Railroading as a Spiritual Practice....

From the DairyStatePhone
As the others have said, now is the time to start. You have a very nice plan, but remember
it is a plan and not a blueprint.
You'll find that there will be some things, that no matter how hard you try, you won't be able to fit them in, even though they're on the plan. Very few plans actually get built with track as drawn, esp with some computer programs. And some wind up not fitting due to the mistakes of the builder.
Important thing is don't sweat the small stuff, as it's all small! Go ahead and start building, and enjoy the heck out of it!
Well, today I managed to complete leveling all the sections of the layout, then bolted them together. The only things missing are the triangular addition at St. Matthew and the lift-out piece. I want to draw up the 1:1 scale plan before I make either of those pieces. Next step is putting down the foam I got, now several months ago...I've got the Liquid Nails for Projects (foam-friendly) for that and various heavy objects to hold it all down. I'll probably put that in during the week, so whatever fumes it gives off have dissipated by the time DairyStateMom gets home from work. No new pictures to add today.
Couple things before gluing the foam. Make sure you remove the thin plastic coating on the foam pieces.
Don't spread the caulking smooth, use the caulking gun and go in zig zag patterns. It needs pockets of air in order to dry correctly.
Thanks, Michael! The wrapping is already off. The info on the need for air pockets where it's cemented is very helpful.
Here is the last 'before' picture. No adhesive down yet. But plan to start in the morning.
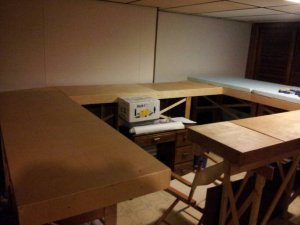
I am also thinking of painting that white wall a light blue for general sky effect. I'll attach a backdrop in some other places, but this would be a simple improvement.
From the DairyStatePhone
Erik,
I started to post something about it, when you were discussing the Red Rock Northern. I didn't want to say anything until you had it either in or completely out of your mind.
I am currently building this plan for a friend of mine. Its a very interesting plan, and I've made some alterations to it for improving the ops standpoint of it. As soon as we get to an appropriate point, I'll be posting some pictures.
Hey, Carey --
Yes, as you see, that turned out to be a (pick your cliche) red herring/blind alley/wild goose chase.
But I think the RRN is a great trackplan. For my situation, it didn't end up working like I thought it would because, to really work nicely with the two terminals that are at right angles to each other and share a turntable, it needs to be closer to square than to oblong. Otherwise, one of the terminals ends up being so visually dominant that (for me anyway) it sort of dwarfs everything else.
If my space allowed for its full size I think I would have gone for it a long time ago. I'll be interested to see your photos of the rendition you're building for your friend.
Fumes? What fumes?
I've put down the two 3x4-foot segments of foam on their respective section platforms. Wondered what to weight them down with, then realized all those old files of story notes and clippings could do something besides just sit in their boxes! The best part, though, is that this stuff doesn't give off a lot of fumes like I thought it would.
I killed one tube of Liquid Nails on just the 3 x 8 area I've done so far.
As I told DSM last night, "Well, there's no turning back now!"
OK, the first layer of foam is all down. I've made three trammels -- one fixed at 20-inch radius, one fixed at 24-inch radius, and one using a yardstick and a small binder clip to hold the pencil so that I can adjust it infinitely. I'll mainly use that for larger radii, although if in a tight spur I need to drop down to 19 or 18 inches, it will serve that purpose, too. Gotta clean off the top of the layout now so I can put down paper to rough out the 1:1 plan.
I have some ideas about reworking parts of the loop and staging area so that there might be some more holding tracks there. I've also figured that the wye at St. Matthew actually creates a great opportunity for operational purposes. One leg of the wye will be designated as going to Green Bay, so northbound traffic from off layout will come from there. The other leg will be designated as going to an off-layout mining branch just over the state line in Upper Michigan (a/k/a the UP), with full ore cars coming from there and empties going to there. Making sure that the proper trains are coming and going from the appropriate leg on the wye will add some challenge and interest, I think.
(For the digression on renaming the road and firming up the concept, or just in case you're suffering from insomnia and need something to quickly put you to sleep, go
read my remblings here.)
Just a very brief update and a promise of some pictures soon, although for now they'll be very boring.
By fits and starts I've been moving forward. The foam was laid down sometime back. This weekend I refined a new corner piece for the inside of the operating area to accommodate part of the return loop and wye. I've got track and turnouts to start on the return loop/wye segment and I've laid out the center line for the loop. I bought some ribbonrail gauges from my LHS over the weekend to help curve the flex track. And I am amply supplied with cork roadbed. So soon (and by "soon" I mean sometime before Zefram Cochrane invents and tests the warp drive
, I'll actually be putting down some cork and then track.
Erik I was wondering what was happening with your layout. Looking forward to seeing some pics!
Man, whatever happened to the last 4 months?!
Seems like I have had hardly any time at all. But... I have marked out the hidden reverse loop, including 2 of the 3 turnouts for the wye, and the track leading to the hidden staging yard. And finally,
after my brief worry about whether the latex caulk I bought yesterday was going to work, today I finally got to putting down the first segment of cork on the part that I have marked out. I will work on completing the roadbed for this first segment over the course of this weekend...
Northern Pacific history enthusiast
I wondered how everything was going with you. Great to hear you are advancing on your project. Thought about you the other day when I found some Wisconsin Central gondolas (something I have been looking for) at Fox Valley Models. They are actually a little to contemporary for most of my stuff, but I can always clear off the rolling stock and run a modern train once in a while.
lasm
Staging Tracks revision
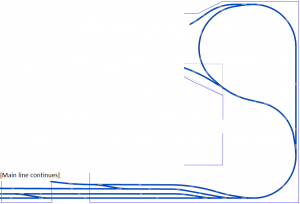
So just as I was about to lay some more cork I had another brainstorm on revising the loop and staging track. (I had dallied with this back in December but hadn't quite made it work then and gave up on the idea -- but this morning I finally got it through my thick head on how to make it work!)
Original hidden staging area and the loop were going to look like this:
But now I've worked it to look like this:
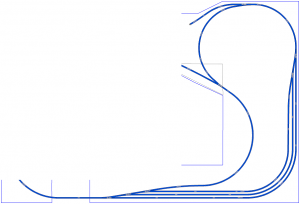
One disclaimer: In the revised version, I know that the concentric curves in the lower right hand corner are probably too close as they appear on the plan. The reason, though, is that I have limited patience and skill in working with the design software. I know that I have enough room to make sure that the curves are properly spaced apart in that segment.
I see lots of reasons that the new arrangement is better -- much more staging capacity, simpler set up overall. Although hidden, the track will be accessible from what in the picture is the the right hand side and the bottom.
If you see any reason I should
not opt for the revised version, speak up
Northern Pacific history enthusiast
If I am reading your plan right, it looks like you will have only 1 track at your lift out section, which I think is wise.
If I am reading your plan right, it looks like you will have only 1 track at your lift out section, which I think is wise.
Well, there will actually be two others that aren't shown here. One is the other part of the main (recall, this is a twice-around plan), which is shown below.
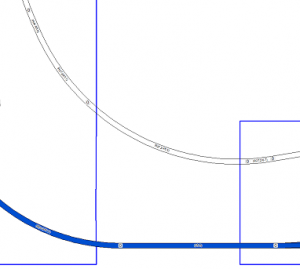
Also, eventually there will be a branch line off of the upper level yard/engine terminal scene (Eagle Junction), going across the entryway as well. But that will be sometime down the road...
But as you can see from the picture in my earlier post today, the original version of the loop/staging area set up would have had to run all three of the staging tracks *as well* across the liftout to have any decent staging capacity. And that would have been crazy for all kinds of reasons!

Affiliate Disclosure: We may receive a commision from some of the links and ads shown on this website
(Learn More Here)




