
logandsawman
Northern Pacific history enthusiast
Thanks, Tony, always nice to get some encouragement!Looking good as always Dave

Thanks, Tony, always nice to get some encouragement!Looking good as always Dave

Love this scene, but where did you find those trucks Dave ?Landscape materials applied around the new buildings, also crossing modeling the "tracks-buried-in-road" completed. Sifted dry gravel is used, glued with Woodland Scenics Scenic Cement. Pins hold down cardboard base while drying. Some grass and shrubs applied on the perimeter:
View attachment 163579
also some activity unloading/loading barrels at the freight house:
View attachment 163580
Dave LASM
Thanks, definitely something I would like for myself, I'll see what I can find.Thanks for asking, Chris... the flat bed on the right is from Woodland Scenics and is a metal kit which is readily available. I think it was supposed to be a dump truck but I made it into a flatbed.
The one on the left is a much older kit which may be found on ebay or a local hobby store. I cannot recall the mfg right off hand but I purchased two similar kits and they are pretty cool. just threw away the boxes about a week ago while cleaning I know they came from ebay.
Dave
Found the truck you were asking about, Scale Structures LTD. Use that search on ebay to see some really nice stuff, great kits:Love this scene, but where did you find those trucks Dave ?

Thought Tony would appreciate this one.It is a pity they seem to be only HO as they have some nice looking stuff !!
Thank's Dave, I'll take a lookFound the truck you were asking about, Scale Structures LTD. Use that search on ebay to see some really nice stuff, great kits:
View attachment 163969
I also noticed the same truck for 36.xx. Many nice old kits using that search, glad you asked, I never thought to search for it that way.
Dave


Another entertaining video, thank you Dave!Thanks, Louis! Here is the latest progress on my layout, featuring the locomotives typical to my era (1900-1939) which are usually on the layout. This is a DC layout so when trains are parked the section of track is deactivated with a simple toggle switch, allows independent movement of trains without too much complexity:
You will notice the little 0-6-0 does a few hiccups but manages to keep its stride. That loco stays on the track real well but needs to be worked more to get the kinks out.
The Varney does very well for a 50+ year old model. The newest loco, the Walthers, is my best performer.
Dave LASM

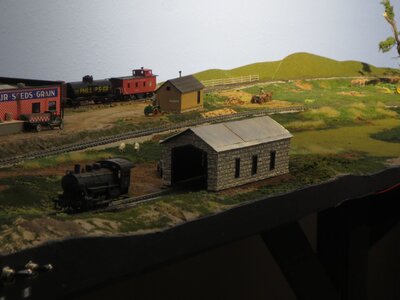
Nice work as always Dave.The roofing material is glued down and trying out the structure in its location:
(I used CA glue to attach the standing seam galvanized roofing to the structure)
View attachment 164407
Still to do: install the chimney and vent, weather the roofing and walls, attach the doors, and energize the LED lighting which is installed in the building.
One option was to cut the roofing into scale 3' wide sections and piece them together to emphasize the seams. I think that would have created lots of problems in getting the metal to stick also would have been super time consuming. When the weathering is done I can reasses the situation, the roof is removable and easily lifts off.
Dave LASM

That would have looked really nice Dave, BUT as you said, it would have been time consuming.One option was to cut the roofing into scale 3' wide sections and piece them together to emphasize the seams.
Right, Tony, plus the small pieces are shiny and do not want to stick as well. I put some powders on it last night also thinking about dull coating the material, also added a couple smokestacks, totally forgot to attach the doors until Wife brought it up.That would have looked really nice Dave, BUT as you said, it would have been time consuming.
Been there, done thatRight, Tony, plus the small pieces are shiny and do not want to stick as well. I put some powders on it last night also thinking about dull coating the material, also added a couple smokestacks, totally forgot to attach the doors until Wife brought it up.
Spent several hours making the doors glueing small pieces together then forget about it? They will go on tonight will get pic tomorrow of completed building if all goes as planned.
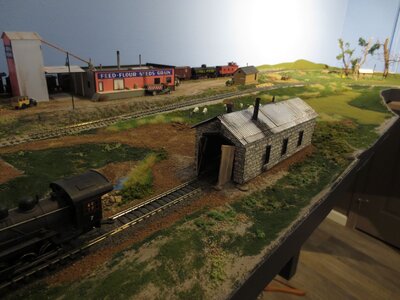
Me too !Dave, love the engine shed - well your entire layout actually

Looks goodI have been applying some coats to the combine car I am trying to tone down, here is after a couple applications of white wash and then india ink/water/alcohol.
Not sure if it is "done" may tweek it a bit. However, Thanks to TomO weathering suggestions just a brush coat of dk. brown on the trucks helps a lot:
The before pic (front car with railing off)
View attachment 163362
I brushed on a couple coats of white wash followed by india ink mixture. The model is directly below a flourescent white light so lighting somewhat abnormal:
View attachment 163363
Here are the trucks with just the paint:
View attachment 163364
I may do some rubbing on the white water drops to fade them a little. This is supposed to be a dull, sun faded version of the car.
Still a ways to go but having some fun with this one.
Dave
Landscape materials applied around the new buildings, also crossing modeling the "tracks-buried-in-road" completed. Sifted dry gravel is used, glued with Woodland Scenics Scenic Cement. Pins hold down cardboard base while drying. Some grass and shrubs applied on the perimeter:
View attachment 163579
also some activity unloading/loading barrels at the freight house:
View attachment 163580
You definitely know how to make a scene come alive, I really like this one
Dave LASM
