Weathering Rolling Stock, a Continous thread

ModelRailroadForums.com is a free Model Railroad Discussion Forum and photo gallery. We cover all scales and sizes of model railroads. Online since 2002, it's one of the oldest and largest model railroad forums on the web. Whether you're a master model railroader or just getting started, you'll find something of interest here.


I think the little WC 2-bay hoppers were used for roofing granules (crushed mineral used for the colour on asphalt shingles) service. They certainly don't have the spill weathering that typical cement cars accumulate.
Chris

You are correct. WC purchased the cars for the 3m roofing granule plant in Wausau, Wi. For 11 years I worked next door to 3m when the Milwaukee Road and CNW both worked the plant in Wausau. I worked at Crestline Windows. The land the window company was on is now a brownfield under environmental remediation

TomO

the 3M plant is at the top of the picture

3M security believes pictures from public property are not ok

these 2 images are from Google Earth
FBE15165-18FE-4004-95A9-58D157185320.png


50C86CC6-48AE-462E-989C-EB38B4FF5482.png
 
Hey, I’m back. After cleaning the painting bench I pulled out the WC cars to be weathered again.

These cars will be done with various Pan Pastels and already today some #71.040 Burnt Umber from Vallejo Air.
8285B98B-835D-44FA-8872-C5B58433D476.jpeg
662DF131-4864-42B7-A59A-518FA91A3191.jpeg
23BF6E9E-C421-43D2-9031-F836571C707D.jpeg

Since I had the paint booth rebuilt this area of the shop has driven me nuts. So much so I have stayed away. I reorganized it into my paint prep and weathering station plus electronics as the DCC programing track is still above. The new paint booth is maybe 20’ away but this might work for now.

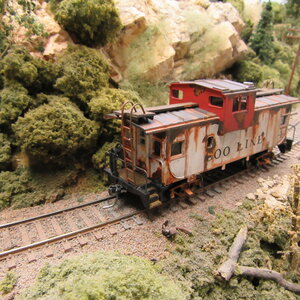
The 2 cars are WC 84676 and WC 8469 and had been faded a couple weeks ago. All previous attempts of weathering were stripped off and Vallejo Air dark umber #71.040has been used as dark rust. Some Orange Extra Dark #280.1 pan pastel has been applied to #84676.
7E24D21E-8B76-4B31-9733-2D369050A55F.jpeg
7B51CDAD-EA1E-4E2A-9CE9-BC576455E305.jpeg


I don’t have a lot of Pan Pastels 16 plus 6 duplicates for a total of 22. I have used all 16 but do find myself coming back to 7. These will last as a bit goes a long way.

Vallejo Air, I use for hand brushing and rarely do use it in the air brush. 26 colors plus 8 duplicate. I have used all 26 colors but find my self coming back to 12.

Vallejo Model Color and Panzer Aces also for hand brushing and I have 5 colors with only 1 duplicate, for a total of 6. The 2 Panzer Aces are light and dark rust and they work great on structures. I constantly use these somewhere on the layout or at the painting bench.

Tamiya, I have 15 paint jars of which 4 are duplicates, so 11 various colors. Constantly in use when I was painting and weathering before vacation. If I use the air brush 98% of the time Tamiya is being blown. I love these and I buy them from scalehobbyist.com. The best pricing on any brand of paint on the internet that I have been able to find.

I have 2 tubes of oils but just used so far on a test gondola. They are a different beast.

I have a few washes from Tamiya (2), Vallejo (3), AK interactive (2) and Vallejo (2). But, I find mixing my own works fairly well and I will not be replacing these.

Hopefully these cars will work out for me. The bottom by the dump gates and the splatter from road bed grime had me stumped but we shall see…

Have a great day
TomO


Hi, back with photos of the 3 WC covered hoppers. They will be posted separately due to forum software picture posting limitations. PLUS, you know I am not the “atta boy” type of guy. I want your constructive criticism which means why don’t you enjoy it and how should I fix it. With each car posted separately this will concentrate your responses.

I don’t mind if you dislike it but I want to know why and what your constructive criticism is. None of you have been mean, (I beat myself up, don’t need that help from you) but you have been honest, please continue that.

This car is a mix of products to get it this far. Some Pan Pastels, some air brushed Tamiya Arcylics and some hand painted Vallejo Air. Plus a few coats in between of Testors getting super expensive Dull Cote in the can.

As for being honest, I have decided this car will be stripped and started over. But my reasons will hold until I review and comment on what you say. I will be away from the bench for a few days starting at 6:40am 5/5 as the Doctors get to play the healing game. Just a clean up procedure but I am off my thyroid replacement meds and per the plan I have absolutely no energy.

Let me know what you think both the good and not so good.

TomO

7CB94EE0-DBE3-481E-BC90-4058D9B2FF42.jpeg
EFA88ACD-F940-4DDB-BE79-803D6216680C.jpeg
4F4089CB-6A0A-4C42-9C3A-055B956B1ECE.jpeg
F1DDE510-F263-4351-8A31-EA0EE55946B9.jpeg
D17DA459-D4E8-44A4-BC42-A2C70A9C4E0D.jpeg
 
WC84663. I dislike the roof intensely. It just doesn’t work for me

Guy from the Diner has sent me some roof top pictures after I sent out a plea for help. This was done prior to getting the pictures of roofs.

More pictures in the Diner of 5/1
699BC0E8-B9C3-43DE-8A0F-634DB73F92C7.png
ED13F40B-9ED7-49E0-8F98-3556909DBB63.png


TomO
 
Hello TomO: Just my three cents worth on the weathering of the covered hoppers.

You're correct about the weathering on the cars' roof tops. It just doesn't look natural the way we find rusting. Have you considered the sponge method of lightly dappling the rust colors on the roof areas? Fade the roof first and then a extremely light wash of rust then followed by the the dappling effects. (Really extremely light.)

Also, have you thought of doing some rust streaking along the sides of the hopper and some rust spotting? I recall an article in MRH about weathering hoppers and they did some streaking on the tops as well as the sides.


I found this photo on the web and it maybe of some help to you in your weathering efforts. I can't give the photographer credit for the photo.

1651601940598.png


The ribs on a hopper for some reason do not like to rust as much as the car sides. I would use powders almost for all the side work and acrylics and some powers on the cars' roofs. I would try fading the sides with dilute oils followed by down ward brushing with a wide brush with a light coating of oil thinner. It's important to start at the top of the car and bring the wide brush straight down in one movement. Or, apply oil paint to the sides of the car and then rub the majority of the oil off the car's sides and let it build up in the sides of the ribs.

I use a base of an acrylic rust color to form an area where rust has established itself and the touch the acrylic once dry with diluted lighter color of oil paint and lets capillarity action move the oil paint. The oil paint with form an area outside of the acrylic paint, just as real rust like to attack the areas around old rust. This would work in areas under the top metal rib where the top meets the sides, along the undersides of the top rib and the roof hatch areas. This method takes a few minutes of practice on an old or cheap car!!!

I haven't done my covered hoppers as of yet and I believe the covered hoppers maybe the hardest pieces of rolling stock to master weathering.
It takes practice to get the weathering on many types of rail cars. There so many methods to weather that it just takes time to find the one you are most comfortable using.

I wrote of this several times, but I have a spot to rail fan where I park my vehicle within just feet from the UP right-of-way and watch the trains roll in and out of the UP Butler, WI yard. One day a 100+ car unit train of covered hoppers passed by and they rolled so slowly that I could catch all the details. Didn't have a camera or phone with me.

Hope your medical procedure goes well and I also have two scheduled as an out patient for next Thursday.

Greg

IMG_0452.JPG
 

Attachments

  • IMG_0458.JPG
    IMG_0458.JPG
    872.1 KB · Views: 138
Last edited:
WC84663 as I mentioned will be stripped. At first the roof but after reviewing it again, I think the whole car

Greg, thank you for the comments.

I have not had any success with the ripped sponge application process. I will pull out the practice bodies and see how it goes again.

I need to read that MRH article as I do read Nick’s stuff in the Weathering Workshop on the Rustbucket Forum.

For me reading or watching about the ”how to” use Oil paints is easy. Actual practice for me has been problematic to say the least. I am JUST now getting comfortable with Tamiya Arcylic. I am not sure I want to do the oils yet. JC’s Riptrack on You Tube is a tremendous source for weathering with oils, IMO. So is Panzermiester

My procedure tomorrow should be fine, thank you. I am more nervous about the Ultra Sound and CT scans next Tuesday. Hoping those find nothing after tomorrows Doctor playing! Good luck with the outpatient stuff.

TomO

883D765B-4B93-4903-A860-6C38C64DBE17.jpeg


TomO: I like using oils for streaking and fading since they do not dry as fast as an acrylic paint. Oils may take several days to dry to the touch.

Just a note.

Greg
I have practiced with oils but not a lot. Or should I write, not to my satisfaction. By placing the oil dabs on a piece of corrugated cardboard or a thick paper towel you wick off the linseed oil. By doing that I have read you create a quicker drying time, instead of 2-3 days maybe 24 hours. Still plenty of time to work the oil paint. I can speed that 24 hours up by using the dehydrator but have not played with that. Also, not matter how long oils have dried Mineral Spirits will still make them workable.

TomO
 
Hi. I got home Friday but not to the paint bench until about 8pm Saturday for an hour or so and then a few hours on and off today. Pictures later for each of the cars but here is a group roof weathering picture.
5E7160FF-1FCD-4F61-BEA2-63F77D77ED3E.jpeg


A CT chest scan and then a Ultra Sound tomorrow. I doubt I will get to the train room as I will be sedated for these 2 formerly very easy procedure for me.

There were a few well wishes for my Thursday surgery. Again thanks guys. I feel pretty good but it will be a process before the strength is back.

I have mentioned boomer diorama before from You Tube. I use his fading method using Tamiya x-21 base.
1BE8A552-6078-497B-AFDC-34E8BAA8BDCE.jpeg


Tom
 
TomO: I enjoy the work of Boomer Diorama and his use of Tamiya Base White fading methods.

I have a heavily rusted GP38-2 that I wasn't too real happy with the weathering and it was a a nearly a $295.00 locomotive that I thought was ready for the junk pile. But...I'll use Boomer's method and save the over rusted areas and change them back to being just lightly weathering and fading painted areas.

Another subject, on the way home today from the cabin in Oshkosh Wisconsin we stopped at a grade crossing for a Wisconsin Southern unit train of covered hoppers and I could see first hand the lightly rusted tops and sides of the cars. Wish the camera was ready!!!

I like the roofs on the frieght cars. Nice work.

Good luck on the next round of med scans.

Greg

##############
Thank you for the comments Greg. We don’t get many trains during the day in the Madison area. Terry and I during a 2020 Summertime Covid drive ended up at the terminal of the WSOR near the old GM plant in Janesville, Wi. No trains in the yard just a few Sd40-2’s. I alway carry my cell phone which of course has the camera in it. It is so hard to catch trains let alone the roofs.

For the WC covered hoppers GUY in the diner posted some roof pictures for me and of course others. I use pictures as a guide but much of the heavier weathering for me is by feel as to what is enough or not. Ihave not gotten the “correct” feel on the roofs of the 6 cars shown on the bench. That’s why you are not seeing addition “these are finished” pictures.

TomO
 
Hi

My last gondola got a bit of a reaction on the Facebook page HO scale shelf modeler. Many thought I had overdone it beyond being realistic. The ends had lots of suggestions, the sides, the floor and the load got great comments. Thankfully Arcylic is very forgiving.

from this
View attachment 141809View attachment 141810
To this after some rework
View attachment 141807View attachment 141808
Today I had a Facebook friend send me some reference pictures he took for me today 2/28/2022, in Edson Alberta Canada. Here they are:
View attachment 141811View attachment 141812View attachment 141813View attachment 141814
These pictures show exactly the type of help I was asking for on FB and the type of sharing we can do here at modelrailroadforums.com.

I have more gondolas to work on but the prototypes are heavily used but not abused with dings, dents and rust.

TomO
Love the rolling stock, these reference pictures show you need to dull down the kadees, far too clean, loving the thread
 
Hi Tom- read on the forum here someone heated up a screwdriver and used that to make the dents.

Maybe used the same torch they started the fire with 😉
Heated metal tools, a knife for instance I have used to make a flat tyre, same principal, sorry not rolling stock
 

Attachments

  • B08663AD-21E8-4147-9849-C548AC26B2A5.jpeg
    B08663AD-21E8-4147-9849-C548AC26B2A5.jpeg
    544.2 KB · Views: 155


Affiliate Disclosure: We may receive a commision from some of the links and ads shown on this website (Learn More Here)

Back
Top