
You are using an out of date browser. It may not display this or other websites correctly.
You should upgrade or use an alternative browser.
You should upgrade or use an alternative browser.
Weathering Rolling Stock, a Continous thread
- Thread starter TLOC
- Start date
ModelRailroadForums.com is a free Model Railroad Discussion Forum and photo gallery. We cover all scales and sizes of model railroads. Online since 2002, it's one of the oldest and largest model railroad forums on the web. Whether you're a master model railroader or just getting started, you'll find something of interest here.


I watched this video a few times when I knew I was going to be doing Centerbeams. It’s also the video that prompted our discussion on chat about Opera window car. My LHS says he found one for me and will have it next week.
thanks for sharing

better pictures


That said, I do have the idea there are white-based ink kits which can take the standard gray-scale (and presuming they do sport low-level blacks) down further. I'm pretty sure there are also metallic inks (or ink series) which are similarly available for "home" level printers. If these are what you need, I do think they are available.
An alternative to these methods might be the classic "dry transfers." There was an article about how to put these together back around 1980 in MRR, and I would imagine a MRR library would turn up a link. The one downside here is that I recall there were "blackout films/negatives/slides" and the associated art which were required then. This is why I bought and still have today a "Beseler" film enlarger" in storage.
I did quite a few line drawings of brick patterns, and, particularly base drawings of my own road-scheme/"Logos." I anticipated technology might move on, and the products I needed might become hard to find or even unavailable. Half right: Kodak basically went out of business, but digital photography and printing took its place. So I needn't have worried, but I still did.

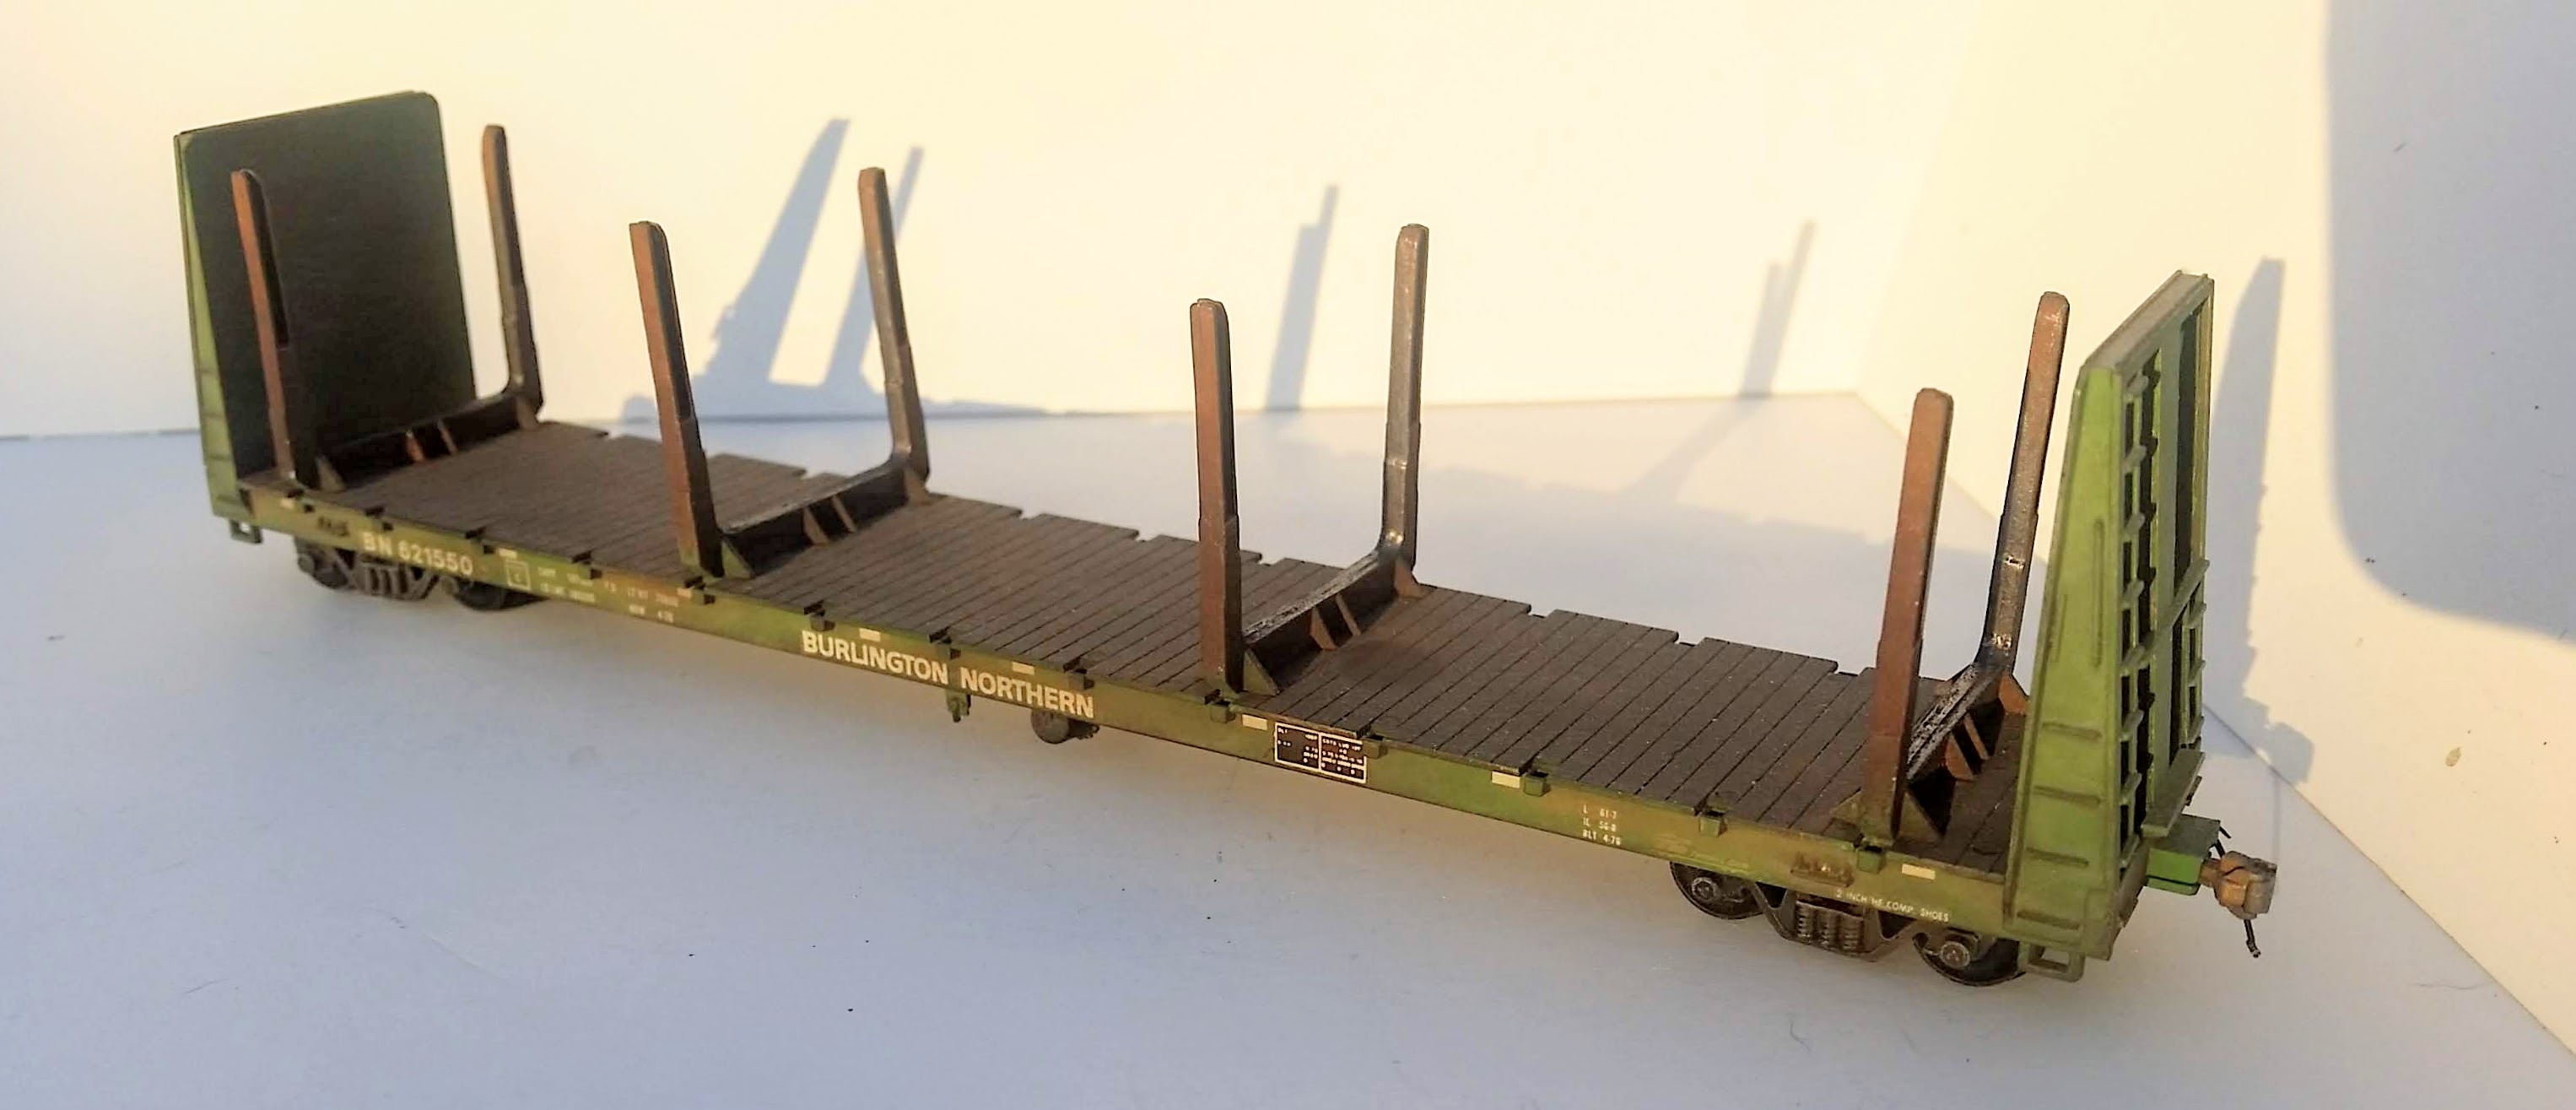
Something you might try is to come back to the areas that actually get touched by the load - especially the raised ribs along the floor but to a lesser degree the center partition ribs - with a pencil. That might sound crazy but metal rubbed raw frequently is not exactly shiny like a rail head or a wheel, but it isn't rusty yet either. It's kind of this in between gray brown tone with a slight sheen. In other words, the look you get from a graphite pencil stroke is pretty darn close. I would limit the pencil marks to areas where you already have the rusty brown stains. Think of the rust being knocked off by the shifting load and buffing the metal to a dull sheen. The action of the load moving will affect the ribs the load rests upon most, then the ends and vertical partition ribs less so.
The other way the shifting load affects the weathering is by slamming into the bulkheads of the car. Generally the loads are pretty tightly placed on the car with only a few inches to spare at each end so there's not a lot of damage done when the load moves, but an older car like this will have numerous small impact marks no bigger than the corner of a 2x6 stick of lumber. Rarely there will be more damage to the bulkheads.
The raised ribs that the load rests upon and against protect the other surfaces of the car from impact damage. You might find old dunnage and bits of lumber scraped off by errant forklift forks but usually the flat surfaces in between the ribs are more or less clean as far as rust pits are concerned, though road grime and dust are certainly fair game.
This is not exactly the same thing as a centerbeam lumber car, but here are a couple photos of the rubbed raw metal look:


This is just what boots are doing. You can imagine the impact 110 tons of dimensional lumber has.
And here's a different type of car, but the same general idea. I used some graphite on the areas of the log bunks that would be touched and buffed by the load to "remove" the rust and make the parts look like metal. This is a much more abused car than a centerbeam lumber car, but again same principal:
Thanks, still working on the cars. I did the pencil lead scrubbing on the 1st of the 5 Centerbeams. I showed that last week. The client is happy with the 1st car but said he doesn’t want it on any of the next 4. I did use the pencil scrubbing on my pulp cars early in this thread. HOW, do you keep the graphite on the car? I like to clear coat but it washes away for me. Now I just leave it raw. But, the pictures you show are excellent and will be of great use.
When the 5 cars are done I will post a group picture and I will show the graphite rubbings. I love using it
My sample folder is getting bigger with all the references being offered and I truly appreciate it.
(All beavers...let us pray)*
I cut .060 styrene sheet to fit the gondola. Raise it off the floor with styrene .250 square tubing. Then a layer of scrap followed by a drenching of diluted glue (similar to applying ballast) then keep adding. Painting was by brush. Vallejo Air colors of rust, dirt, dark umber followed up at the time with that impossible to find now in my area Testors dull cote in the spray can.
Glad you understood that is supposed to be rebar sections. The rebar pieces are the cutoffs from when I create wire armature trees. I have a scrap bin I put everything in, wire, styrene, wire insulation and recently old computer boards. Willie in the Diner showed a couple weeks ago what he does with old computer parts. I had fun making these and of course they never are the same.
I leave it raw. But I apply it over areas that are somewhat rough because of the powders used to make the rust color. It likes to stay on the edges well enough. I also mix powdered graphite in with my coal powder mix for weathering the insides of coal hoppers. I use the pencil to highlight worn edges of the inside of hoppers as well.
I have an old BB flat car that I brushed on a flat clear coat and on the other 1/2 of the car some gloss coat. Let it dry3 hours and took my graphite stick and rubbed that on. Rubbed it in then with a brush.
The gloss coat side for the most part when I ran a finger across it, most of the graphite came off.
The matte finished side mostly stayed on. I will rub again tomorrow to see if it will come off. The tooth created by the matte finish might be a key for me. I have my own center beam to be weathered
RCH, thank you. I’d be fine applying graphite to more of my pulp cars and Centerbeam. Once on my layout cars, well they rarely get touched and then carefully. Not sure about that with a client car.
What powders do you use?

Affiliate Disclosure: We may receive a commision from some of the links and ads shown on this website (Learn More Here)
TLOC
Well-Known Member
That frustrating CN Covered Hopper is even more frustrating today
I fixed the spot from yesterday. Emailed the pictures. Client then asked if I would trade him my car for his. Sure, he had to pay more though then his car because I added steel wheels and metal Kadee couplers to mine. He was ecstatic
So, I added Kadee couplers to his now my car, changed out the wheelsets and then painted the couplers so neither one will move!


 This guy will be on the FB sales groups tonight, I hope. $35 plus shipping
I fixed the spot from yesterday. Emailed the pictures. Client then asked if I would trade him my car for his. Sure, he had to pay more though then his car because I added steel wheels and metal Kadee couplers to mine. He was ecstatic
So, I added Kadee couplers to his now my car, changed out the wheelsets and then painted the couplers so neither one will move!
Alcomotive
Grandson of an ALCO Builder
I think I saw that you subscribe to SoCal ??
TLOC
Well-Known Member
James, Yes you did and I do.I think I saw that you subscribe to SoCal ??
I watched this video a few times when I knew I was going to be doing Centerbeams. It’s also the video that prompted our discussion on chat about Opera window car. My LHS says he found one for me and will have it next week.
thanks for sharing
TLOC
Well-Known Member
I started the posts only for the next TTZX car. Rarely do I sit at the bench after 7pm, but I will run trains then. Well last night I stayed there on and off till 10.
I clear coated the BCIT car, tossed it in the dehydrator, added some more fade to both yellow TTZX cars and mixed up some sample batches of paint for the brown/red oxide colored car. My poor 40’ baby hi-cube cars purchased in 1976 have really gotten a workout this month. I use them for sampling techniques and paint samples.
Here are the posts for the next car


I will be done today by lunch time. This afternoon is me time and working on the layout. I want to install the fence around the transload facility and then just vegetate! Volleyball on campus tonight #4 Wisconsin vs #1 Nebraska. It’s on the Big Ten network at 8 CST and I sit 4 rows up from the backcourt line and opposite the student section. I will wave! I will have the empty seat to my left tonight. I will be among 8000 others in a packed Fieldhouse.
I clear coated the BCIT car, tossed it in the dehydrator, added some more fade to both yellow TTZX cars and mixed up some sample batches of paint for the brown/red oxide colored car. My poor 40’ baby hi-cube cars purchased in 1976 have really gotten a workout this month. I use them for sampling techniques and paint samples.
Here are the posts for the next car
I will be done today by lunch time. This afternoon is me time and working on the layout. I want to install the fence around the transload facility and then just vegetate! Volleyball on campus tonight #4 Wisconsin vs #1 Nebraska. It’s on the Big Ten network at 8 CST and I sit 4 rows up from the backcourt line and opposite the student section. I will wave! I will have the empty seat to my left tonight. I will be among 8000 others in a packed Fieldhouse.
TLOC
Well-Known Member
I have kept my promise to myself. I am out of the train room and away from the bench by noon Wisconsin time.
I have decided, I am not working on the layout after lunch. I will in this 45+ degree weather with the wind howling at 20+ mph go outside looking for freshly fallen branches. I need to produce 21 pulp loads and another 4 pulp wood piles for another Pulp yard.
This was my last pulp load, April, 2022.

In this picture, it was still drying. It was sent to Greg@mmr before he passed away. He had 3 of my pulp cars weathered and 7 pulp loads. I have made in the last 3 years about 250 pulp loads, (Terry would know from the records) and they are gone even the ones intended for my own pulp cars.
Unless I get a request from anyone here at modelrailroadforums.com loads (7 plus shipping to fit Walthers pulp cars) will only be produced for me. I have 21 pulp cars and that’s how many loads I intend to produce.
Centerbeams and other cars this week


I sent these to the client this morning. He wants contrast between the 2 yellow TTZX cars. I sent this before I do anymore as I believe he may say one is too dark


Yes, the wheel are weathered but this client wants the wheel face edges clean. He feels because these cars get humped and go through the brake retsrders on the hump those edges stay clean

The 4 cars above are projects I have worked on. The gondolas are duplicate numbers to cars on my roster. They will each get a scrap metal load and be listed. (Previous gondolas and possible loads)


The 2 covered hoppers are the same number and were cars for a FB friend I traded 2-1 with. He wanted a pulp car and I needed some project cars.
I should be done weathering until Saturday, see you then
I have decided, I am not working on the layout after lunch. I will in this 45+ degree weather with the wind howling at 20+ mph go outside looking for freshly fallen branches. I need to produce 21 pulp loads and another 4 pulp wood piles for another Pulp yard.
This was my last pulp load, April, 2022.
In this picture, it was still drying. It was sent to Greg@mmr before he passed away. He had 3 of my pulp cars weathered and 7 pulp loads. I have made in the last 3 years about 250 pulp loads, (Terry would know from the records) and they are gone even the ones intended for my own pulp cars.
Unless I get a request from anyone here at modelrailroadforums.com loads (7 plus shipping to fit Walthers pulp cars) will only be produced for me. I have 21 pulp cars and that’s how many loads I intend to produce.
Centerbeams and other cars this week
I sent these to the client this morning. He wants contrast between the 2 yellow TTZX cars. I sent this before I do anymore as I believe he may say one is too dark
Yes, the wheel are weathered but this client wants the wheel face edges clean. He feels because these cars get humped and go through the brake retsrders on the hump those edges stay clean
The 4 cars above are projects I have worked on. The gondolas are duplicate numbers to cars on my roster. They will each get a scrap metal load and be listed. (Previous gondolas and possible loads)
The 2 covered hoppers are the same number and were cars for a FB friend I traded 2-1 with. He wanted a pulp car and I needed some project cars.
I should be done weathering until Saturday, see you then
CambriaArea51
Well-Known Member
Tom, all the cars look great.
TLOC
Well-Known Member
Thanks Tom. I sent him pictures and he called back saying I am on the right track (his words). Told him I am done working on them till Friday morning. I feel the 2nd yellow car is too dark but…Tom, all the cars look great.
better pictures
CambriaArea51
Well-Known Member
That actually turn out pretty good. Did you wipe that down.Thanks Tom. I sent him pictures and he called back saying I am on the right track (his words). Told him I am done working on them till Friday morning. I feel the 2nd yellow car is too dark but…
better pictures
View attachment 154745View attachment 154746View attachment 154747View attachment 154748
CambriaArea51
Well-Known Member
Back from the club.... with a project. I asked him how he wanted them done, he didn't care.

Snowman
Well-Known Member
The difficulties with printing decals on a home system is that you can't print white with a normal/standard CMY setup. You can print decreasing levels of grayscale, using black, but eventually you do hit bottom.Thanks for sharing. I agree very nice work. I have a few of the same cars he is weathering in the video from BLMA. They are extremely fragile.
He is excellent with the decals. I have been playing around with decals of graffiti from circuscitydecal.com and they are very nice and easy to work with.
That said, I do have the idea there are white-based ink kits which can take the standard gray-scale (and presuming they do sport low-level blacks) down further. I'm pretty sure there are also metallic inks (or ink series) which are similarly available for "home" level printers. If these are what you need, I do think they are available.
An alternative to these methods might be the classic "dry transfers." There was an article about how to put these together back around 1980 in MRR, and I would imagine a MRR library would turn up a link. The one downside here is that I recall there were "blackout films/negatives/slides" and the associated art which were required then. This is why I bought and still have today a "Beseler" film enlarger" in storage.
I did quite a few line drawings of brick patterns, and, particularly base drawings of my own road-scheme/"Logos." I anticipated technology might move on, and the products I needed might become hard to find or even unavailable. Half right: Kodak basically went out of business, but digital photography and printing took its place. So I needn't have worried, but I still did.
RCH
Been Nothin' Since Frisco
Thanks Tom. I sent him pictures and he called back saying I am on the right track (his words). Told him I am done working on them till Friday morning. I feel the 2nd yellow car is too dark but…
better pictures
View attachment 154745View attachment 154746View attachment 154747View attachment 154748
Something you might try is to come back to the areas that actually get touched by the load - especially the raised ribs along the floor but to a lesser degree the center partition ribs - with a pencil. That might sound crazy but metal rubbed raw frequently is not exactly shiny like a rail head or a wheel, but it isn't rusty yet either. It's kind of this in between gray brown tone with a slight sheen. In other words, the look you get from a graphite pencil stroke is pretty darn close. I would limit the pencil marks to areas where you already have the rusty brown stains. Think of the rust being knocked off by the shifting load and buffing the metal to a dull sheen. The action of the load moving will affect the ribs the load rests upon most, then the ends and vertical partition ribs less so.
The other way the shifting load affects the weathering is by slamming into the bulkheads of the car. Generally the loads are pretty tightly placed on the car with only a few inches to spare at each end so there's not a lot of damage done when the load moves, but an older car like this will have numerous small impact marks no bigger than the corner of a 2x6 stick of lumber. Rarely there will be more damage to the bulkheads.
The raised ribs that the load rests upon and against protect the other surfaces of the car from impact damage. You might find old dunnage and bits of lumber scraped off by errant forklift forks but usually the flat surfaces in between the ribs are more or less clean as far as rust pits are concerned, though road grime and dust are certainly fair game.
This is not exactly the same thing as a centerbeam lumber car, but here are a couple photos of the rubbed raw metal look:
This is just what boots are doing. You can imagine the impact 110 tons of dimensional lumber has.
And here's a different type of car, but the same general idea. I used some graphite on the areas of the log bunks that would be touched and buffed by the load to "remove" the rust and make the parts look like metal. This is a much more abused car than a centerbeam lumber car, but again same principal:
TLOC
Well-Known Member
Ended up pressure spraying with 91% Isopropyl Alcohol with PSI at 65That actually turn out pretty good. Did you wipe that down.
TLOC
Well-Known Member
RCHSomething you might try is to come back to the areas that actually get touched by the load - especially the raised ribs along the floor but to a lesser degree the center partition ribs - with a pencil. That might sound crazy but metal rubbed raw frequently is not exactly shiny like a rail head or a wheel, but it isn't rusty yet either. It's kind of this in between gray brown tone with a slight sheen. In other words, the look you get from a graphite pencil stroke is pretty darn close. I would limit the pencil marks to areas where you already have the rusty brown stains. Think of the rust being knocked off by the shifting load and buffing the metal to a dull sheen. The action of the load moving will affect the ribs the load rests upon most, then the ends and vertical partition ribs less so.
The other way the shifting load affects the weathering is by slamming into the bulkheads of the car. Generally the loads are pretty tightly placed on the car with only a few inches to spare at each end so there's not a lot of damage done when the load moves, but an older car like this will have numerous small impact marks no bigger than the corner of a 2x6 stick of lumber. Rarely there will be more damage to the bulkheads.
The raised ribs that the load rests upon and against protect the other surfaces of the car from impact damage. You might find old dunnage and bits of lumber scraped off by errant forklift forks but usually the flat surfaces in between the ribs are more or less clean as far as rust pits are concerned, though road grime and dust are certainly fair game.
This is not exactly the same thing as a centerbeam lumber car, but here are a couple photos of the rubbed raw metal look:
This is just what boots are doing. You can imagine the impact 110 tons of dimensional lumber has.
And here's a different type of car, but the same general idea. I used some graphite on the areas of the log bunks that would be touched and buffed by the load to "remove" the rust and make the parts look like metal. This is a much more abused car than a centerbeam lumber car, but again same principal:
Thanks, still working on the cars. I did the pencil lead scrubbing on the 1st of the 5 Centerbeams. I showed that last week. The client is happy with the 1st car but said he doesn’t want it on any of the next 4. I did use the pencil scrubbing on my pulp cars early in this thread. HOW, do you keep the graphite on the car? I like to clear coat but it washes away for me. Now I just leave it raw. But, the pictures you show are excellent and will be of great use.
When the 5 cars are done I will post a group picture and I will show the graphite rubbings. I love using it
My sample folder is getting bigger with all the references being offered and I truly appreciate it.
Last edited:
Snowman
Well-Known Member
Looks like that car is built to handle 2" x 4"...gold bricks. Another kind of "YellaWood," as it were.2 cars removed from the dehydrator this morning
BCIT is green under base of the light rust color
View attachment 154364
the the yellow TTZX car
View attachment 154365
I am going to leave the trucks and wheelsets are they are
(All beavers...let us pray)*
Snowman
Well-Known Member
The load on that first gondola in particular--the CN car, ICG 246583 with all the loose sheet, etc. is really impressive. The bent back wire/rebar (?) To my eye, the underlying wire base (particularly at the right center, above the CN logo) really sells it. Brilliant.I have kept my promise to myself. I am out of the train room and away from the bench by noon Wisconsin time.
I have decided, I am not working on the layout after lunch. I will in this 45+ degree weather with the wind howling at 20+ mph go outside looking for freshly fallen branches. I need to produce 21 pulp loads and another 4 pulp wood piles for another Pulp yard.
This was my last pulp load, April, 2022.
View attachment 154691
In this picture, it was still drying. It was sent to Greg@mmr before he passed away. He had 3 of my pulp cars weathered and 7 pulp loads. I have made in the last 3 years about 250 pulp loads, (Terry would know from the records) and they are gone even the ones intended for my own pulp cars.
Unless I get a request from anyone here at modelrailroadforums.com loads (7 plus shipping to fit Walthers pulp cars) will only be produced for me. I have 21 pulp cars and that’s how many loads I intend to produce.
Centerbeams and other cars this week
View attachment 154721View attachment 154722
I sent these to the client this morning. He wants contrast between the 2 yellow TTZX cars. I sent this before I do anymore as I believe he may say one is too dark
View attachment 154726View attachment 154725View attachment 154724
Yes, the wheel are weathered but this client wants the wheel face edges clean. He feels because these cars get humped and go through the brake retsrders on the hump those edges stay clean
View attachment 154727
The 4 cars above are projects I have worked on. The gondolas are duplicate numbers to cars on my roster. They will each get a scrap metal load and be listed. (Previous gondolas and possible loads)
View attachment 154728View attachment 154729
The 2 covered hoppers are the same number and were cars for a FB friend I traded 2-1 with. He wanted a pulp car and I needed some project cars.
I should be done weathering until Saturday, see you then
TLOC
Well-Known Member
Snowman, Thank you. I made a few like that.The load on that first gondola in particular--the CN car, ICG 246583 with all the loose sheet, etc. is really impressive. The bent back wire/rebar (?) To my eye, the underlying wire base (particularly at the right center, above the CN logo) really sells it. Brilliant.
I cut .060 styrene sheet to fit the gondola. Raise it off the floor with styrene .250 square tubing. Then a layer of scrap followed by a drenching of diluted glue (similar to applying ballast) then keep adding. Painting was by brush. Vallejo Air colors of rust, dirt, dark umber followed up at the time with that impossible to find now in my area Testors dull cote in the spray can.
Glad you understood that is supposed to be rebar sections. The rebar pieces are the cutoffs from when I create wire armature trees. I have a scrap bin I put everything in, wire, styrene, wire insulation and recently old computer boards. Willie in the Diner showed a couple weeks ago what he does with old computer parts. I had fun making these and of course they never are the same.
Last edited:
Snowman
Well-Known Member
@RCH: Your two photos there have reminded me that, in addition to a number of black and white brick pattern drawings I did (back the day), I also drew a "diamond plate." I'm pretty sure I can find that.
@TLOC: With regard to the two sided Rio Grande freight car you posted a couple of months back--the logo on one side missing--there is a reference to something very much like that made of a Salida CO based steam engine switcher by Robert W. Richardson (who was a very well known photographer of railroading history (particularly narrow gauge), and who also founded and ran the Colorado Railroad Museum).
Could also be Robert La Massena, so I'm going to have to back and look for it.
Essence: There was a Rio Grande steam engine which worked in and around the Salida CO yards until what was, pretty much, the end of the steam era. The front end of this locomotive pointed away from the Continental Divide behind it, so it worked almost--or all--of its service life as a switcher pointed at the rising sun. As a result, the right side of the boiler and all the rest were sun baked to a black-overwritten-by-chalking* patina, while the left side retained its dark green boiler jacket original paint until the railroad sent it to scrap.
[* as you might do it]
As to that car where you removed the logo on the one side, but I did not realize it at first: I found the photos I was referring to, and, suffice it to say, and whether or not you intended to, you did a bang up job re: The missing logo.
I was sure I had the photographic evidence to prove it, and I do.
I told you I would post a thread about it sometime down the road. I have no excuses now.
Last edited:
RCH
Been Nothin' Since Frisco
HOW, do you keep the graphite on the car?
I leave it raw. But I apply it over areas that are somewhat rough because of the powders used to make the rust color. It likes to stay on the edges well enough. I also mix powdered graphite in with my coal powder mix for weathering the insides of coal hoppers. I use the pencil to highlight worn edges of the inside of hoppers as well.
TLOC
Well-Known Member
I was not weathering but I was playing with the graphite.I leave it raw. But I apply it over areas that are somewhat rough because of the powders used to make the rust color. It likes to stay on the edges well enough. I also mix powdered graphite in with my coal powder mix for weathering the insides of coal hoppers. I use the pencil to highlight worn edges of the inside of hoppers as well.
I have an old BB flat car that I brushed on a flat clear coat and on the other 1/2 of the car some gloss coat. Let it dry3 hours and took my graphite stick and rubbed that on. Rubbed it in then with a brush.
The gloss coat side for the most part when I ran a finger across it, most of the graphite came off.
The matte finished side mostly stayed on. I will rub again tomorrow to see if it will come off. The tooth created by the matte finish might be a key for me. I have my own center beam to be weathered
RCH, thank you. I’d be fine applying graphite to more of my pulp cars and Centerbeam. Once on my layout cars, well they rarely get touched and then carefully. Not sure about that with a client car.
What powders do you use?
Affiliate Disclosure: We may receive a commision from some of the links and ads shown on this website (Learn More Here)