The “Give Tony Grief” Thread


Tony Just an update I do have a 18 vdc 1.4 amp power supply but i need to order one of those PL11 switch motors to make sure it will work
All of mine that I used were powered by 12 vdc 2 amp The PL11 needs either 16 vac or 18 to 22 vdc
Mike the PL11 will work with what you have, I'm not sure why they recommend 16v AC (1.5Amp) but they will also easily work on a 12vDC power supply.
 
Mike the PL11 will work with what you have, I'm not sure why they recommend 16v AC (1.5Amp) but they will also easily work on a 12vDC power supply.
Hmm I wonder why everywhere I look they say 16 v ac or 18-20 v dc I'm not really concerned about the ac since the 751D only works on DC
AC voltage will destroy it
So what are you using for power source ??
Still think I need to get a PL11 and test it If it works on the 12 VDC fine good to go But then I can try it on the 18 VDC Would only have to change 2 resisters for the led's
my head hurts :cool:
 
Back to the layout for a second :)

Decisions have been made!!! Some where in the world I'm sure BUT, as for here, absolutely NOTHING has transpired of any meaningful value - that I know of ............ UNLESS, you consider the following something of value:

1" X 3" Risers every 12" (or so) with 1" Foam laid atop of it as the sub road bed. The risers I have on hand and the foam is light and easy to work with AND should be strong enough to support a bit of cork, track and a passing train. If track alone can do it - so can the foam :)

All I need to do is trace out the track location so I can transcribe it onto the foam and we should be in business. The Curved Turnout arrives tomorrow, according to USPS, so there is a possibility of this little layout being up and running in its entirety some time over this weekend :)
 
Still think I need to get a PL11 and test it If it works on the 12 VDC fine good to go But then I can try it on the 18 VDC Would only have to change 2 resisters for the led's
my head hurts :cool:
I know, there are so many different opinions when it comes to powering stuff, I had originally mainly Hornby Point motors, and 3 SEEP sub surface motors and simply used a 12v wall wart that I had at hand for several years, when I got fed up with the Hornby motors unreliability I switched to the PL11's but never changed the power supply to 16v AC. but I've always used a CDU with the point motors.
When I started this current layout I accidentally ordered a 16v AC wall wart, which worked in my favour as I needed a 12v supply for all the LED's so simply switched them over.

The only reason that I can find to use 18v-22v DC is because the point motors need a bit more power to snap across, which is redundant if your using a CDU as that's why it's there.
 
More intriguing thinking ...........

What do you guys think about an "Upper and Lower Track" for the new double track section? In other words, having one track a little higher than the other?

I'm thinking this for two reasons - for something a bit different and found in the real world and for scenery possibilities.
Now that's a really good idea, I like that, and as you've said gives you more scope on the type scenery you could have.
 
A little different, but I ended up with 2 track plans: One at "ground level" and another up in the hills. They are not connected in any way except thay are both controlled by the same DCC system. This way, my "up in the hills" track can traverse bridges, while the "ground level" track disappears into and emerges from tunnels AND goes over bridges (over a river).

Didn't require any grades, and allows my "up in the hills" track to just run around loopty loop style while I operate some trains on ground level.
 
Another change of plans - it seems as though I have enough 1/2" Ply off cuts already shaped (more or less) that I can use for my Sub Road Bed. As such, that is NOW the plan. So, I am still looking at the end of this coming weekend before the layout is fully up and running in DCC mode.
 
i ran slopes of 2 /2% on my layout .. it was sixteen feet by fifteen feet in size, and i had elevation changes of up to nine inches in there , there was very little that was flat .. the layout is on the scarm web site, and it's named the squirrel creek railroad ... era is 1890 so there is very little power, even the throws for the turnouts are manual .caboose ground throws ..
i didn't run long trains on there, but it was enough to push or pull a dozen cars up and down slopes and twenty two inch radius curves
 
Last edited:
At the moment, I will have the double track on two different elevations with the outside track about an inch or so higher than the inside track. The outside track will have a grade of about 4% with the inside track having a grade of about 3%, give or take. Those figures could change a little as the track gets laid.
 
At the moment, I will have the double track on two different elevations with the outside track about an inch or so higher than the inside track. The outside track will have a grade of about 4% with the inside track having a grade of about 3%, give or take. Those figures could change a little as the track gets laid.
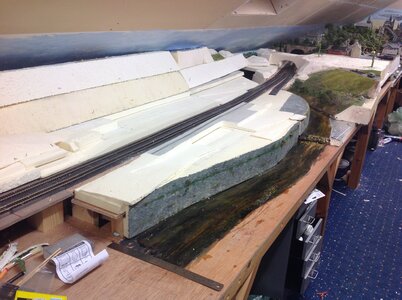
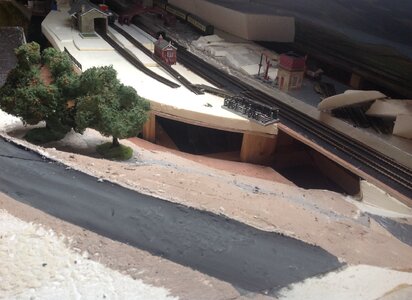
🤔you may want to increase that to around 2 1/2" to give the lower track clearance for the train itself, and be be able to have decent scenery between the upper and lower level, unless your simply going for a plain rockface type scenery between the two.
 
I do not know if this helps but we cut up the boards the only thing fixed in place was the tracks,everything else can be removed for repair maintenance a lot of foam just sits in place,a couple of places have lean your weight on spots IF you need to lean across and pick up a derailment, fyi in the hot weather that foil wrapped foam can curl!,either remove neither foil or Both to keep the tension similar and stop curling,in our case a top sheet one side removed curled we tore off the metal film on the other side immediately weighted it and managed to rescue it before the curl was too much, with you warm hot weather may be a big issue, feel free to delete as pictures are not your thread
 

Attachments

  • IMG_2666.jpeg
    IMG_2666.jpeg
    533.4 KB · Views: 30
  • IMG_1792.jpeg
    IMG_1792.jpeg
    565.1 KB · Views: 29
  • IMG_1057.jpeg
    IMG_1057.jpeg
    402.5 KB · Views: 35
  • IMG_1077.jpeg
    IMG_1077.jpeg
    548.1 KB · Views: 39
  • IMG_1059.jpeg
    IMG_1059.jpeg
    391.5 KB · Views: 37
  • IMG_1069.jpeg
    IMG_1069.jpeg
    515.1 KB · Views: 38
  • IMG_0975.jpeg
    IMG_0975.jpeg
    502.4 KB · Views: 38


Back
Top