
You are using an out of date browser. It may not display this or other websites correctly.
You should upgrade or use an alternative browser.
You should upgrade or use an alternative browser.
post your model RR tips........
- Thread starter Greg from Mi.
- Start date
ModelRailroadForums.com is a free Model Railroad Discussion Forum and photo gallery. We cover all scales and sizes of model railroads. Online since 2002, it's one of the oldest and largest model railroad forums on the web. Whether you're a master model railroader or just getting started, you'll find something of interest here.

However, I am a little more frugal. I use the fake credit cards and laminated advertising materials that come in the mail.

Thanks for the tip.

Just a small piece a masking tape on the side to label what's inside.


1) Open the folder containing the picture using the "Thumbnail" view.
2) Right click on the thumbnail to bring up the dialog box and left click on "Copy".
3) Return to the forum page.
4) Then position the cursor in the "Reply" box and right click again for the dialog box; then left click "Paste".

Affiliate Disclosure: We may receive a commision from some of the links and ads shown on this website (Learn More Here)
In my old modelling days, I would heat sprue close to it's melting point, then slowly pull both ends apart, to make "tubing" or "pipes" of whatever diameter I needed, then let it cool.Yes, done that for years. Works really well.
I also slice appropriate-size sprues very thinly to make plates on the tables in my eateries. Easiest to see on outdoor dining areas.
The drink cups are pieces of .015 styrene rod.
View attachment 203550
westtexjohn
Well-Known Member
I buy inexpensive playing cards at the dollar store. These can be used as shims, mixing small amounts of epoxy or setting under the tip of my hot glue gun to catch an errant drip or two.
PaulieT
Model Builder
Clever!I buy inexpensive playing cards at the dollar store. These can be used as shims, mixing small amounts of epoxy or setting under the tip of my hot glue gun to catch an errant drip or two.
shortwrench
Well-Known Member
Good tip.I buy inexpensive playing cards at the dollar store. These can be used as shims, mixing small amounts of epoxy or setting under the tip of my hot glue gun to catch an errant drip or two.
However, I am a little more frugal. I use the fake credit cards and laminated advertising materials that come in the mail.
Canalligator
Well-Known Member
I use business cards from the last job I had requiring business cards... ca. 2006. Yes, I had lots of extras.I buy inexpensive playing cards at the dollar store. These can be used as shims, mixing small amounts of epoxy or setting under the tip of my hot glue gun to catch an errant drip or two.
shortwrench
Well-Known Member
Now that I have gained some experience in adding decoders and repairing HO locos, I have adopted a "standard" procedure to each loco.

I solder a 1/4" copper wire to each track solder pad on the decoder. This makes for a easy access point to power the decoder via
an alligator clip or EZ hook. Since I don't have rollers for the wheels, it's usually cumbersome to feed power to the decoder while the loco is on the bench. Most of my locos with decoder upgrades are gifted locos and is questionable how reliable the continuity between the wheels and
truck pickups are. On some locos I've spent considerable effort re-establishing a good connection between the wheels and pickups.
They are a convenient way to power the decoder as motor, lights, and sound are set up; not having to worry about how good of a connection there is between the wheels and decoder.
I leave them permanently connected. So far, all locos have plenty of clearance between the wires and the loco shell. If there is any concern, a
piece of Kapton or electrical tape over the wires will provide adequate insulation.[
Last edited:
westtexjohn
Well-Known Member
This idea would/should work for motor connections. It seems I manage from time to time to have a loco go in reverse instead of forward. While you can adjust CVs to correct this problem, I like to try to keep everything correct from the get-go. And I do not like to do things twice.Now that I have gained some experience in adding decoders and repairing HO locos, I have adopted a "standard" procedure to each loco.
View attachment 205397
I solder a 1/4" copper wire to each track solder pad on the decoder. This makes for a easy access point to power the decoder via
an alligator clip or EZ hook. Since I don't have rollers for the wheels, it's usually cumbersome to feed power to the decoder while the loco is on the bench. Most of my locos with decoder upgrades are gifted locos and is questionable how reliable the continuity between the wheels and
truck pickups are. On some locos I've spent considerable effort re-establishing a good connection between the wheels and pickups. They are a convenient way to power the decoder as motor, lights, and sound are set up; not having to worry about how good of a connection there is between the wheels and decoder.
I leave them permanently connected. So far, all locos have plenty of clearance between the wires and the loco shell. If there is any concern, a
piece of Kapton or electrical tape over the wires will provide adequate insulation.[
Thanks for the tip.
Canalligator
Well-Known Member
When converting a well-used loco to DCC, the first step should be servicing the mechanicals: check/renew lubrication and especially clean the wheels. I find these steps easier to do with a DC supply. It is much harder to do after installing the decoder, because at first it won’t run well enough to keep the wheels turning.
For wheel cleaning, I first scrape the wheels (if needed) with a hobby knife. Then I use the paper towel on track method.
As for lubrication, well, you’ve got it open anyway, might as well. And if they’re as old as my locos, they’re probably due for it.
On Athearn blue box locos, check that the axil bushings are correctly placed in the truck frames. Also make sure the geared axils have not split, they sometimes split with age. If its white rubber motor mounts have dried out, replace them or remount the motor with foam tape.
michaeljoe
Well-Known Member
I use prescription pill containers of different sizes .......for all kinds of parts and pieces.I use 35mm film containers to hold toothpicks and Q-Tips. I put a large flat washer in the bottom so they don't fall over easily. Too bad film is not used much any more. Small prescription medicine containers also work well for this.
I had a piece of 1 x 4 plastic wood left over from a house project. I drilled a series of 9/64" (#28 Drill) holes 1/2 inch deep across the 4" wide surface to hold rotary tool (Dremel) bits, burrs, and stones. I also made another one to hold small needle files.
Just a small piece a masking tape on the side to label what's inside.
michaeljoe
Well-Known Member
I use (whiskey) shot glasses, to put water... Windex...and or other gleaners to hold, and clean my detail
painting brushes while painting parts and stuff.
The heavy solid bottoms of the shot glasses keep the water and cleaning solutions from tipping over.
painting brushes while painting parts and stuff.
The heavy solid bottoms of the shot glasses keep the water and cleaning solutions from tipping over.
NorthBrit
Well-Known Member


santafewillie
Same Ol' Buzzard
Great tip. I have a few that were wedding gifts 53 years ago that never get used. I drink beer and a shot glass just doesn't hold enough.I use (whiskey) shot glasses, to put water... Windex...and or other gleaners to hold, and clean my detail
painting brushes while painting parts and stuff.
The heavy solid bottoms of the shot glasses keep the water and cleaning solutions from tipping over.
Canalligator
Well-Known Member
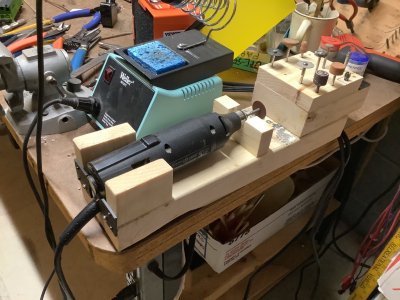
Photo 1. I recently replaced my motor tool holder. The old one had a broken corner and too few places for bits.
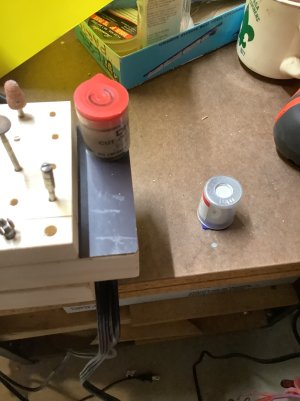
Photo 2. The little shelf on the back has magnet paper glued onto it, and I glue a washer to the bottom of cutoff wheel containers.
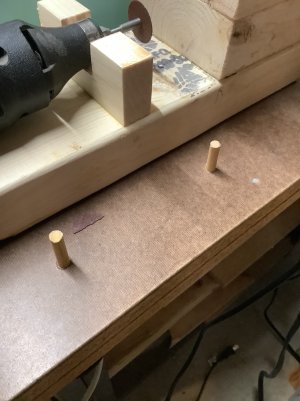
Photo 3. There are two holes on the bottom of the tool holder, to fit the two dowels mounted on the workbench.
I can pick upthe whole thing and take it to a remote work location, on the layout, in the garage, etc.
Photo 2. The little shelf on the back has magnet paper glued onto it, and I glue a washer to the bottom of cutoff wheel containers.
Photo 3. There are two holes on the bottom of the tool holder, to fit the two dowels mounted on the workbench.
I can pick upthe whole thing and take it to a remote work location, on the layout, in the garage, etc.
Attachments
shortwrench
Well-Known Member
Nice job. Well thought out.Photo 1. I recently replaced my motor tool holder. The old one had a broken corner and too few places for bits.
Photo 2. The little shelf on the back has magnet paper glued onto it, and I glue a washer to the bottom of cutoff wheel containers.
Photo 3. There are two holes on the bottom of the tool holder, to fit the two dowels mounted on the workbench.
I can pick upthe whole thing and take it to a remote work location, on the layout, in the garage, etc.
Canalligator
Well-Known Member
Thanks. Only issue is, that old Craftsman motor tool has an intermittent noisy bearing. When it is replaced, I may have to modify the tool holder.Nice job. Well thought out.
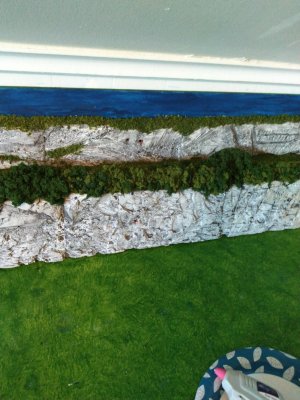
STATIC GRASS WITHOUT APPLICATOR
Non-applicator method (found on the internet) to apply the static grass:
Aileens tacky glue, Static grass, Plastic comb, beard (hair may work?).
Mix colors and lengths of static grass in small foil pot pie tin (foil/aluminum kills the static down while mixing grass).
Apply Aileens liberally in small 3-4" area on the layout. If you have too large an area the glue starts to get a dry skin.
Use flat tip tweezers to set static grass upright in the glue.
As you set small areas of static grass in the glue, run plastic comb through beard hair to create static.
Move comb slowly back and forth just above the static grass. It pulls the grass up and collects any loose strands. You can also lightly brush the top of the grass with the comb. Be sure to re-static the comb. I generally make 3-4 passes over sections placed. It takes a few tries to get the hang of it.
After setting overnight, using hairspray, carefully spray areas (small amount of spray) that need blending and apply different colors or lengths using the same tweezer/comb method.
I ended up applying static grass using this method due to me purchasing the cheap $40 applicator 10 years ago that didn’t work. More grass laid down than stood up. Recently I saw a video side by side comparison of several applicators and the only one that impressed me was the $250 one from England. Too costly for me.
This method also allows me to apply static grass in tight areas where an applicator wouldn’t be able to get to.
Also works for making grass tufts – Mix your color/length combo. Dot parchment paper with Aileens, use tweezers/comb to set grass in glue. Set overnight, peel off with flat blade.
Needless to say, this method does require patience, a bit of dexterity and a beard (or hair?).
michaeljoe
Well-Known Member
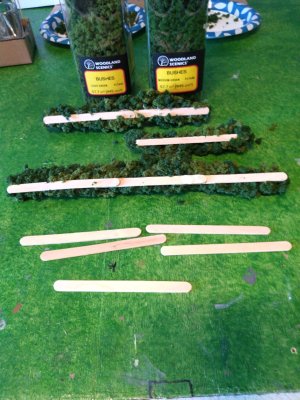
I have been using popsicle sticks.... To glue bushes on.... So to make rows of bushes and hedges.
Trying to post a pictures but again it's only posting a blank black picture it's not working...... I'll continue to try to make the pictures work.
Trying to post a pictures but again it's only posting a blank black picture it's not working...... I'll continue to try to make the pictures work.
Attachments

santafewillie
Same Ol' Buzzard
Try this.I have been using popsicle sticks.... To glue bushes on.... So to make rows of bushes and hedges.
Trying to post a pictures but again it's only posting a blank black picture it's not working...... I'll continue to try to make the pictures work.
1) Open the folder containing the picture using the "Thumbnail" view.
2) Right click on the thumbnail to bring up the dialog box and left click on "Copy".
3) Return to the forum page.
4) Then position the cursor in the "Reply" box and right click again for the dialog box; then left click "Paste".
Affiliate Disclosure: We may receive a commision from some of the links and ads shown on this website (Learn More Here)