Topherisme
Chris wants more hobby time!!!
I know it’s down the road from me a bit, but I like to plan ahead…. Is there a thread here dedicated to signals, the how to, wiring, hardware, etc? Did a search but just kinda jumps around…

I don't know of one. The thing I have always said about signals (working fully automated ones) is that is where the complexity is like stepping off a cliff. There are so many different ways to do them, especially now with the digital technology.I know it’s down the road from me a bit, but I like to plan ahead…. Is there a thread here dedicated to signals, the how to, wiring, hardware, etc? Did a search but just kinda jumps around…
Did I post this? No I didn’t, but it’s exactly what I’m going through right now. Wow! Finishing the basement, curve radius’ and the pen and paper drawings. Wow!Spent that last couple months prepping my basement for the build, and while the fumes from the Flex Seal paint might have made me a bit loopy I still want to attempt what will be for me a good challenge…
Plan is around the walls double deck layout with helix. Cuz of space restriction min radius will be 24.5, max 30, 2.75 between centers.
Hoping the 24.5 radius will work for the helix. #s 4 and 6 turnouts will be used, again for space saving.
When it comes to scenery, wanted to stick to something I know, so has to be something upper Midwest. Because of the helix I wanted a tunnel, a reason for the train to disappear. After some research I decided on the Duncan Tunnel, southern Indiana. I will have a pretty curvy layout, what better excuse for that than the Ohio River. Will be double track main lower level with a yard, single track with a couple passing sidings upper. Main goal is to watch the trains traverse aspect, but will have opportunities for switching fun as well.
Any and all opinions on track spacing, radius and anything else is of course always welcome!!! If interested I can throw some pics of space being used, but my track plan is pen and paper and probably only legible to me lol
Really looking forward to this build!!!!!!!!!
Hope you are coming along! Slow go for me, but I finally have the lower level main line benchwork almost done. I say almost, I know when I start laying track I will see something I would rather do and modify as neededDid I post this? No I didn’t, but it’s exactly what I’m going through right now. Wow! Finishing the basement, curve radius’ and the pen and paper drawings. Wow!
 The way it goes with me lol
Wow! Nice!Hope you are coming along! Slow go for me, but I finally have the lower level main line benchwork almost done. I say almost, I know when I start laying track I will see something I would rather do and modify as needed
That's coming along quite nicely, I'm going to enjoy watching this build of yours.View attachment 178439View attachment 178440This area will be coal mine. Track far left bottom pic will be the branch line connecting, be slightly elevated as it is track that approaches helix. Upper level will have the coal powered power plant it delivers to. Space measures roughly 60” x 24”, can those who have modeled a coal mine confirm that is enough to drop in the scene please…
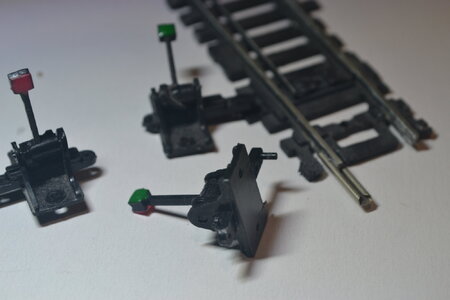
Thanks for the post RicoWhat I’ve done if the arm still sticks out enough when the points are set for the straight route is drill a hole and still use the throw. If not you can still do it with a stiff wire bent into the hole in the center and secured under the arm.
You might be able to simply extend the arm but I’m not sure what glue you’d use, maybe melted together?
With the Caboose ground throws DO NOT push them past the horizontal position.
You'll feel the stop when you throw them, going past that will spread the mechanism and make it harder to throw back.
Willie uses track nails to limit the throw, an eloquent solution!
 Thinking they were used in a yard and had to be cutoff for space, see what I can do with them…. I do remember Willies post, also remember N scale will work, gonna order both and see what I like best. Just hope I can figure out those short arms, believe I got a few of em…
That's really looking good, you've got a lot done in a short time.View attachment 178551View attachment 178552Probably not the best pics…. Been working on elevation. Top pic is where coal mine will reside, 2 mains bottom most level, branch track with creek running beside it heading up to the mine…. Bottom pic will be roads and a few homesteads…
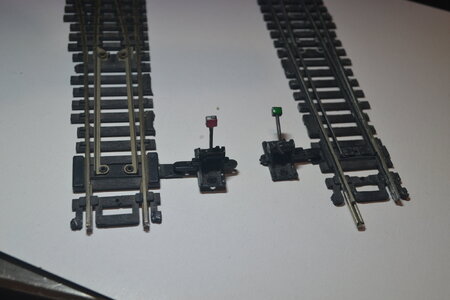
Yes the caboose industries will work I've used numerous ones ( 30-40) some I had to make and extension out of piano wire not to many of those just if I couldn't mount the ground through where is should beView attachment 178446I buy used, just can’t afford new, and sometimes you get what you have above. I have never used Caboose Industries ground throws, is there a way they can still be attached to the throw arm if it’s been cut like the example to the left is showing?
There's no reason I can think of why they wouldn't, they are, after all, the same as most switches a simple manual circuit breakerI have decided to use single pole light switches for power to tracks on/off. Can buy a cheap 15 amp switch for $1.40, can’t find a toggle switch for much less than $3, good or bad option? I want each block with its own power to trace a short easier, make sense?
Just found light switches for under a buck, be a sizable savings if you guys think they will work…