
You are using an out of date browser. It may not display this or other websites correctly.
You should upgrade or use an alternative browser.
You should upgrade or use an alternative browser.
How to Make Trees and Shrubs
- Thread starter grove den
- Start date
ModelRailroadForums.com is a free Model Railroad Discussion Forum and photo gallery. We cover all scales and sizes of model railroads. Online since 2002, it's one of the oldest and largest model railroad forums on the web. Whether you're a master model railroader or just getting started, you'll find something of interest here.


Affiliate Disclosure: We may receive a commision from some of the links and ads shown on this website (Learn More Here)
grove den
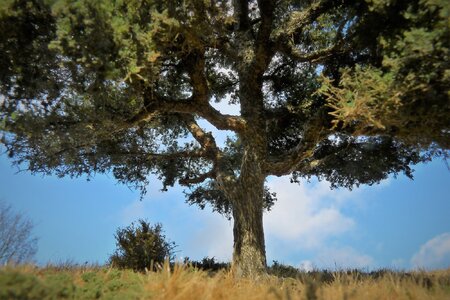
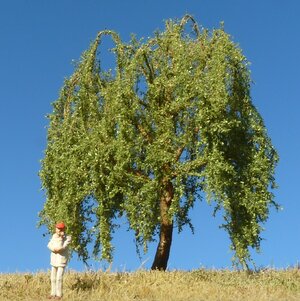
naturally natural trees
Thank you Max!
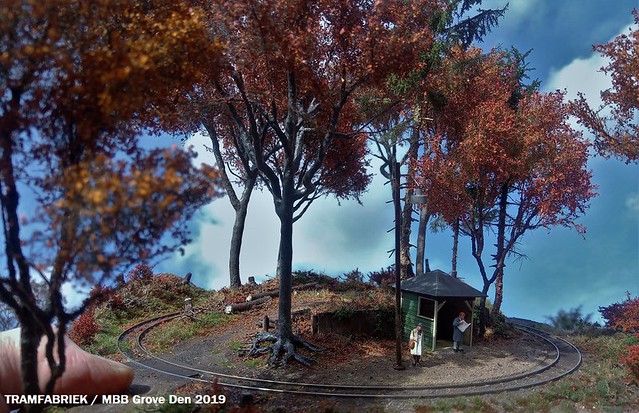
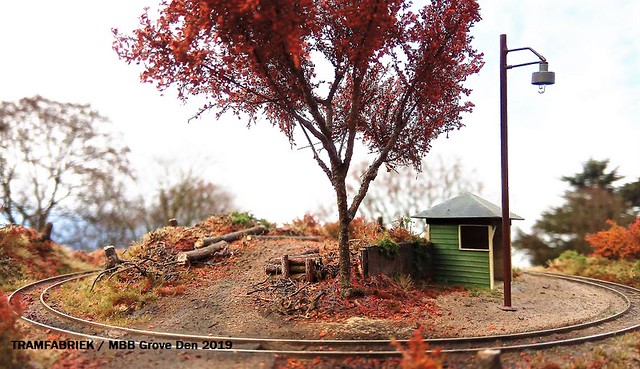
Now something different: Autumn and a lot of tees in a small space, actualy a box : 1 foot x 1 foot x 10 inches
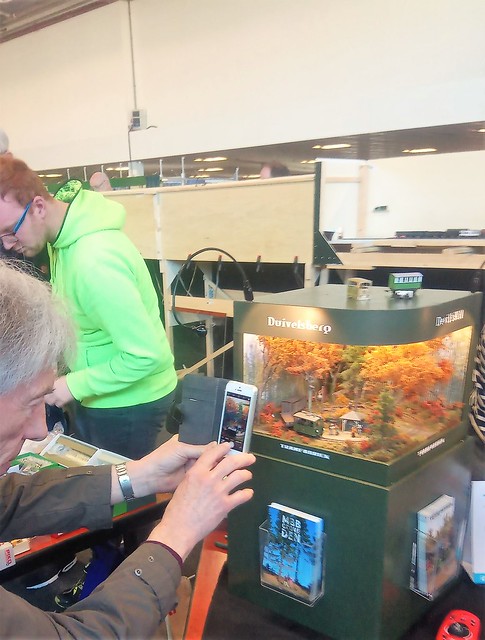 Sven diorama Rail 2019 Klform by Jos Geurts, on Flickr
before the great cut...
 Sven diorama jan 2019 bijna voltooid 2 klform by Jos Geurts, on Flickr
and after
 Sven diorama jan 2019 aanzicht van links klform by Jos Geurts, on Flickr
and at the very very first beginning....
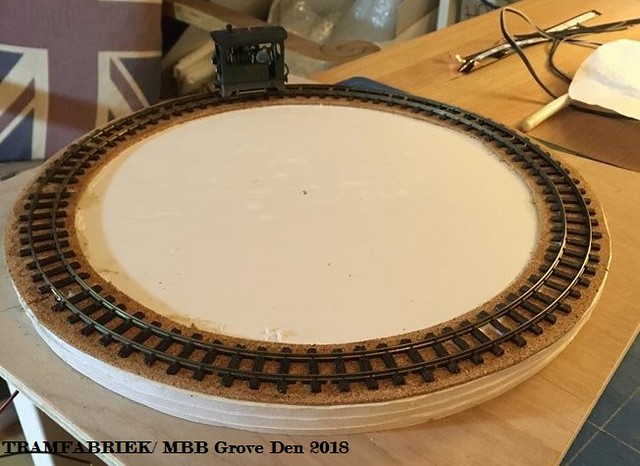 Sven tramfabriek dio 2019 kaal by Jos Geurts, on Flickr
Jos
Now something different: Autumn and a lot of tees in a small space, actualy a box : 1 foot x 1 foot x 10 inches
Sven diorama Rail 2019 Klform by Jos Geurts, on Flickrbefore the great cut...
Sven diorama jan 2019 bijna voltooid 2 klform by Jos Geurts, on Flickrand after
Sven diorama jan 2019 aanzicht van links klform by Jos Geurts, on Flickrand at the very very first beginning....
Sven tramfabriek dio 2019 kaal by Jos Geurts, on FlickrJos
grove den
naturally natural trees
Not realy "new" trees... actualy the same stuff as usual: trees")
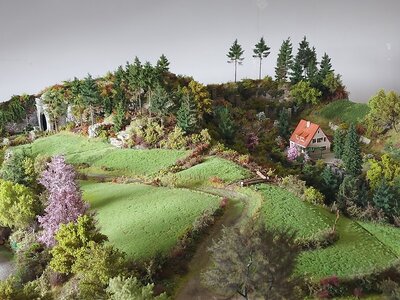
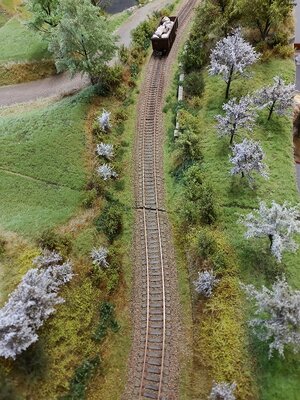
And did the scenery for a customerlayout. Situated somewhere in germany and during early spring.
And did the scenery for a customerlayout. Situated somewhere in germany and during early spring.
Attachments
-
 gossip in the forrest.jpg340.7 KB · Views: 252
 -
 P1290982 (2).JPG579.9 KB · Views: 298
 -
 P1270341 (4).JPG240.9 KB · Views: 255
 -
 P1270052 (2).JPG689.7 KB · Views: 311
 -
 customarlayout landscape spring 2.jpg357.4 KB · Views: 272
 -
 cutomarlayout landscape spring.jpg265.7 KB · Views: 304
 -
 customerlayout spring.jpg324.3 KB · Views: 269
grove den
naturally natural trees
a small "how to"about making "conifer" kind of trees.
Unfortunatly you have to use a "grassmaster"/ "static grass applicator".
A customer asked me if I could make a "North west America "style conifers/trees in scale N and of course cheap and fast to make trees in serie like on an assambly line.
The trees should be about 4-6 inches tall and all with a small base! Kind of sitka spruce in the artic regions of Alaska.
You need a core wire of iron, like floristic wire : 1,4 or 1,6 mm diameter( about 1/16 inch) and in my case 4 or 6 inches longfor the actual tree and 2 inches extra so you can hold the tree more easily during the proces of adding the fibres etc etc.
The glues I use are :
# a simple transparant hobbyglue for the first layer of the fibres.
# the next layers are glued with sprayglue.
#12 mm fibres and 2 mm fibres. colour: whatever.... I always give the fibers before adding the "needles"of fine turf a dark green coat of acrylpaint (out of a spraycan )
# spraycan og dark green acrylpaint
# Spraycan of ocre/khaki acrylpaint
# pair of sharp scissors
# tweezers to get rid of the "wrong placed/glued fibres
# small fine strainer
# fine turf green grass or conifergreen
# some time......
start with piece of core wire, the trunk and add some hobbyglue on it where you want the fibres( = branches!)
take the static grass apl. filles with some 12 mm fibers and shoot them into the glue...
They will all stick regular nice and round the wire ...

let it dry for 20 minutes or so( of course you are making 30 trees so just continue to make the other 29 of these "skeletons" so when ready the first one is almost dry and ready to add the next "layer of 12 mm fibres.!
BUT!!... before adding the second layer you have to cut the tree in "shape"= conical with a very small base in My case( artic sitka spruce!)

As you can see I added( cut a lot of space between some "branches". don't be afraid to cut "holes"! Because the second layer could fill up these gasps/holes...SO actualy less fibres is more...
the second layer of the 12 mm fibres added with just a little bit of sprayglue over the outside of the first layer of fibres.

As you can see ...again full of fibres( = branches) . So again cut gasps/holes between the fibres.... and again the overall conical shape with a very small base .

For those who don't have much time: do not read the following:
I add also some final 2 mm fibres to the tree by , again a mist of sprayglue over the fibres by holding the tree upside down AND add the 2 mm fibres with a small teasieve ! just 2 or 3 "ticks"against the sieve/strainer is enough!
Now I spraypaint the whole tree in a dark green colour . It wil give the vibres and the tree more strength! The base is painted in a khakiocre colour as it looks like these parts are already "dead" because of lack of sunlight .Let dry for an hour.

Finale: add the fine turf : green grass or conifer colour again with a strainer by , again holding the tree upside down when spraying a little bit sprayglue and immediately the fine turf....
hold the tree upright and just tip with your finger againt the groundpin and the loose particals of turf will fall down back in the ( in my case) shoebox.

et voila!

Jos
sorry about the poor quality of the cellphone pictures.
Unfortunatly you have to use a "grassmaster"/ "static grass applicator".
A customer asked me if I could make a "North west America "style conifers/trees in scale N and of course cheap and fast to make trees in serie like on an assambly line.
The trees should be about 4-6 inches tall and all with a small base! Kind of sitka spruce in the artic regions of Alaska.
You need a core wire of iron, like floristic wire : 1,4 or 1,6 mm diameter( about 1/16 inch) and in my case 4 or 6 inches longfor the actual tree and 2 inches extra so you can hold the tree more easily during the proces of adding the fibres etc etc.
The glues I use are :
# a simple transparant hobbyglue for the first layer of the fibres.
# the next layers are glued with sprayglue.
#12 mm fibres and 2 mm fibres. colour: whatever.... I always give the fibers before adding the "needles"of fine turf a dark green coat of acrylpaint (out of a spraycan )
# spraycan og dark green acrylpaint
# Spraycan of ocre/khaki acrylpaint
# pair of sharp scissors
# tweezers to get rid of the "wrong placed/glued fibres
# small fine strainer
# fine turf green grass or conifergreen
# some time......
start with piece of core wire, the trunk and add some hobbyglue on it where you want the fibres( = branches!)
take the static grass apl. filles with some 12 mm fibers and shoot them into the glue...
They will all stick regular nice and round the wire ...
let it dry for 20 minutes or so( of course you are making 30 trees so just continue to make the other 29 of these "skeletons"
so when ready the first one is almost dry and ready to add the next "layer of 12 mm fibres.!BUT!!... before adding the second layer you have to cut the tree in "shape"= conical with a very small base in My case( artic sitka spruce!)
As you can see I added( cut a lot of space between some "branches". don't be afraid to cut "holes"! Because the second layer could fill up these gasps/holes...SO actualy less fibres is more...
the second layer of the 12 mm fibres added with just a little bit of sprayglue over the outside of the first layer of fibres.
As you can see ...again full of fibres( = branches) . So again cut gasps/holes between the fibres.... and again the overall conical shape with a very small base .
For those who don't have much time: do not read the following:
I add also some final 2 mm fibres to the tree by , again a mist of sprayglue over the fibres by holding the tree upside down AND add the 2 mm fibres with a small teasieve ! just 2 or 3 "ticks"against the sieve/strainer is enough!
Now I spraypaint the whole tree in a dark green colour . It wil give the vibres and the tree more strength! The base is painted in a khakiocre colour as it looks like these parts are already "dead" because of lack of sunlight .Let dry for an hour.
Finale: add the fine turf : green grass or conifer colour again with a strainer by , again holding the tree upside down when spraying a little bit sprayglue and immediately the fine turf....
hold the tree upright and just tip with your finger againt the groundpin and the loose particals of turf will fall down back in the ( in my case) shoebox.
et voila!
Jos
sorry about the poor quality of the cellphone pictures.
Last edited:
Lynnb
Well-Known Member
Jos excellent tutorial, I’ve done furnace filter trees, scenic express Super Trees and pretty much flocked up cheapo trees but have never tried this. I have WS Static Grass applicator that I’ve only used once but would like to try making some Tufts, are you familiar with making Tufts?
grove den
naturally natural trees
Thanks Glenn and Lynn.
@Lynnb: "
are you familiar with making Tufts?
Well that is actualy the basic of using a static appl.!
I use a glue that doesn't set as fast as white glue... the "surface "of the tiny blobs has to be "open" for some time.
I use /made a mixture of white glue and gesso or matte medium. Or glue that bookrestaurateurs use to glue the edges of the pages to each other...this glue will stay elastic
The "tiny blobs" are made with a pipette so the mix should not be to viscous. On the other hand it should also not to liquid ... otherwise the blob wont be a blob ...more a flat drop.
The blobs are put on a piece of paper that is used for cooking stuff in ovens. ( didn't find the right word for it in english) This paper is , kind of,"oiled" so when the tufts are ready they can be easily removed with tweezers.
Of course I place the blobs in a row (s!!)with enough distance to each other knowing what kind of lengt I use for the fibres!
The first layer is always some 1 or 2 mm fibres....let them dry and add than the longer fibres. Of course using the glue mix again before the fibres are shoot on the smaller basic tufts.
The "easiest" way of adding that second layer of glue is using a small cheap long haired brush.
I experimented with a piece of aluminiumfoil under the " oiled/ waxed"paper and it worked well/better for the NOCH grass stat. appl.( 15 kV) But I do have also a RTS Greenkeper of 55vK and he does the job well without the foil....
Jos
@Lynnb: "
are you familiar with making Tufts?
Well that is actualy the basic of using a static appl.!
I use a glue that doesn't set as fast as white glue... the "surface "of the tiny blobs has to be "open" for some time.
I use /made a mixture of white glue and gesso or matte medium. Or glue that bookrestaurateurs use to glue the edges of the pages to each other...this glue will stay elastic
The "tiny blobs" are made with a pipette so the mix should not be to viscous. On the other hand it should also not to liquid ...
otherwise the blob wont be a blob ...more a flat drop.The blobs are put on a piece of paper that is used for cooking stuff in ovens. ( didn't find the right word for it in english) This paper is , kind of,"oiled" so when the tufts are ready they can be easily removed with tweezers.
Of course I place the blobs in a row (s!!)with enough distance to each other knowing what kind of lengt I use for the fibres!
The first layer is always some 1 or 2 mm fibres....let them dry and add than the longer fibres. Of course using the glue mix again before the fibres are shoot on the smaller basic tufts.
The "easiest" way of adding that second layer of glue is using a small cheap long haired brush.
I experimented with a piece of aluminiumfoil under the " oiled/ waxed"paper and it worked well/better for the NOCH grass stat. appl.( 15 kV) But I do have also a RTS Greenkeper of 55vK and he does the job well without the foil....
Jos
Last edited:
JeffH
Well-Known Member
Parchment paper worked for me. I imagine wax paper would also work.
N scale tufts. A drop of Elmers Glue-All, some 2mm and 4mm static grass, and a homemade static applicator! I also made strips, like you would see between the ruts in an old gravel road.


These pics were my first attempt. I didn't get the grass to stand up as well as I could have. Didn't have the applicator close enough to keep the grass standing up better. But I'm happy. from 2-3 feet, they look great!
N scale tufts. A drop of Elmers Glue-All, some 2mm and 4mm static grass, and a homemade static applicator! I also made strips, like you would see between the ruts in an old gravel road.
These pics were my first attempt. I didn't get the grass to stand up as well as I could have. Didn't have the applicator close enough to keep the grass standing up better. But I'm happy. from 2-3 feet, they look great!
Last edited:
Lynnb
Well-Known Member
Excellent Jos , I need to try this. ThanksThanks Glenn and Lynn.
@Lynnb: "
are you familiar with making Tufts?
Well that is actualy the basic of using a static appl.!
I use a glue that doesn't set as fast as white glue... the "surface "of the tiny blobs has to be "open" for some time.
I use /made a mixture of white glue and gesso or matte medium. Or glue that bookrestaurateurs use to glue the edges of the pages to each other...this glue will stay elastic
The "tiny blobs" are made with a pipette so the mix should not be to viscous. On the other hand it should also not to liquid ...
The blobs are put on a piece of paper that is used for cooking stuff in ovens. ( didn't find the right word for it in english) This paper is , kind of,"oiled" so when the tufts are ready they can be easily removed with tweezers.
Of course I place the blobs in a row (s!!)with enough distance to each other knowing what kind of lengt I use for the fibres!
The first layer is always some 1 or 2 mm fibres....let them dry and add than the longer fibres. Of course using the glue mix again before the fibres are shoot on the smaller basic tufts.
The "easiest" way of adding that second layer of glue is using a small cheap long haired brush.
I experimented with a piece of aluminiumfoil under the " oiled/ waxed"paper and it worked well/better for the NOCH grass stat. appl.( 15 kV) But I do have also a RTS Greenkeper of 55vK and he does the job well without the foil....
Jos
Lynnb
Well-Known Member
Do you also start with short 2mm and then go over it again with longer? What lengths please. Looks greatI don't have an example/photo of making tufts.... View attachment 161818 I , mostly, make them right on the spot where they belong...
Lynnb
Well-Known Member
They definitely look good.Parchment paper worked for me. I imagine wax paper would also work.
N scale tufts. A drop of Elmers Glue-All, some 2mm and 4mm static grass, and a homemade static applicator! I also made strips, like you would see between the ruts in an old gravel road.
View attachment 161814
View attachment 161815
These pics were my first attempt. I didn't get the grass to stand up as well as I could have. Didn't have the applicator close enough to keep the grass standing up better. But I'm happy. from 2-3 feet, they look great!
grove den
naturally natural trees
@Lynnb:
" what lengths please"
Start with some 1 mm and the second layer are the 12 mm fibres.
The 1 mm ones can be darker or even Brown... as a base.
I can imagine that sometimes the colour of dry grass or hay or burnt grass is a better choise. It is up to you to decide/ how it works/ looks on your layoutscenery.
Jos
Lynnb
Well-Known Member
Perfect thank you@Lynnb:
" what lengths please"
Start with some 1 mm and the second layer are the 12 mm fibres.
The 1 mm ones can be darker or even Brown... as a base.
I can imagine that sometimes the colour of dry grass or hay or burnt grass is a better choise. It is up to you to decide/ how it works/ looks on your layoutscenery.
Jos
grove den
naturally natural trees
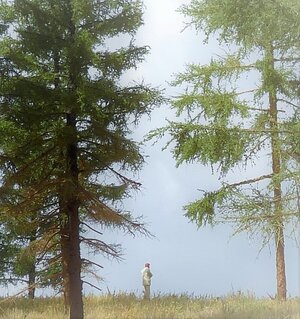
Some other kind of trees. More specific growing in cities/along streets. They are less wide as "common"trees. It's a type of tree that ends, in latin, with: , "fastigiata"
because I don't have a "city"diorama I've placed the trees in a row on a piece of "wild nature" and of course always that gossip...even among the Preisermen!

because I don't have a "city"diorama I've placed the trees in a row on a piece of "wild nature" and of course always that gossip...even among the Preisermen!
TLOC
Well-Known Member
These trees are great, thanks for sharingSome other kind of trees. More specific growing in cities/along streets. They are less wide as "common"trees. It's a type of tree that ends, in latin, with: , "fastigiata"
because I don't have a "city"diorama I've placed the trees in a row on a piece of "wild nature" and of course always that gossip...even among the Preisermen!
View attachment 162443
grove den
naturally natural trees
@747flier:
Is was not a mistake....( it was what the client asked) overhere( the Alps and Schwarzwald) it is common that larches can be covered with( the first!)snow before they loose their needles...even when they are still a little bit green/yellowish! And yes within 2 weeks they all will dropp their beautifull yellow /brown golden needles.....
About the disapeared pictures:
Mostly the "old ones"........the new ones( photos) are more up to date regarding new techniques and materials I use.
Jos

Only one error could I fine, his Larches in Winter. The Larch (I have a couple at my house) turn yellow and drop their needles in Winter.
Is was not a mistake....
( it was what the client asked) overhere( the Alps and Schwarzwald) it is common that larches can be covered with( the first!)snow before they loose their needles...even when they are still a little bit green/yellowish! And yes within 2 weeks they all will dropp their beautifull yellow /brown golden needles.....About the disapeared pictures:
Mostly the "old ones"........the new ones( photos) are more up to date regarding new techniques and materials I use.
Jos
Affiliate Disclosure: We may receive a commision from some of the links and ads shown on this website (Learn More Here)