Central Valley Truss Bridge


Motley

Active Member
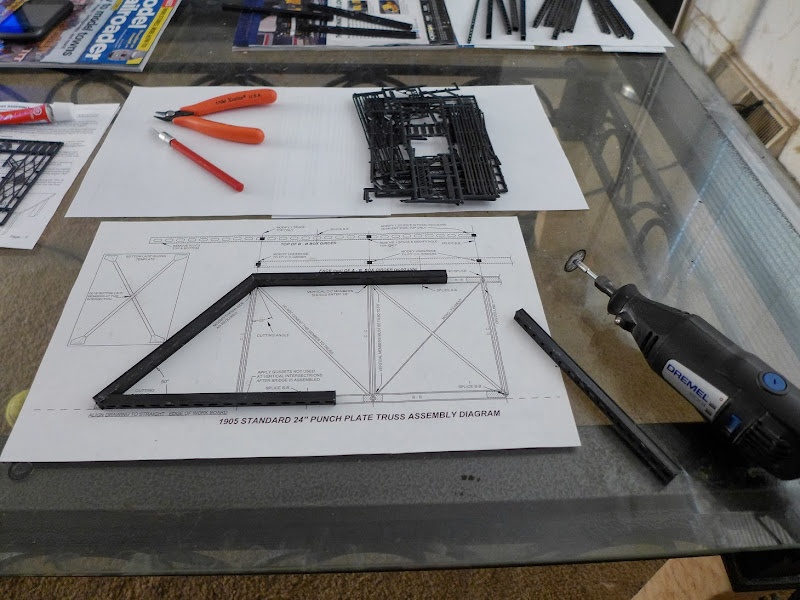
I just picked up the new release of the CV 150' Truss Bridge. I've built a CV girder bridge before, and it was fairly easy.

This bridge has a lot more parts, and seems kinda complicated. I'm replacing this bridge with my Atlas truss bridge. In the main layout room.
I'm redoing this entire area. With a new bigger river under the bridge, that will go to the edge of layout. I'm ripping out the lower tracks there, and there will be two new lower tracks, that will traverse the river
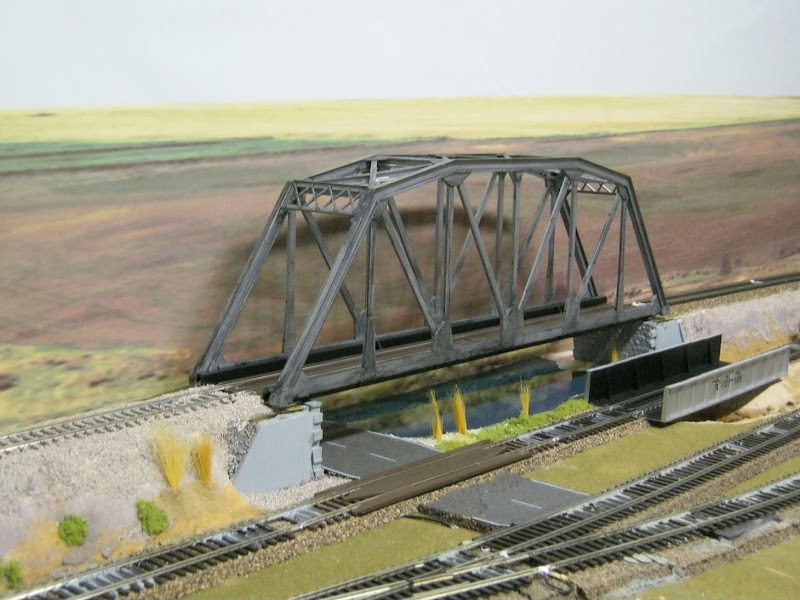
Old bridge:

IMG_0349.JPG


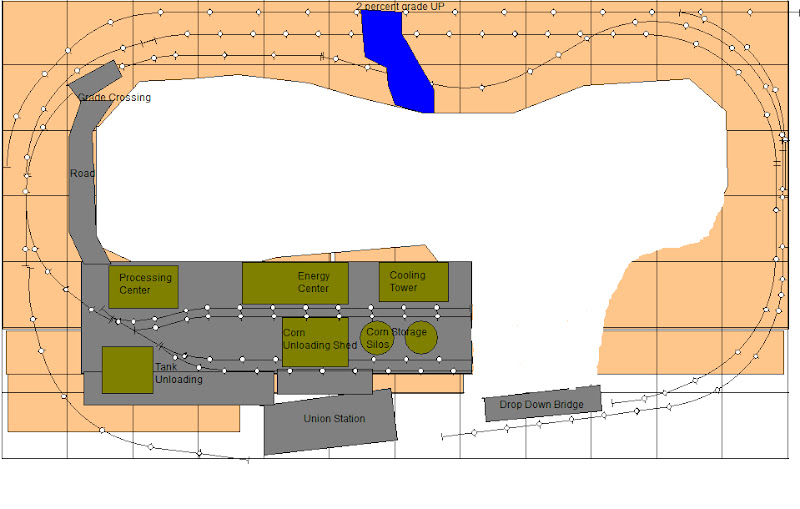
Here is the re-designed trackplan for this main layout room. This new bridge is the top track against the wall.

Layout%252000.jpg


Here is the progress I made so far. I'll keep updating this thread with progress photos.

P1000167.jpg
 
I really like that Motley. I have always found bridges fascinating. I will be glad when the time comes that I can build an actual layout. I like yours.
 
Thanks guys, I appreciate the feedback. This bridge is much better than the Atlas. That one only took me like 1hr to build, and this one will take me at least a week or so. I hope to finish it by next weekend, and install it.
 
That's an excellent kit. Much more detailed than the Atlas. I kew a fellow who had a large layout and strung six of those together plus a secction that was deck girder. He loved bridges too, and this was one of three really big nice ones on his layout.
 
Alan, that was Jim G. (RIP). He built that bridge for the contest at the SER convention in (IIRC) 1982. He scored about 90 pts. with it. He would have scored higher but it had no scratch built parts. Doesn't matter, it was and still is a beautiful model. However, for how much longer we're not sure. The wife of the new owner wants to tear the layout down, but grampa wants to keep it.

Also, Jim Thorington, has taken his layout down, and OMH here has bought the entire collection, except for the brass. Dave is selling those on consignment, and I've already fallen victim to one. He had a LOT of stuff.
 
Last edited by a moderator:
Alan, that was Jim G. (RIP). He built that bridge for the contest at the SER convention in (IIRC) 1982. He scored about 90 pts. with it. He would have scored higher but it had no scratch built parts. Doesn't matter, it was and still is a beautiful model. However, for how much longer we're not sure. The wife of the new owner wants to tear the layout down, but grampa wants to keep it.

Also, Jim Thorington, has taken his layout down, and OMH here has bought the entire collection, except for the brass. Dave is selling those on consignment, and I've already fallen victim to one. He had a LOT of stuff.

Carey,

I know!!! Guess who painted it? :D Damn near burned me up, there were so many fumes in the workshop when I finished it! I hope grandpa wins the argument! I have a ton of sweat equity in that layout! There are some great structures on it too. The other two bridges, that Muscoda iron mine scene (I painted that one too) I hope if it is dismantled they do it selectively and don't just haul it out to the curb!

I've been talking with Jim Thorington. I painted two Santa Fe 4-8-4's for him and kept a third as payment, which is going together as we speak. I also fell victim to a 5000 series 2-10-4 he had. He numbered all his brass, and the number on the bottom cover plate of the 2-10-4 was 61!!! Not sure where it stood in line :eek:
 
He also has a lot of SR steam, and IIRC 5 are already gone via Dave. He had more ATSF than anything, but I believe that won't sell well here. If it doesn't, its going to Caboose Hobbies in Denver. Most of this is still unpainted.

If wifey wins at Gibson's, I hope that they sell it off in pieces parts, as I too have a lot of sweat equity in that layout. Getting that complicated yard throat working without derailments, was a chore.
 
Michael,

That bridge will make a nice addition to your remodel. Make sure and post a pic or two when you get it installed.

It took me over a month to build the 275' tall steel viaduct bridge from micro engineering. Great results though.

Brad
 
Wow this thing is up there on the difficulty scale. You don't just simply glue it together. You have to make all kinds of cuts to the box girders to fit a template they provide.

P1000170.jpg
 
Building a kit like this is one of the reasons why I keep a razor saw, jewelers saw and model mitre box around.
 
It's a character builder! Can be a vocabulary builder too :p

Funny Alan, real funny. This is the first kit I've built thats like this, so its challenging. Don't know why they couldn't just create the molded parts that will fit together, instead of having to make so many modifications. I need law degree in structural engineering.

Its also taking a very long time. Maybe I'll finish by next month. LOL

I need four of these sections, two for each side. I completed one last night.
 
Last edited by a moderator:
I am guessing it could also lead to premature hair loss,from pulling one's hair out no? Also on the subject of Jim's brass collection,I too have my eye on a brass Southern Steamer.William.
 
Funny Alan, real funny.

One tries ;)

This is the first kit I've built thats like this, so its challenging. Don't know why they couldn't just create the molded parts that will fit together, instead of having to make so many modifications. I need law degree in structural engineering.

Its also taking a very long time. Maybe I'll finish by next month. LOL

I need four of these sections, two for each side. I completed one last night.

That's why they call 'em carftsman kits my friend. You are transitioning to a different type of model building (good for you BTW), and when you are done you'll have expanded your skillset and feel pretty good about what you put together. For now: take your time, follow the instructions. Read over the steps a couple of times and test fit as you go. I often go over the instructions of a kit like this three or four times before building it. If you do what they say, it will go together like it's supposed to, and it will blow the Atlas bridge away. Stick with it and if you do get frustrated, put it away for a day and come back to it fresh. You'd be surprised how many times a solution to a problem comes to you overnight. Happens to me all the time. :cool:
 
I am guessing it could also lead to premature hair loss,from pulling one's hair out no? Also on the subject of Jim's brass collection,I too have my eye on a brass Southern Steamer.William.

Any one in particular? I have a list up here somewhere. He had some decent Southern stuff. I like that little ten wheeler that PFM did. Put two coaches behind it and you have a perfect little layout sized passenger train! I have a Ps-4 up here that I need to get painted and re-assembled. Not sure when I'll get to it, there are so many!!!
 
Wow this thing is up there on the difficulty scale. You don't just simply glue it together. You have to make all kinds of cuts to the box girders to fit a template they provide.

P1000170.jpg

And I was thinking of getting a 14 of those kits to make a double track bridge, lol. Unfortunatly it might me my best option short of brass, lol.

100_2608.jpg


2004123023340816675.jpg


100_2610.jpg


4700_1182106800.jpg
 
Hey Motley,

Excellent undertaking! How hard is it to cut the pieces, must be some kind of plastic (now called resin). Use the dremel for everything or does a cutter work for part of the cut?

I look forward to following your progress! I ended settling with a decorative truss bridge for my layout that goes around the living room. I am just about done with a suspension bridge. I was going to begin installing the structure of my layout today but it is kind of hot in our living room.

Anyway, I will watch your progress.

logandsawman
 
When you get to building a kit like this, it reminds me of building R/C planes over plans. All are built like this. I would put wax paper over the plan and then start building. I could glue the parts in place without worrying that the wood would (wood would lol) stick to the plans. I would use T-pins to hold the parts in place while they dried. Many guys use the tiles from drop ceilings as a building board so the T-pins could be pushed into it. Again, it's funny how things cross-over between hobbies.
 
Last edited by a moderator:
Mark, building 14 of these bridges would be insane! It would take very long to build all those. But that would looks spectacular.

I am using the dremmel to cut everything, and that seems to be working fine. I'm taking my time, little bit here, by little bit, its coming along.

This kit caught me by surprise. I built the CV girder bridge kit, and it was really easy. I guess I was expecting about the same kind of kit.

Thanks everybody for all the feedback and tips.


Back
Top