A Beginner's Journey


Jacob Z

Member
I'm retired, haven't touched model railroads since I had a toy Hornby set as a child, and looking to get into what looks like a really fascinating and multidimensional hobby. I've decided to journal my experiences as I get started all the way through to (I hope!) completing my first layout.

I'm not really expecting anybody to read this, but if I don't write it down somewhere, it will keep going around in my head!

Where I'm starting from...
Experience: zero, not only with model railroads but anything even remotely related.
Confidence: low; I have never shown any crafting or artistic talents
Skill level: klutz

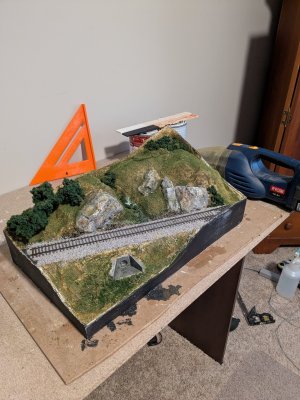
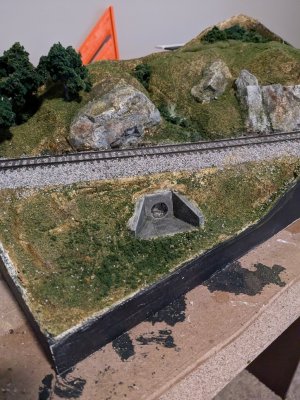
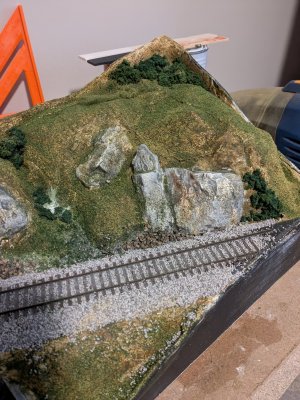
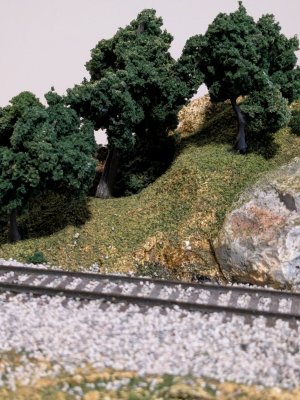
So before I start work on a layout of my own, I watched many hours of videos (if you've ever posted a video, I probably watched it, so thank you!). And I ordered "The Scenery Kit" from Woodland Scenics. That seemed like a good way to learn some basics, be able to practice them on a diorama that won't matter if I make mistakes, and generally build some confidence.
 
Last edited:
Step one of the Kit is to assemble a box. I won't bore anybody with the details. I did learn one lesson though: Precision matters. Despite my best efforts, my box is not perfectly square, and it's bugging me just a tiny bit. Anyway.

The next step is to create terrain. This is done with plaster cloth roll over wadded up sheets of newspaper. This was pretty straightforward even for a klutz like me, and the cloth fell very naturally into realistic looking folds, crags, and so on. Lessons learned here for next time: One, be thorough about spreading the plaster to fill as many holes in the mesh as possible. It's going to matter later when it comes to painting and flocking the surface. And two, pay attention to the seams where on sheet overlays another. I ended up with some small edges sticking up, which I didn't notice until much later.
 
Once the plaster had dried (there's a lot of "wait will it dries" in this hobby, it turns out), it was time to add a small culvert and also attach the provided rocks. The instructions said to adjust the plaster with a hobby knife to get a better fit, which confused me at first. It looked like I would need to carve a hole in the plaster to inset the culvert. But after watching a video on the Woodland Scenics site, it turned out that was actually the right thing to do. The rocks were easier, it was just a matter of shaving enough to get a good attachment. Lesson learned here is to give the glue time to get tacky before attempting to attach the rocks. The pictures below show how it looked at this stage. The culvert was colored before inserting it using a black wash. The rocks don't show out too well here, but will be much clearer once painted.

PXL_20241231_205136136.NIGHT.jpg
PXL_20241231_205107248.NIGHT.jpg
 
Now it was time to color the rocks. The kit described a "leopard spotting" technique with two colors followed by a black wash. There was also a video on Woodland Scenics demonstrating the technique. At first, I thought my effort here looked terrible. However, once the paints all dried, it looked really good. I actually felt pleased with it (which is an entirely new feeling for me with any art or craft project.) Lesson learned: Don't judge a finish until it's dry. (Honestly, I should know that by now having refinished the occasional table before now. By which I mean I have occasionally finished a table, not I finished an occasional table. Anyway.)

With the rocks dried, I applied a coat of "earth brown" paint to the hills. This is the point that I realized that I should have done a better job with the plaster. Next time. I was happy with the way there was a lot of natural variation from the way the paint washed over the slopes.

(In these pictures I have also laid down the track bed and track, and started ballasting, and then realized I hadn't taken any pictures of the terrain. So ignore that.)

PXL_20250102_135205530.jpg
PXL_20250102_135207541.MP~2.jpg
 
For your first time you are doing great! 👍 It's a hobby, so learn doing small projects. We all started simple and developed skills & techniques, from others and our own experiences.

Just remember "textural variance"...nothing in nature is all the same. Vary the color and types of ground cover.

Trees look better in odd numbers....1 random single, groups of 3, 5, 7, etc

Here's some examples
 

Attachments

  • DSCN2615.JPG
    DSCN2615.JPG
    607.9 KB · Views: 13
  • DSCN2614.JPG
    DSCN2614.JPG
    621.3 KB · Views: 13
  • DSCN2627.JPG
    DSCN2627.JPG
    858.2 KB · Views: 12
Last edited:
This is actually a pretty typical start for an intelligent person who researches, keeps an open mind, learns easily, and has a vision. So far, you seem to have all those working for you.

In nature, even vertical surfaces often have some greenery, whether a lone shrub or some tuft grasses....whatever. I would urge you to experiment with the orientation of your crude terrraformations to see how best to get them 'greened'. I often tilt modules to help with that, but for natural appearance, rock faces should only have green stuff on ledges, whether large or small, or in crevices. So, for those vertical surfaces, keep them vertical and use an aluminum pie place, the disposable kind, and put a tbsp of your blend of grasses, and gently blow out some of it from off the plate so that they fall onto a previously brushed horizontal or level surface, a ledge. You brush them with a light glue mixture using a small paint brush and then gently blow some greenery foam bit down onto it, or shake the pie place gently. Let the glued stuff dry, and then blow away what you don't want, and that can be blown away. Touch up where you need to.

For steep slopes, but you want them looking fairly green, pie plate blowing is a great way to do that. Spray the hillside/bank with some glue mixture, and then immediately blow some green stuff onto it. Don't forget some 'bushes', also a ground foam product.

I like your terrain so far. You have a great eye!

index.php


index.php


index.php
 
Last edited:
For never doing this before, you are off to a great start! everything you add will (trees, talus, undergrowth, etc..) will really bring this more to life.

Nice job!
Before I started down this path I had never heard the word "talus". I now realize that I had noticed it on other people's layouts, and realized what a difference a small detail like that makes to the realism.
 
This is actually a pretty typical start for an intelligent person who researches, keeps an open mind, learns easily, and has a vision. So far, you seem to have all those working for you.

In nature, even vertical surfaces often have some greenery, whether a lone shrub or some tuft grasses....whatever. I would urge you to experiment with the orientation of your crude terrraformations to see how best to get them 'greened'. I often tile modules to help with that, but for natural appearance, rock faces should only have green stuff on ledges, whether large or small, or in crevices. So, for those vertical surfaces, keep them vertical and use an aluminum pie place, the disposable kind, and put a tbsp of your blend of grasses, and gently blow out some of it from off the plate so that they fall onto a previously brushed horizontal or level surface, a ledge. You brush them with a light glue mixture using a small paint brush and then gently blow some greenery foam bit down onto it, or shake the pie place gently. Let the glued stuff dry, and then blow away what you don't want, and that can be blown away. Touch up where you need to.

For steep slopes, but you want them looking fairly green, pie plate blowing is a great way to do that. Spray the hillside/bank with some glue mixture, and then immediately blow some green stuff onto it. Don't forget some 'bushes', also a ground foam product.

I like your terrain so far. You have a great eye!
Thanks for the encouragement and the tips. I love your bridges, and the little details like the rust stains running down the support. Now I have an urge to figure out how to include a trellis bridge of some kind in my eventual layout. Also your rocks look so real!
 
DSC00534.JPG


DSC00535.JPG


DSC00536.JPG


The rocks in the first 2 photos are real rocks from my yard which has an endless supply.

In the 3rd photo, the rocks above the walkway are real rocks. The rock face below the walkway is foam covered with drywall compound,
and painted.

Don't underestimate your skill level and confidence-we all started at the same place. Keep us posted as you progress.
 
Any suggestions for removing loose grass and ballast without damage? Dustbuster? Shop vac?

Anyway, ballasting is now complete. Lesson learned: when people say to saturate the ballast, they are not messing around. Also, patience.

Also, the base layer of grass is down. I tried to keep it off the vertical faces as much as possible. Once it is dry, I will add some other colors for variation. After that, trees, bushes, talus, and other details.

I need to figure out how to patch that crack that has developed. I'm thinking maybe plaster and a black wash.

PXL_20250103_112416123.MP.jpg
PXL_20250103_112426986.MP.jpg
 
Any suggestions for removing loose grass and ballast without damage? Dustbuster? Shop vac?

Anyway, ballasting is now complete. Lesson learned: when people say to saturate the ballast, they are not messing around. Also, patience.

Also, the base layer of grass is down. I tried to keep it off the vertical faces as much as possible. Once it is dry, I will add some other colors for variation. After that, trees, bushes, talus, and other details.

I need to figure out how to patch that crack that has developed. I'm thinking maybe plaster and a black wash.

View attachment 208326View attachment 208327
To remove the loose ballast and grass use a Dustbuster or other battery powered vacuum rather than a
shop vac. The battery vacs have enough power to suck up the unwanted material while the shop vac
with higher suction will want to suck everything off the top of your layout. Either way, secure a piece of
pantyhose over the end of the vacuum nozzle to trap any material that you didn't want to get sucked
up such as people, trees, and other details. This way you won't have to dig through all the material
inside the vacuum to find inadvertently sucked up items. Most of the stuff that gets trapped by the
pantyhose can be used as talus.

Regarding the crack that developed-leave it alone. It mimics what happens in nature. Per Selector's
comments in post #7, it's an ideal place for a little bit of greenery-even a small tree growing from the
crack.

Keep up the good work.
 
Last edited:
Well, the project is now complete. Or at least, I got to the end of the booklet. Overall I am pleased with how it turned out for a first try, especially given my lack of crafting skills. And I ended up with the confidence to attempt a layout next. So thank you all for the encouragement. I know I have a huge amount more to learn, just looking at the amount of detail in other people's work, but I feel like I took a successful first step.

I added some lighter colors to the base layer of grass. They don't show up too much in the photos, but in person it definitely breaks up the unrealistic uniformity of the base layer. I also added some bushes and low-lying vegetation and a small cluster of trees. As shortwrench and Selector suggested, I filled the crack with bush material and it looks very good.

I decided to leave the hillside relatively sparse rather than go overboard with ground cover and bushes. I really like the look of the earth undercoat showing through in places. This is a hill where the vegetation is barely clinging on. When I do my layout I will do something like this again, but also contrast it with lusher lowland areas.

There are some things I would do differently/am not entirely happy with, so lessons learned for when I build an actual layout:

- the kit advised to sprinkle a little yellow fine turf on the trees and bushes for highlights. I don't like the result, and will try something like a lighter green next time.

- the bushes are actually in two shades of green, but they are so similar it is hard to tell. I will go for greater variation next time.

- for some reason the kit included brown talus, rather than grey, and it doesn't match well to the rocks it has supposedly fallen from. I tried washing it in black, but it didn't take particularly well. Next time I will start with grey talus.

- the kit included some long static grass but no applicator (presumably for cost reasons). I tried it out on a scratch board and it was messy and difficult, so I will hold off trying that until I get an applicator.
 

Attachments

  • PXL_20250106_193944158.jpg
    PXL_20250106_193944158.jpg
    592.6 KB · Views: 15
  • PXL_20250106_193923014.jpg
    PXL_20250106_193923014.jpg
    680.2 KB · Views: 15
  • PXL_20250106_193913500.jpg
    PXL_20250106_193913500.jpg
    787.5 KB · Views: 16
  • PXL_20250106_193853736.jpg
    PXL_20250106_193853736.jpg
    626.8 KB · Views: 14
One more thing, in case any other beginners come along and read this. I learned a few things about useful tools:

- salt and pepper shakers are good for adding accents. I got the cheapest Target sells ($7)
- a box of assorted foam brushes is really useful for broad and detail work. And at $4, they are essentially disposable
- cheap paint rollers can also be tossed rather than cleaned
- for cleanup I have acquired a cordless mini computer vacuum, which gets into crannies and picks up loose material better than my dustbuster.
- a set of cheap measuring spoons, a small mesh strainer, and spray bottles were all useful acquisitions.
 
Well, the project is now complete. Or at least, I got to the end of the booklet. Overall I am pleased with how it turned out for a first try, especially given my lack of crafting skills. And I ended up with the confidence to attempt a layout next. So thank you all for the encouragement. I know I have a huge amount more to learn, just looking at the amount of detail in other people's work, but I feel like I took a successful first step.

I added some lighter colors to the base layer of grass. They don't show up too much in the photos, but in person it definitely breaks up the unrealistic uniformity of the base layer. I also added some bushes and low-lying vegetation and a small cluster of trees. As shortwrench and Selector suggested, I filled the crack with bush material and it looks very good.

I decided to leave the hillside relatively sparse rather than go overboard with ground cover and bushes. I really like the look of the earth undercoat showing through in places. This is a hill where the vegetation is barely clinging on. When I do my layout I will do something like this again, but also contrast it with lusher lowland areas.

There are some things I would do differently/am not entirely happy with, so lessons learned for when I build an actual layout:

- the kit advised to sprinkle a little yellow fine turf on the trees and bushes for highlights. I don't like the result, and will try something like a lighter green next time.

- the bushes are actually in two shades of green, but they are so similar it is hard to tell. I will go for greater variation next time.

- for some reason the kit included brown talus, rather than grey, and it doesn't match well to the rocks it has supposedly fallen from. I tried washing it in black, but it didn't take particularly well. Next time I will start with grey talus.

- the kit included some long static grass but no applicator (presumably for cost reasons). I tried it out on a scratch board and it was messy and difficult, so I will hold off trying that until I get an applicator.
You did well and more important you learned a lot.

You can go pretty deep down the scenic rabbit hole. Take a look at what's available from Scenic Express. https://www.scenicexpress.com/
 
Now it was time to color the rocks. The kit described a "leopard spotting" technique with two colors followed by a black wash. There was also a video on Woodland Scenics demonstrating the technique. At first, I thought my effort here looked terrible. However, once the paints all dried, it looked really good. I actually felt pleased with it (which is an entirely new feeling for me with any art or craft project.) Lesson learned: Don't judge a finish until it's dry. (Honestly, I should know that by now having refinished the occasional table before now. By which I mean I have occasionally finished a table, not I finished an occasional table. Anyway.)

With the rocks dried, I applied a coat of "earth brown" paint to the hills. This is the point that I realized that I should have done a better job with the plaster. Next time. I was happy with the way there was a lot of natural variation from the way the paint washed over the slopes.

(In these pictures I have also laid down the track bed and track, and started ballasting, and then realized I hadn't taken any pictures of the terrain. So ignore that.)

View attachment 208288View attachment 208289
Very nice!!


Back
Top