Can anyone please tell me which layout configuration would keep me from getting bored?
4x6ft oval HO scale layout with a few turnouts
OR
2x6ft oval N scale layout with a few turnouts
OR
2x6ft HO scale switching yard layout?
A lot depends on what you want the layout to do: to paraphrase an old line, it's not the size of your layout, it's what you do with it! It's easy to fill a sheet of plywood with tracks, on the assumption that more tracks=more fun, but that's not always the case. A good layout starts with an idea, based on what sort of railroading you want to model. This is the case whether you're designing a mini layout that fits on a coffee table or a building-sized club layout.
If you are more of a train-watcher, who enjoys sitting back and watching trains run, then an oval will almost always be more satisfying than a switching layout. But there are also modelers who enjoy switching--I'm in that camp myself. And there are also plenty of ways to add switching and operation to a 4x6 HO layout or 2x6 N layout, which is why a lot of model railroaders start out with a loop and add switches to increase complexity and operating potential. The trouble happens when they keep adding more switches, again with the "more track=more fun" idea in mind. But sometimes less is more--again, based on what you want to do with your trains. A switching layout is intended to simulate jobs a real railroad does--namely, moving cars from a yard (where mainline trains have left cars to be delivered to that part of the railroad) to local industries, and then moving cars at those industries back to the yard. There are other types, like switching layouts that are just yards, or just complex industries, or even just engine service facilities, but each part of the layout has a function.
Here's my solution to a similar problem:

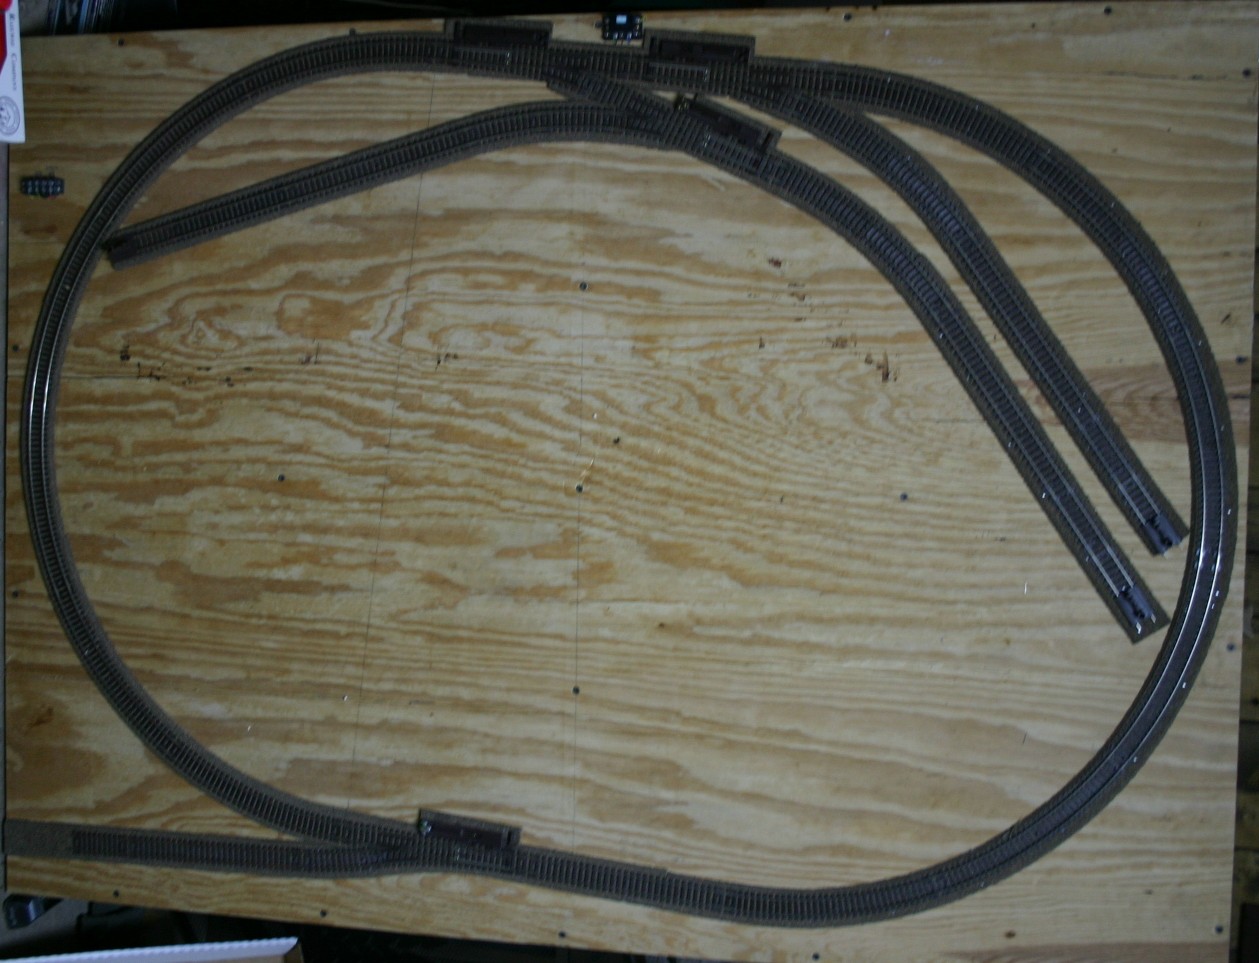
This is a 3'x6' HO scale switching layout. It is L-shaped, so in square feet it's slightly smaller than your 2'x6' switching layout plan. It's intended to model Sacramento Northern Railway's switching operations on the northern end of the city of Sacramento. It consists of three main parts. On the right is a small yard, which can hold up to 8 cars or locomotives. On the left are 4 industries, 2 of which are on one siding with a capacity of 1 car each, 1 has its own siding and a 2 car capacity, and 1 has its own siding and a 3 car capacity, so the customers here can accept up to 7 cars. In between is a runaround track, which can handle 2-3 cars at once, with room for a loco and a car or two on each end. You start with a locomotive and a few cars in the yard. By whatever means sound like the most fun (waybills and car cards, wheel reports, switch lists, roll of the dice or just random whim), decide which cars need to go to which industries, and use the switcher to move the cars to the industries by a series of moves involving the runaround track and main line. To add a bit more complexity, start with a couple of cars already spotted at the industries; these become the "inbound" cars that you will remove from the spurs and bring back to the yard, presumably to be picked up by the next train going northbound or southbound. Operation is a whole separate discussion, but that's what turns this from a static diorama or animated display into a strategy game.
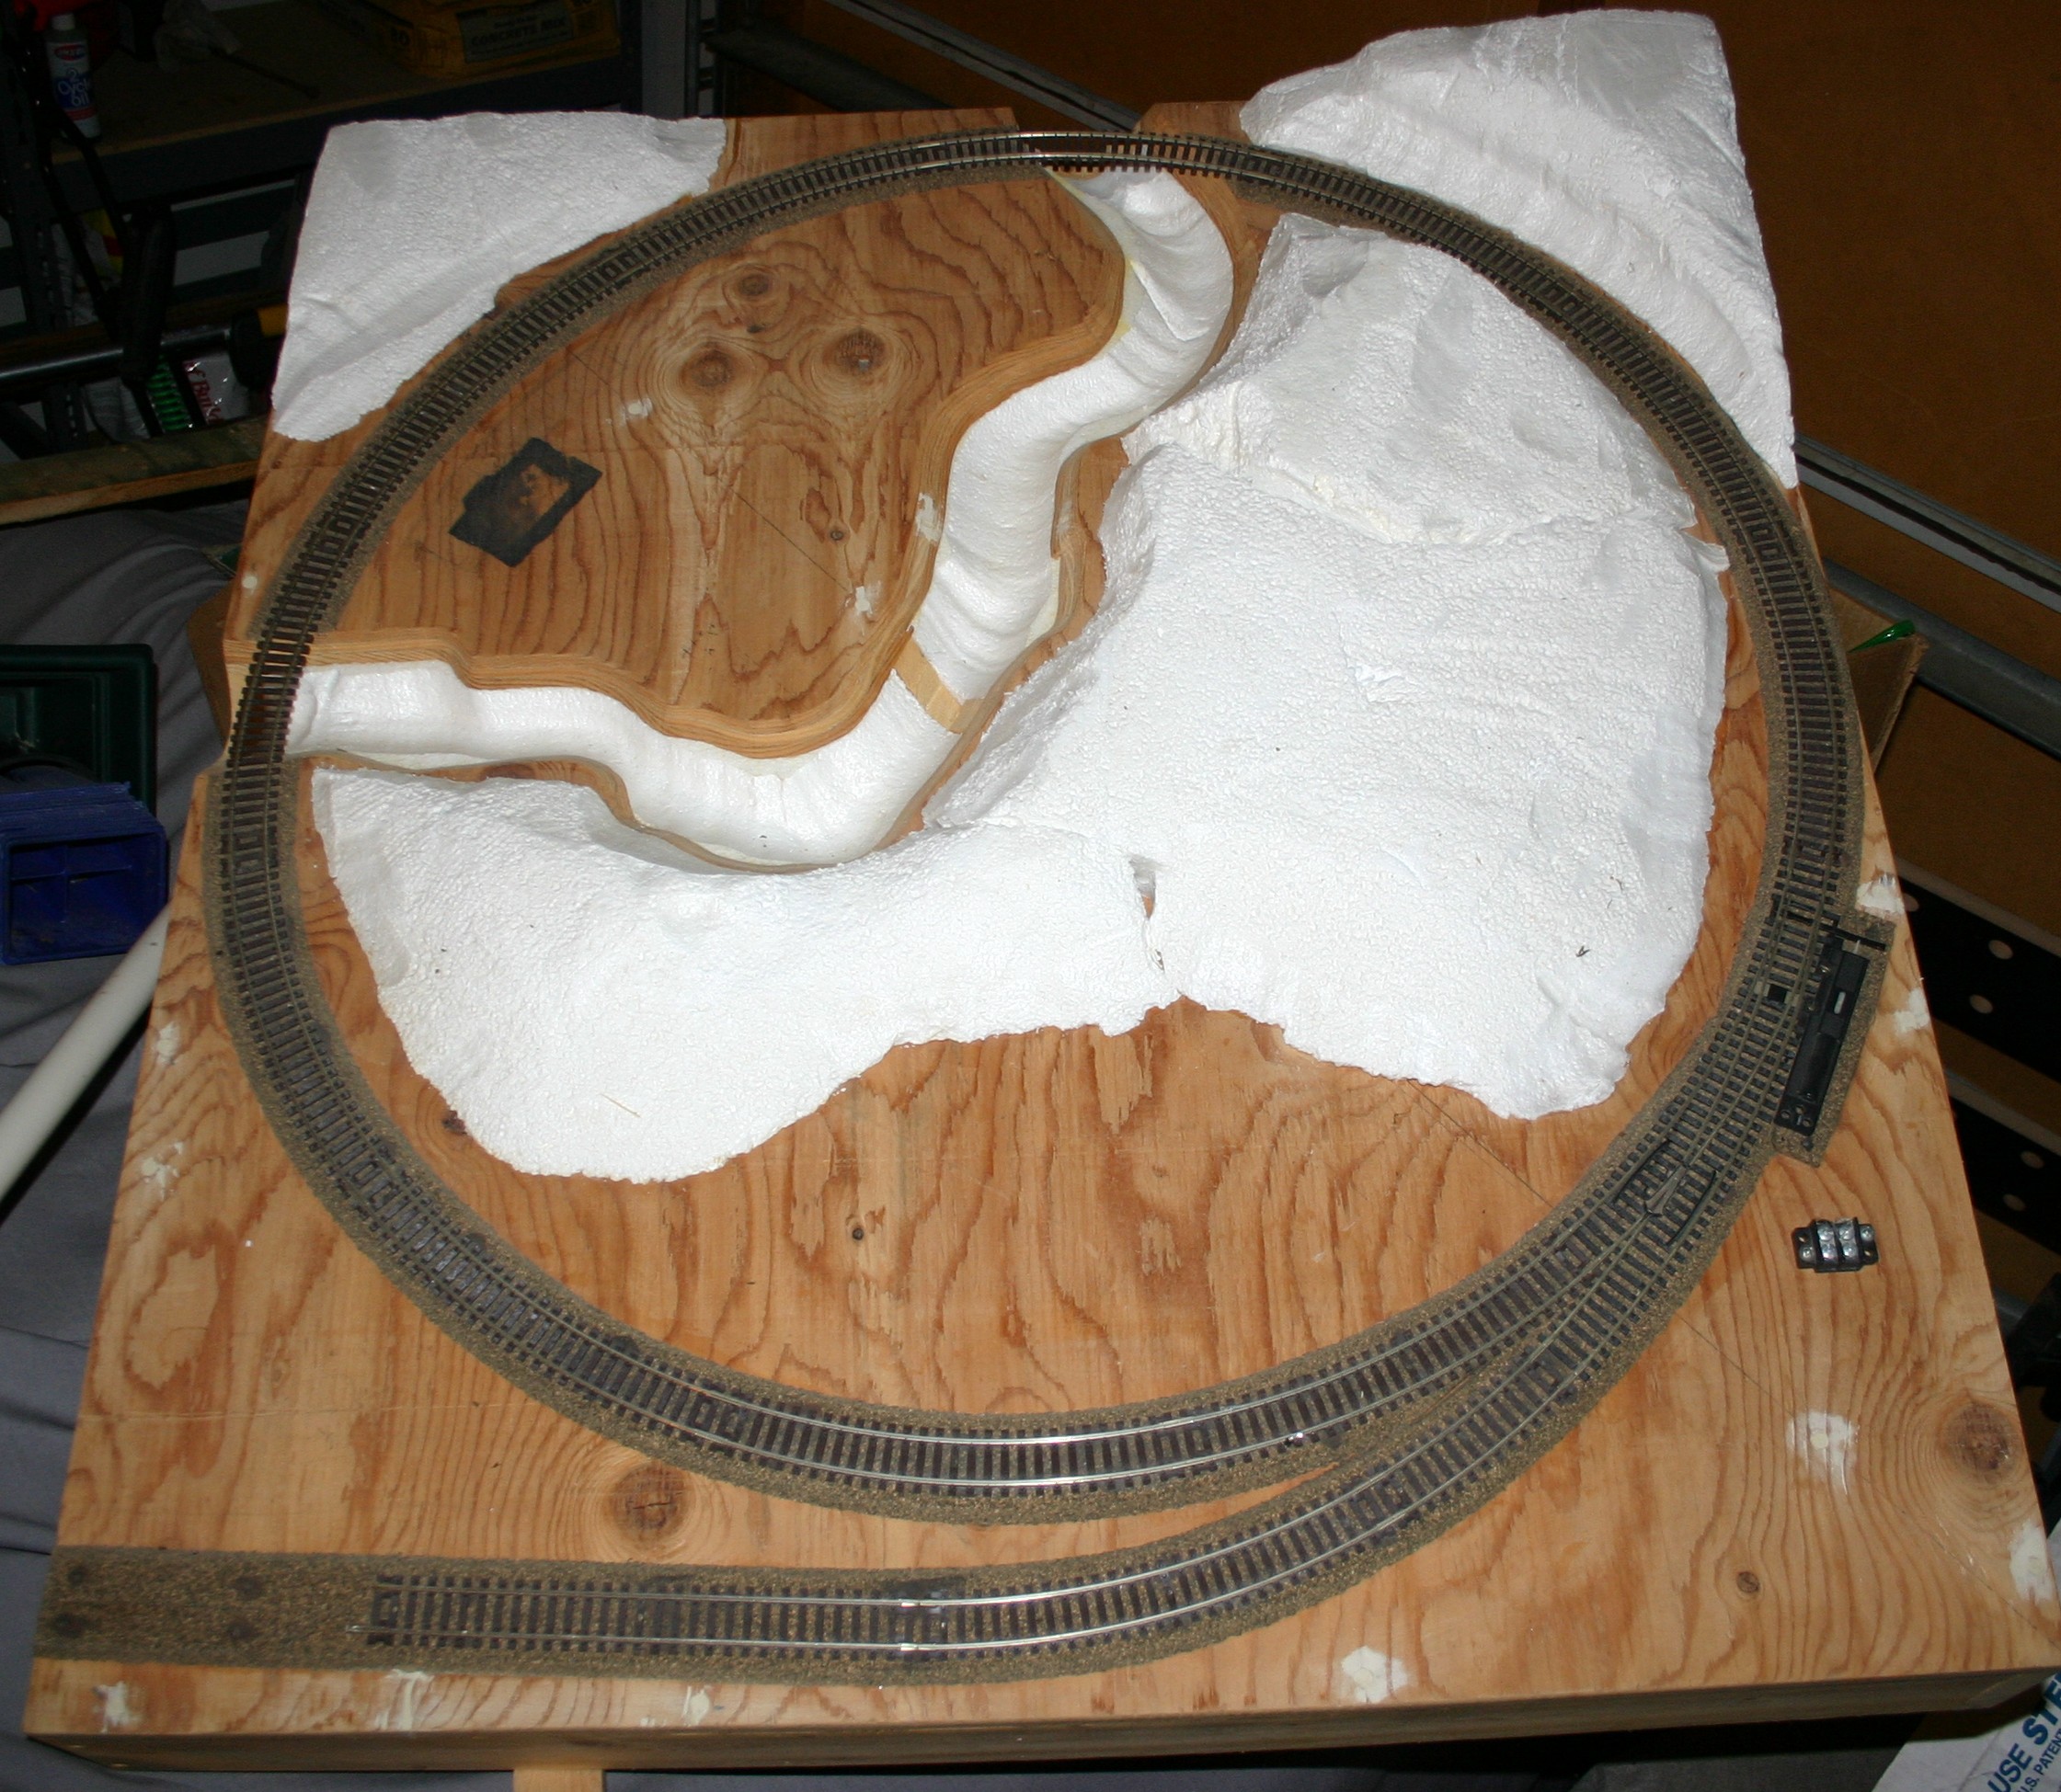
Other fun to be had: I left enough room on the layout for the industries, scenery, and some decorative elements just for scenery, like the homes and businesses near the runaround track, and the non-functional railroad berm on the left that run over the tunnel. As someone who enjoys the artistry of doing scenery and building buildings, that's a big part of the fun for me. I built this mini layout first, after experimenting with a 3'x6' HO scale layout (with very sharp curves) and discovering that I was not a round-and-round fan. Speaking of which, the curve onto the peninsula on my plan is very sharp (12" radius) which might not be suitable for everyone, but someone adapting this plan to their own use could easily substitute 15" or 18" curve and still get similar capacity, but with a smaller industry building. Switches are basically equivalent to #4.
But here's a second potential solution, if you're more of a yardmaster type:
This is a pair of sections that I added to the L-shaped mini layout above (you can see the tunnel on the right which is in the far left of the photo above), representing a prototype division-point yard. It consists of 2 sections attached end to end, 1 6' long and 1 4' long (which used to be 6' long but I had to cut 2 feet off after relocating the layout), which as you can see makes up a 4-track yard, with spurs on either end for cabooses and Maintenance of Way equipment. From bottom to top, the tracks are the main line, northbound, southbound, and interchange (the prototype interchanges with its parent railroad Western Pacific.) But for someone who likes making and breaking trains, it's operable as a mini layout all by itself.
And just for fun, here's a third, even simpler option:

This is a 4' by 1' section of layout, attached to the right-hand side of the first picture I posted. It has just 1 large industry (a cannery) with 2 spurs with a capacity of 2 cars each, and the main track on the bottom, with room for 1 car and a switcher to the left. It's similar to a common "mini layout" switching-puzzle plan called an Inglenook. I added this to the layout separately, but with the deliberate idea that it could function as its own mini layout, by starting out with several cars and a loco on the main, and shuffling cars between there and the two spurs. It sounds like you're already thinking in terms of future shelf-layout expansion, which is also what I did; today the layout runs around 3 walls of a roughly 23'x10' space, with room for a branch line and plans for a loop running around the fourth wall. Not each section is as deliberately designed for independent operation, but it has allowed me to grow from a mini layout to a garage empire (admittedly over the course of nearly two decades) with each section being completed and operable in turn, instead of the traditional approach of building all the benchwork, then all the trackwork, then all the scenery, and not being able to run trains through finished layout for many years. It also has other advantages, like portability (I have moved this layout twice, which is no fun but less agony than demolishing a permanent layout and starting from new.) I have more sections, but this post has already gone on long enough and I hope my points are clear without being too pedantic.