ModelRailroadForums.com is a free Model Railroad Discussion Forum and photo gallery. We cover all scales and sizes of model railroads. Online since 2002, it's one of the oldest and largest model railroad forums on the web. Whether you're a master model railroader or just getting started, you'll find something of interest here.
3 of the 4 TBOX yellow 60’ high cubes have been sent on their way. I am going to try to keep 1. There are 6 more per the inventory sheet that I may someday get to weather. I enjoy the value of the Walthers Mainline cars that have been produced since 2020
Next up for the weathering bench are a couple of Walthers Proto Autoracks. I had a visitor drop off some more spine and trailers last night. He saw the 2 BNSF cars and asked if those were mine or a weathering project. Well, they are his now and will be lightly weathered and just a few tags, no graffiti!!! He models the current era 2010 to today. But, he is building a train for 2000 at his club and these will fit that scheme
Purchased earlier this week I only changed out the wheels and couplers.
Hello from the cave in So. Central Wisconsin. For some reason my eyes have really started watering while at the weathering bench this morning. Thought after lunch I’d be fine but nope, so relaxing right now.
I finished this up awhile ago but the client asked if I’d sell it for him.
So…
HO scale Weathered Front Runner with 48’ trailer
TTOX #130100 from Walthers Mainline series
Per online photo sites this car was built in 6/1984 and there are pictures showing in operation dated 7/4/1995
EDITED
11/18/2023, the model sold on FB yesterday evening and is shipping to Mexico this morning,
While I mainly use Arcylics from Vallejo and Tamiya I do have some from Mission and Army painter. Just wondering if anyone is using any from Ammo by Mig? Any good or negative comments if you have. I’ve been watching the price on this set for awhile. While I have used some of the AK Interactive weathering effects, those are enamel.
So if you have any opinions by this evening let me know your thoughts
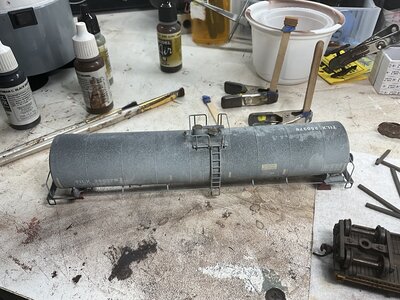
The tank car is a Walthers Mainline 25,000 gallon car. This is another of the (4) cars over the last18 months that when adding a final clear coat there was a reaction. I will need to strip this car completely, repaint and add new decals. In the mean time, it’s being transported after a derailment to the TILX facility to be inspected
I am trying to figure out how to implode this car. I am open to suggestions. Using heat basically melts it down, looking for more of the pancake effect
I've thought of the implosion and one thought was to drill a small hole to suck the air out with a vacuum as I heated it with a heat gun to soften the plastic. Just haven't gotten around to it.
The tank car is a Walthers Mainline 25,000 gallon car. This is another of the (4) cars over the last18 months that when adding a final clear coat there was a reaction. I will need to strip this car completely, repaint and add new decals. In the mean time, it’s being transported after a derailment to the TILX facility to be inspected
You have mentioned previously, that you thin your water-based acrylics with tap water. Maybe some mineral or other leftover from your water doesn’t work & play well with the clearcoat?
You have mentioned previously, that you thin your water-based acrylics with tap water. Maybe some mineral or other leftover from your water doesn’t work & play well with the clearcoat?
I've thought of the implosion and one thought was to drill a small hole to suck the air out with a vacuum as I heated it with a heat gun to soften the plastic. Just haven't gotten around to it.
What kind of vacuum? I have the heat gun and it melts rail cars very nicely, maybe the vacuum will help pancake
It was pointed out to me in a email that it’s doubtful they would transport an imploded tank car on a flat car. More then likely they would scrap the car onsite
I could push in one of the end panels on the tank car.
What kind of vacuum? I have the heat gun and it melts rail cars very nicely, maybe the vacuum will help pancake
It was pointed out to me in a email that it’s doubtful they would transport an imploded tank car on a flat car. More then likely they would scrap the car onsite
I could push in one of the end panels on the tank car.
A small vacuum and cut down the suction. Yes most likely they would scrap it on site. The cars I did for a derailment load I scratched up with a knife and deeper ones with a soldier gun. One I heated and pushed the corner in to give it a wrinkled look.
A small vacuum and cut down the suction. Yes most likely they would scrap it on site. The cars I did for a derailment load I scratched up with a knife and deeper ones with a soldier gun. One I heated and pushed the corner in to give it a wrinkled look.View attachment 177491View attachment 177492
Thank you Tom, both cars look great. Instead trying something totally out of my element I like what you have done. I am going to scratch and dent the tank car. Plus, I think it’s more realistic transporting a scratch and dented car versus the imploded one. The help and examples are most definitely appreciated
Here's the complete collection of wrecked/damaged/repaired engines I've done over the last couple of years. If anyone has some of their own, please add them for us to see. Prototype-SP SW1500 #2568 Model Prototype-BNSF SW10 #3635 Model Prototype-CSX SD35 #4511...
Here's the complete collection of wrecked/damaged/repaired engines I've done over the last couple of years. If anyone has some of their own, please add them for us to see. Prototype-SP SW1500 #2568 Model Prototype-BNSF SW10 #3635 Model Prototype-CSX SD35 #4511...
Thank you Tom, both cars look great. Instead trying something totally out of my element I like what you have done. I am going to scratch and dent the tank car. Plus, I think it’s more realistic transporting a scratch and dented car versus the imploded one. The help and examples are most definitely appreciated