Weathering Rolling Stock, a Continous thread

ModelRailroadForums.com is a free Model Railroad Discussion Forum and photo gallery. We cover all scales and sizes of model railroads. Online since 2002, it's one of the oldest and largest model railroad forums on the web. Whether you're a master model railroader or just getting started, you'll find something of interest here.


Status
Not open for further replies.
I think it looks fine…👍🏻
It’s like a black hole…you can keep adding paint and pigment till u hit the Event Horizon…then there is no turning back
That's the problem, I want it to stay at the Event Horizon, disappearing into that black hole is not where I want to go.
 
Smudge617, I like it. But, what don’t you like?

I won’t guess.

What paints did you use? Have you clear coated anything beyond the 1st color?
I'm using Vellejo acrylic, and I've clear coated up to applying this rust, so I should be able to remove this, it just doesn't look natural to me, seems forced.


I'm using Vellejo acrylic, and I've clear coated up to applying this rust, so I should be able to remove this, it just doesn't look natural to me, seems forced.
So you want to redo this layer.

Take a cotton swab, q-tip, cotton bud or whatever you call it, dipped in Isopropyl Alcohol and wipe off the layers after the last clear coating. You will use lots of the cotton buds

OR my favorite.

Crank the compressor up over 65 PSi, load the airbrush with straight Isopropyl Alcohol and from the top down spray what you want removed. Like pressure washing.

Final option from my side is.

Take a couple clean stiffer brushes, dip one of them in Isopropyl Alcohol and brush on the area. Wait 10 seconds. Next using the other brush, slightly dampened with the IPA, pull from the top down if you are trying to straighten out rust streaks or remove some coverage. The amount of pressure is something you will figure out. Experiment as everyone has ideas on how this might work.

Don’t use cotton balls or the pads used to remove eye makeup. While you may get different results from what I did, this is just a FYI or warning as you may get the mess I have in the past.
 
So you want to redo this layer.

Take a cotton swab, q-tip, cotton bud or whatever you call it, dipped in Isopropyl Alcohol and wipe off the layers after the last clear coating. You will use lots of the cotton buds

OR my favorite.

Crank the compressor up over 65 PSi, load the airbrush with straight Isopropyl Alcohol and from the top down spray what you want removed. Like pressure washing.

Final option from my side is.

Take a couple clean stiffer brushes, dip one of them in Isopropyl Alcohol and brush on the area. Wait 10 seconds. Next using the other brush, slightly dampened with the IPA, pull from the top down if you are trying to straighten out rust streaks or remove some coverage. The amount of pressure is something you will figure out. Experiment as everyone has ideas on how this might work.

Don’t use cotton balls or the pads used to remove eye makeup. While you may get different results from what I did, this is just a FYI or warning as you may get the mess I have in the past.
Thanks, I'll have to go the q-tip route, my compressor only does about 20pis. I don't want to remove all of it, just the bit's that don't look straight, Oh Yeah ! that's most of it then. :D
 
FYI I often hate something whilst working on it and only like it once I have moved onto the next, I like the fading also, move on to the next THEN look back at it when it is not in your face. We. Are always highly critical of our own work,I bet if it was someone else’s you would be thinking I wish I could do that
 
Smudge617. I agree with JazA. I Like it. We are always very critical of our own work. But saying that If you are not happy, that is all that matters.

Go easy with the q-tip as the weathering will come over fast.
 
For me, Vallejo acrylics dry too fast to work well for weathering… they are great for solid spot painting, scratches, figures, etc

But on the issue of weathering once I’m “not happy” with the result, it’s hard to reverse the feeling…
 
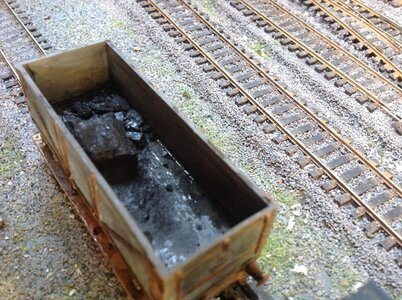
I think I did a little better with the interior than the exterior on the gondola, no matt varnish yet.

20221124_191605.jpg


I think I did a little better with the interior than the exterior on the gondola, no matt varnish yet.

View attachment 156609
I like to pool water for real in nd see what happens when a little colour I added, I like the rust colour choice, no specific reason just a number of mine for consideration
1D5E7950-8A27-4073-A6B3-19BAE03A98D2.jpeg
real coal looks good
169CDA49-7F9D-4CFF-820A-CA52BCCE7A5B.jpeg
My colours are not dissimilar here but I used technical paint which leaves a texture imitating drying material
965DE5CA-6178-4079-A5DD-1B3A1663AE4F.jpeg

different angle, now I do not consider this a good one, but I never upgraded it as it does the job
29878BFB-EFE5-4D19-A44B-856D7CCCFA80.jpeg

real wood not metal though
63EAFFB6-C79D-48F8-82BB-E36EE72B0829.jpeg

this one has a touch of varnish leaving that wet look
C04B5D11-DE82-4014-B569-CDFA81E0593F.jpeg
I left wet paint to dry naturally
this are just random ones I picked out none of the insides have been upgraded plain flat plastic, but putting kit inside often helps

 

Attachments

  • C2737AE0-9BB0-4BB0-9C66-686C7CF62EC3.jpeg
    C2737AE0-9BB0-4BB0-9C66-686C7CF62EC3.jpeg
    726.6 KB · Views: 169
I like to pool water for real in nd see what happens when a little colour I added, I like the rust colour choice, no specific reason just a number of mine for considerationView attachment 156612real coal looks good
View attachment 156613My colours are not dissimilar here but I used technical paint which leaves a texture imitating drying material
View attachment 156614
different angle, now I do not consider this a good one, but I never upgraded it as it does the job
View attachment 156615
real wood not metal though
View attachment 156616
this one has a touch of varnish leaving that wet look
View attachment 156617I left wet paint to dry naturally
this are just random ones I picked out none of the insides have been upgraded plain flat plastic, but putting kit inside often helps
Nice I need to try that, but when I'm a little more confident I think.
 
These loads are not mine but I was given permission to repeat them, but you can see how they improve the looks no end
93771702-8B12-464B-A410-BF4827FA5B1B.jpeg

cotton wool bandages and thin wire - sheep wool
C6CC1465-0399-495A-ACA4-6AC1C2573B26.jpeg
wood dowel branches etc cut to similar sizes balsa whatever
78AF0E7F-CE46-4036-B0B4-F1A43EA11BA1.jpeg
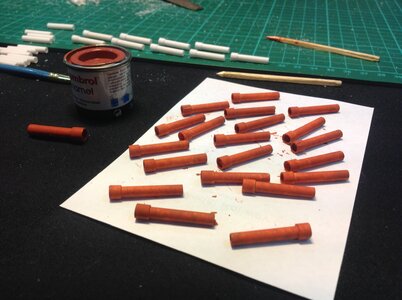
Plastic pipe too sizes cut pain terracotta and you have ceramic pipe
E0C16FFA-A524-4F5C-B7F1-BA6E67434FD6.jpeg
5671C1B3-377E-4A3A-B0F9-6D8E35E7A351.jpeg
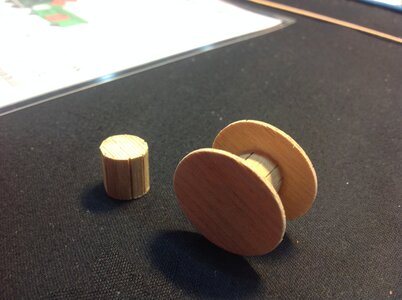
Balsa wood
D69D173B-A617-4582-BD3B-0B65A6295B19.jpeg

and the guy who made them
 

Attachments

  • 02E5D5B7-6B14-430D-A1B9-5E35531B6023.jpeg
    02E5D5B7-6B14-430D-A1B9-5E35531B6023.jpeg
    358.5 KB · Views: 194
  • F0F61C6A-9CB3-41E8-9593-16E91C10F078.jpeg
    F0F61C6A-9CB3-41E8-9593-16E91C10F078.jpeg
    332.9 KB · Views: 189
These loads are not mine but I was given permission to repeat them, but you can see how they improve the looks no end
View attachment 156624
cotton wool bandages and thin wire - sheep wool
View attachment 156625wood dowel branches etc cut to similar sizes balsa whatever
View attachment 156626Plastic pipe too sizes cut pain terracotta and you have ceramic pipe
View attachment 156628View attachment 156627Balsa wood
View attachment 156629
and the guy who made them
Very nice, if I ever get a permanent layout I'd love to do something like this
 
It doesn't look natural to me
You could add earth tone and some grimy black in paint or powder form to blend. I do a wash with craft paint. A mix of burnt umber and burnt sienna (helps in hard to get areas) then blend with earth tones powder and paint. I did this on the bottom of this hopper car.The sides were a gray craft paint wash to dull and powder for the rust effect. The Chessie car was powder and airbrush mix.
IMG_4001.jpg
IMG_4002.jpg
IMG_4009.jpg
IMG_3496.jpg


I li
You could add earth tone and some grimy black in paint or powder form to blend. I do a wash with craft paint. A mix of burnt umber and burnt sienna (helps in hard to get areas) then blend with earth tones powder and paint. I did this on the bottom of this hopper car.The sides were a gray craft paint wash to dull and powder for the rust effect. The Chessie car was powder and airbrush mix.View attachment 156641View attachment 156642View attachment 156643View attachment 156645
I like this, show's how much I have yet to learn. :(
 
Status
Not open for further replies.


Affiliate Disclosure: We may receive a commision from some of the links and ads shown on this website (Learn More Here)

Back
Top