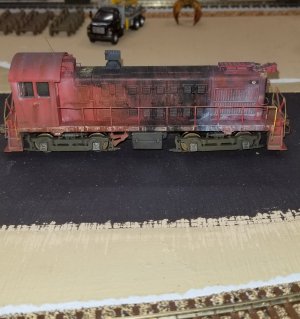
Weathering Engines a Continuous thread.

ModelRailroadForums.com is a free Model Railroad Discussion Forum and photo gallery. We cover all scales and sizes of model railroads. Online since 2002, it's one of the oldest and largest model railroad forums on the web. Whether you're a master model railroader or just getting started, you'll find something of interest here.


Just wondering if you do panel outliner - I recently tried the Tamiya stuff and I liked it - after the fact, I read the instructions (all too common ha ha) and they said it works best on gloss coat, perhaps that is why it's a bit smudgy. But it really did cling to the cracks pretty well. Perhaps it could even be done with a thinned enamel...View attachment 246119
I have used the panel liner in the past. I’ve used it on both gloss and matte finishes. I prefer the matte because I like the smudgy look you show here.
 
I'm kind of stuck in one weathering mode at the moment - filthy. What's interesting about weathering is the actual variation in effects in different locales and different service regimens. The dirt you've got on the UP unit there looks right at home for where it lives, the soil (dust?) is mostly reddish light brown. I noticed in my last weeks CP photos of some big GE's, the weathering that has worked it's way up from the ground is different, more like grimy dark grey. The trucks were more of the same, really dark. And, it was halfway up the body to also meet the grimy soot coming down from the rear radiator section near the exhaust. China has a lot of iron in the soil, most of the loco dirt is a distinctive reddish brown colour, similar to the western USA if I'm not mistaken. So it can be a task to concoct realistic dirt because it subconsciously registers when we see the prototype, but we don't notice it unless it's extreme. But on the model, a big difference can be jarring. If, for example, I painted that GE the same way as the UP. Because it would only happen from spending a year or more in the southwest USA.
 
I'm kind of stuck in one weathering mode at the moment - filthy. What's interesting about weathering is the actual variation in effects in different locales and different service regimens. The dirt you've got on the UP unit there looks right at home for where it lives, the soil (dust?) is mostly reddish light brown. I noticed in my last weeks CP photos of some big GE's, the weathering that has worked it's way up from the ground is different, more like grimy dark grey. The trucks were more of the same, really dark. And, it was halfway up the body to also meet the grimy soot coming down from the rear radiator section near the exhaust. China has a lot of iron in the soil, most of the loco dirt is a distinctive reddish brown colour, similar to the western USA if I'm not mistaken. So it can be a task to concoct realistic dirt because it subconsciously registers when we see the prototype, but we don't notice it unless it's extreme. But on the model, a big difference can be jarring. If, for example, I painted that GE the same way as the UP. Because it would only happen from spending a year or more in the southwest USA.
2 months since I last visited.

Diesel, weathering for locale is a big issue for me. Like you mention in the 11/2 post there are differences and in some very big differences.

I had a client in 2021 when he sent me his 1st pieces I worked on for him. His freelance layout was set in Oklahoma along the Red River region/area. It was 2 cars not diesels (sorry Tom for thread drift). I really made an effort to get the red coloring I’d see in Oklahoma pictures. I must have succeeded as most of his club started sending me work. He mentioned I was the 1st weatherer he hired that even tried to match the red coloring of his locale. Until he passed in 11/2024 he was good for 5 cars a month and for a little over year 1 diesel per month. His club still will send me cars…

I have a current diesel client modeling the area around Eastern Washington then dipping into both Northern and Southern Montana. Before I started his weathering commissions I sent him this synopsis of soils:

The Cascade Mountains create a stark contrast in soil types that will dictate your lower-body weathering.

• Western Washington (The "Wet" Side):

• Color: Deep, dark browns and nearly black tones.
• Texture/Vibe: Think Damp Grime. Because of the high organic matter and moisture, the dirt on trucks and fuel tanks will look like a "sludge" or dark mud.
• Modeling Tip: Use a dark wash (Vandyke Brown or "Oily Black") to simulate the damp, compost-heavy soil of the Puget Sound region.

• Eastern Washington (The "Dry" Side):

• Color: Pale tans, light grays, and dusty "buff" tones.
• Texture/Vibe: Fine Dust. In the Palouse or Columbia Basin, the soil is volcanic loess—it's very fine and coats everything in a light-colored film.
• Modeling Tip: Use a light tan pigment or a very thin "dust" spray (Tamiya Buff or Deck Tan) along the sills

Montana: The Glaciated Plains vs. The Mountains

By 1965, GN locomotives were hauling heavy freight across the "High Line" (Northern Montana).

• Northern Montana (The High Line):
• Color: "Scobey" soil—a dark grayish-brown.
• Characteristics: This is glaciated soil. It is rich and dark, but in the summer, it dries into a grayish-tan dust.
• Modeling Tip: Use a medium gray-brown (like Umber) for the primary "road grime" on the fuel tank and trucks.

• Southern Montana (Mountainous/Yellowstone Border):

• Color: Reddish-browns and yellows.
• Characteristics: Soils here often have higher iron content or volcanic minerals. If your GN power is detouring or working south toward Billings, you’ll see more warmth in the soil.
• Modeling Tip: Add a hint of Burnt Sienna or a "Rust" pigment to your dirt mix to represent the mineral-heavy soils of the mountain passes.

Somewhere in October I needed research help beyond my normal deep dives into online searching. I started playing with Ai for structure research. See my Swing bridge build and Paper Mill design threads. In December I starting using Google’s Ai app. The above info minus the modeling tips were sent to the client for his confirmation. I know very little about railroading in Washington and Montana. He agreed with the Ai info. It’s helped me shorten the research I was doing and may have been part of the causation of my frequent burnouts. I can weather all day but research was getting to me.

Just saying locale weathering is very important but it should be correct too



Youtube is a big help. I model CSX and watch many videos. I type in CSX railfanning 2025 for example and I'll get videos for that year and the last two. I also look for videos that show above shots. Many think that because the sides of a boxcar is rusted the top is too. Sometimes but not always. The tops are usually different type of steel (galvanized for example) so they don't need to be as strong as the sides and ends.
 
Last edited:
Some of my attempts at various levels of diesel weathering.
Athearn CC&VGMD 2 (My model) (5).jpg
ALCO Models CC&VGMD 1 (My model) (8).jpg
Athearn CM MT & SL 4000 (My model) (5).jpg
Athearn CM MT & SL 4000 (My model) (6).jpg
Tenshodo CM MT & SL 6242 (My model) (6).jpg
Tenshodo CM MT & SL 6242 (My model) (7).jpg
 
Hi all, planning to start my first loco. I've done some ok rolling stock but I'm still a little intimidated. My first victim is going to be this Atlas SD60.
image0 (1).jpeg

My layout is nominally 1995-1997 Appalachia so the plan is to add a yellow nose and make this either 8706 or 8707 since they seem to have survived with longest with the stealth gray.

Screenshot 2026-02-03 102941.png


Screenshot 2026-02-03 101100.png


I've got cut levers, MU hose, and sunshade details for it. Plan was to pull the cab and body, flat clear everything, spray the nose yellow, add the nose and number decals. Add the warning decals where applicable. Paint and add sunshades and lower details. Paint the railings, maybe even go black on the verticals. Put everything back together and do a very light fade, particularly on the lower. Flat clear again. Mask and spray the grilles, and give the trucks and tank a dusty pass too, then finish off with a lot of powder.

Any advice? I'm sure I'm missing things.
 
I would paint the nose yellow before the first clear coat, if you're doing that. The layer before the decals go on should be a clear gloss not flat. Also shave off the two class light housings with an exacto knife first, they don't exist on the prototype. It's an easy mod. If you feel ambitious, working ditch lights make a big difference.


Hi all, planning to start my first loco. I've done some ok rolling stock but I'm still a little intimidated. My first victim is going to be this Atlas SD60.
View attachment 256761
My layout is nominally 1995-1997 Appalachia so the plan is to add a yellow nose and make this either 8706 or 8707 since they seem to have survived with longest with the stealth gray.

View attachment 256762

View attachment 256763

I've got cut levers, MU hose, and sunshade details for it. Plan was to pull the cab and body, flat clear everything, spray the nose yellow, add the nose and number decals. Add the warning decals where applicable. Paint and add sunshades and lower details. Paint the railings, maybe even go black on the verticals. Put everything back together and do a very light fade, particularly on the lower. Flat clear again. Mask and spray the grilles, and give the trucks and tank a dusty pass too, then finish off with a lot of powder.

Any advice? I'm sure I'm missing things.
Here's the one I did.
IMG_7990.jpeg
IMG_7991.jpeg
IMG_7992.jpeg
 
image1 (11).jpeg
image2 (1).jpeg

image0 (11).jpeg
image3 (1).jpeg

This took substantially longer than I expected since I had to go in and re-sand twice after painting. Class lights are removed though. The rear is a bit of a mess, I got more Q tip crud in there than I realized. The front is at least passable though. Learned a lot from the mistakes at least. Feedback appreciated as always.
 
image0 (12).jpeg

Well 8707 it is. The decals I had looked to be more the correct size for 07 which seemed to have an unusally large and high CSX on the nose. Painting the railings and steps was easy and really livened up the model.
image1 (12).jpeg

I started with Micro Mark Tarnished Black for the grills, which didn't seem nearly dark enough. Went over it again with Vallejo Tire Black, which was better but still not particularly black. I might need to buy a true black since they seem VERY dark in the prototype pics. Still, between the grills and the handrails this thing looks a million times better already. Much less toy, much more model. Nobody is going to mistake it for a Scaletrains, but it'll look much more at home among more modern models.

Don't be like me, mask your whole model. I have bits over yellow overspray everywhere. I'm hoping the panel liner will cover up of most of it.
 
Panel liner looked a lot better and easier on youtube. Is this gonna get better after some blending with powder and airbrush? I'm hesistant to lock it in with clear. The hinges really prevented it from running like its supposed to and when I go brush it off the doors it seems to take a lot of the liner with it, even if I use a q-tip.
image0 (13).jpeg


View attachment 259363
View attachment 259364

More progress pics. I like the left side better. The airbrush stopped cooperating on the right side, but I think there's some weird compression going on in this pic since it doesn't look the splotchy in person. Next up, powders.
It looks good. Weathering is a great equalizer. It can hide many flaws. Don't be to hard on yourself. It looks good i n my opinion.


Affiliate Disclosure: We may receive a commision from some of the links and ads shown on this website (Learn More Here)

Back
Top