
You are using an out of date browser. It may not display this or other websites correctly.
You should upgrade or use an alternative browser.
You should upgrade or use an alternative browser.
Weathering Engines a Continuous thread.
- Thread starter CambriaArea51
- Start date
ModelRailroadForums.com is a free Model Railroad Discussion Forum and photo gallery. We cover all scales and sizes of model railroads. Online since 2002, it's one of the oldest and largest model railroad forums on the web. Whether you're a master model railroader or just getting started, you'll find something of interest here.

Here is the 1st locomotive iused X-21 flat base on


Pretty much my experience as well. The broken parts fiesta was even worse for an N scaler like me.
It never really got to the “works great” phase for me.
But “works great” never, looks good though, yes!


Pinching off the paint flow! Interesting! What PSI are you spraying at? Is it dry tip or inside the brush chamber? I spray with Tamiya and rarely go above probably a 20% paint to 80% thinner. Generally more towards 10% paint to thinner. It allows for layers but they are more precise IMO


Outcome - thinning more made a big difference. The new (but still cheap) airbrush was better, especially on the low feed response. I need a lot of practice. But I think the base coat problems are mostly solved. I'm practicing on the road dirt layer, I thinned that more, it was pure Flat Earth XF-52. I added 3 drops of Dark Grey XF-42 and 3 more drops of Buff XF-57 to the fade mix, along with the extra thinner. It wasn't too much as it turned out fairly subtle. I know this is a loco thread, I did coat a loco but no photos until it's re-assembled. I'm satisfied with the results, and it's not quite the end as I can go nuts now with the washes and dry brushing.



Affiliate Disclosure: We may receive a commision from some of the links and ads shown on this website (Learn More Here)
TLOC
Well-Known Member
X-21 is what I started off using years ago for the fade. Brush it on and 2 hours later brush it off. Worked great but oh what a PITA it was. A few years later I caught Boomers video about how to use it. He never said how hard and how many parts can break when brushing it off.Flat base (like Tamiya X-21) is something that you mix into a paint to ensure it dries with a flat finish. X-21 has Titanium Dioxide to produce the flat effect.
It’s not normally used by itself, although Boomer Diorama does it in some of his Youtube videos. It’s been, uhh, “less than successful” on the occasions I tried it.
Here is the 1st locomotive iused X-21 flat base on
C&OMtnMan
Well-Known Member
X-21 is what I started off using years ago for the fade. Brush it on and 2 hours later brush it off. Worked great but oh what a PITA it was. … many parts can break when brushing it off.
Pretty much my experience as well. The broken parts fiesta was even worse for an N scaler like me.
It never really got to the “works great” phase for me.
TLOC
Well-Known Member
I’ve had success with flat base x21 but it’s not worth the time, effort and broken details. But I still have a bottle if I need it.Pretty much my experience as well. The broken parts fiesta was even worse for an N scaler like me.
It never really got to the “works great” phase for me.
But “works great” never, looks good though, yes!
Jaz avalley
Station cat
Never used it, plus if it broke a part….faints…..I would never touch it againPretty much my experience as well. The broken parts fiesta was even worse for an N scaler like me.
It never really got to the “works great” phase for me.
TLOC
Well-Known Member
Wisconsin Interstate #4022 has returned from Colorado. Thanks to Jimmy Brannon and The Denver Terminal Railway Company the Gp40-2L headed to Colorado to meet up with other Mac Transportation family members power units for the Freelance Forum Meet held in conjunction with the Colorado Prototype Modelers Meet at the Colorado Model Railroad Museum in Greeley, Colorado on 9/27 and 28
Thanks also are sent to the HomeShops LLC and Chris Palmieri for putting on and sponsoring the meet along with Michelle from the CMRRM.
Next year depending on the date I hope to be there

WCIS 4022 and CN 9433 are entering Paper Mill Yard in Central Wisconsin

4022 is heading to the Maintenance Shed and 9433 is heading to the ready tracks for the next train to Stevens Point Wisconsin

The weathering process for 4022 starts soon. Based on posts here today I will show how I have used Tamiya x-21 Flat Base to fade WCIS 4022, stay tuned
Thanks also are sent to the HomeShops LLC and Chris Palmieri for putting on and sponsoring the meet along with Michelle from the CMRRM.
Next year depending on the date I hope to be there
WCIS 4022 and CN 9433 are entering Paper Mill Yard in Central Wisconsin
4022 is heading to the Maintenance Shed and 9433 is heading to the ready tracks for the next train to Stevens Point Wisconsin
The weathering process for 4022 starts soon. Based on posts here today I will show how I have used Tamiya x-21 Flat Base to fade WCIS 4022, stay tuned
TLOC
Well-Known Member
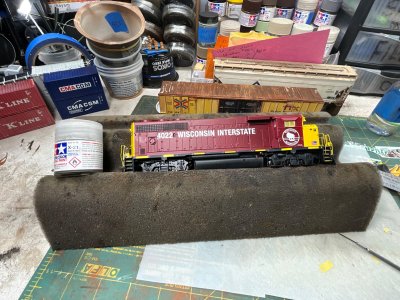
WCIS 4022 is on the bench. Sorry if it’s boring but I’m going to document most of the steps.
1. See above post for the clean unit
2. Mask the windows


I use Tamiya masking tapes and I have 3 widths but mostly use 1/4” as I will here

Ditchlights, head and rear are all masked off. Because I will be using X21 Flat Base I’m not too fussy with masking off things as I would if I was doing the fading using the airbrush

3. Remove the side rails and shake the
 X-21 Flat base
Now walk away for 10 minutes or take lunch. I broke a tab holding the railing to the body. Thankfully it’s my unit
Back later
1. See above post for the clean unit
2. Mask the windows
I use Tamiya masking tapes and I have 3 widths but mostly use 1/4” as I will here
Ditchlights, head and rear are all masked off. Because I will be using X21 Flat Base I’m not too fussy with masking off things as I would if I was doing the fading using the airbrush
3. Remove the side rails and shake the
Now walk away for 10 minutes or take lunch. I broke a tab holding the railing to the body. Thankfully it’s my unit
Back later
Attachments
Last edited:
TLOC
Well-Known Member
Lunch is done, back to the bench


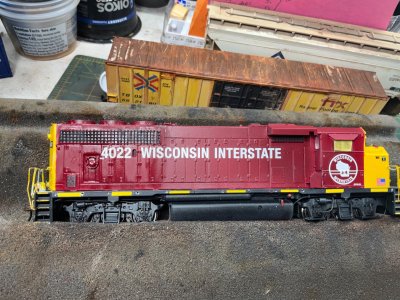
The x-21 Flat base to create a fade has been applied and has dried for almost 60 minutes. After shaking the x21 it’s just a dip and apply with a brush. I did vary the amount on the body panel with less at the back and more x21 nearer the cab. Not sure in the end if there’s a big enough difference. Notice in picture 2 the missing brake wheel that appeared in picture #1. This is the main reason I rarely use x21 to fade, details come off. It’s the brush user not the brush.

Definitely a fade has occurred. I did glue the brake wheel and a top panel that came off during the scrubbing off of the x21 Flat base. Those are now drying

That’s it. What Boomer Diorama (I love his videos) doesn’t tell you is how time consuming, sometimes frustrating and worrisome fading this way is. Brushing/scrubbing off the Flat Base basically is whatever you get, you get. I’m unaware of any technique other than brush to remove the Flat Base. Adding water to a brush is not helpful. Adding Isopropyl Alcohol is self defeating as it plain old removes the Flat Base.

These are the brushes I use to scrub down the body. They are dry brush brushes that I would normally use with my Pan Pastels or pigments. Just make sure they are clean and dry
Next up is some weathering. I am not going to document the process but will do a final picture. But there is no timetable. Actual work time so far: 10 minutes for masking, 10 minutes for shaking and applying the Flat Base x21 and 30 minutes +/- for the scrubbing. Frustration though is ok bearable!!!
Spraying a fade, including prep of the fade mix, testing the air brush and applying a couple fade coats, maybe 10 minutes. Let it dry 10-15 minutes and do again if necessary, let dry. Total: maybe 30-45 minutes and I’d probably do 3 or 4 units at a time.
You decide…
The trucks, the plows and fuel tanks for sure will get a light grime. The body will get some panel liner and a light grime wash. Any Flat Base build up the dry brushing didn’t remove will dissolve in the weathering wash. I am unsure if any hinges or latches will get any rust or streaking. At the Wisconsin Interstate we try to keep the diesels somewhat “clean”.
Be well, have fun
The x-21 Flat base to create a fade has been applied and has dried for almost 60 minutes. After shaking the x21 it’s just a dip and apply with a brush. I did vary the amount on the body panel with less at the back and more x21 nearer the cab. Not sure in the end if there’s a big enough difference. Notice in picture 2 the missing brake wheel that appeared in picture #1. This is the main reason I rarely use x21 to fade, details come off. It’s the brush user not the brush.
Definitely a fade has occurred. I did glue the brake wheel and a top panel that came off during the scrubbing off of the x21 Flat base. Those are now drying
That’s it. What Boomer Diorama (I love his videos) doesn’t tell you is how time consuming, sometimes frustrating and worrisome fading this way is. Brushing/scrubbing off the Flat Base basically is whatever you get, you get. I’m unaware of any technique other than brush to remove the Flat Base. Adding water to a brush is not helpful. Adding Isopropyl Alcohol is self defeating as it plain old removes the Flat Base.
These are the brushes I use to scrub down the body. They are dry brush brushes that I would normally use with my Pan Pastels or pigments. Just make sure they are clean and dry
Next up is some weathering. I am not going to document the process but will do a final picture. But there is no timetable. Actual work time so far: 10 minutes for masking, 10 minutes for shaking and applying the Flat Base x21 and 30 minutes +/- for the scrubbing. Frustration though is ok bearable!!!
Spraying a fade, including prep of the fade mix, testing the air brush and applying a couple fade coats, maybe 10 minutes. Let it dry 10-15 minutes and do again if necessary, let dry. Total: maybe 30-45 minutes and I’d probably do 3 or 4 units at a time.
You decide…
The trucks, the plows and fuel tanks for sure will get a light grime. The body will get some panel liner and a light grime wash. Any Flat Base build up the dry brushing didn’t remove will dissolve in the weathering wash. I am unsure if any hinges or latches will get any rust or streaking. At the Wisconsin Interstate we try to keep the diesels somewhat “clean”.
Be well, have fun
Attachments
Last edited:
TheXModelRailroader
RANK AMATEURS OF THE MODEL RAILROAD FORM FOUNDER
I did my UP F-E-F now. Its not prefect...But I will get better.


Beter photos coming soon.
Beter photos coming soon.
diesel
Weedy Liver
No photos but I blasted a fade coat on to some rolling stock today. The mix was about 50-50 XF-86 Flat Clear and thinner, a drop of Buff XF-57. I pre-mixed a jar of it this time, which I will always now do. Observations - the Buff looked really thick in the mix but hardly shows on the models, something to remember if I want it really subtle. I laid multiple coats on one to make it stand out. There's always something - the airbrush started pinching the paint flow soon into the job. Maybe 50-50 is too thick? Or my brush is clogged? It did bubble in the cup when I put my finger over the nozzle.
We have lost autumn here, I suspect my spray painting will be halted tomorrow or the next day as it will be too windy, dark and cold to work outside according to the weather report. I know from experience, when it goes it's gone, this time of year. So I've been madly applying base coats so I can follow with indoor bench work for the rest of the paint. There will be a lot of reassembly and decoder installs too, to keep me busy in the winter.
I have 3 steam locos to do, and several "to die for" diesels in my interest range. It is with regret but perhaps wisdom, that I didn't even touch those yet. Everything I did before was with Floquil base, thin acrylic colours and chalks. I am finding, the Tamiya acrylics are much easier to work with but much harder to get the same results with.
The steamer you've got there is really great - only thing I can suggest is a very subtle and very localized application of highlights on the trucks and running gear, whether with dry brushing, washes or chalks. It's something I have to do now on a few of the ones I did recently.
We have lost autumn here, I suspect my spray painting will be halted tomorrow or the next day as it will be too windy, dark and cold to work outside according to the weather report. I know from experience, when it goes it's gone, this time of year. So I've been madly applying base coats so I can follow with indoor bench work for the rest of the paint. There will be a lot of reassembly and decoder installs too, to keep me busy in the winter.
I have 3 steam locos to do, and several "to die for" diesels in my interest range. It is with regret but perhaps wisdom, that I didn't even touch those yet. Everything I did before was with Floquil base, thin acrylic colours and chalks. I am finding, the Tamiya acrylics are much easier to work with but much harder to get the same results with.
The steamer you've got there is really great - only thing I can suggest is a very subtle and very localized application of highlights on the trucks and running gear, whether with dry brushing, washes or chalks. It's something I have to do now on a few of the ones I did recently.
TLOC
Well-Known Member
It looks good. I was just at your thread where you showed this unit. I’ll be checking in more there often.I did my UP F-E-F now. Its not prefect...But I will get better.View attachment 243037View attachment 243038View attachment 243039View attachment 243040View attachment 243041View attachment 243042View attachment 243043View attachment 243044View attachment 243045
Beter photos coming soon.
TLOC
Well-Known Member
No photos but I blasted a fade coat on to some rolling stock today. The mix was about 50-50 XF-86 Flat Clear and thinner, a drop of Buff XF-57. I pre-mixed a jar of it this time, which I will always now do. Observations - the Buff looked really thick in the mix but hardly shows on the models, something to remember if I want it really subtle. I laid multiple coats on one to make it stand out. There's always something - the airbrush started pinching the paint flow soon into the job. Maybe 50-50 is too thick? Or my brush is clogged? It did bubble in the cup when I put my finger over the nozzle.
We have lost autumn here, I suspect my spray painting will be halted tomorrow or the next day as it will be too windy, dark and cold to work outside according to the weather report. I know from experience, when it goes it's gone, this time of year. So I've been madly applying base coats so I can follow with indoor bench work for the rest of the paint. There will be a lot of reassembly and decoder installs too, to keep me busy in the winter.
I have 3 steam locos to do, and several "to die for" diesels in my interest range. It is with regret but perhaps wisdom, that I didn't even touch those yet. Everything I did before was with Floquil base, thin acrylic colours and chalks. I am finding, the Tamiya acrylics are much easier to work with but much harder to get the same results with.
It’s been so long since I used Floquil. What result are you looking for that you’re not getting with Tamiya?The steamer you've got there is really great - only thing I can suggest is a very subtle and very localized application of highlights on the trucks and running gear, whether with dry brushing, washes or chalks. It's something I have to do now on a few of the ones I did recently.
Pinching off the paint flow! Interesting! What PSI are you spraying at? Is it dry tip or inside the brush chamber? I spray with Tamiya and rarely go above probably a 20% paint to 80% thinner. Generally more towards 10% paint to thinner. It allows for layers but they are more precise IMO
TheXModelRailroader
RANK AMATEURS OF THE MODEL RAILROAD FORM FOUNDER
Well, thank you for stopping by!It looks good. I was just at your thread where you showed this unit. I’ll be checking in more there often.
diesel
Weedy Liver
Here's an (almost) surviving example from that era, it was in an accident and lost a lot of parts...key aspect was, the fade/dirt coat was Floquil, it stayed tacky long enough for the chalks to stick. I'm shooting at 35 PSI, don't have time now to analyze the clogging but I found another airbrush that I can try today. The locomotives had the same treatment, but they are hard to find in my piles. I will also try thinning down more this time.It’s been so long since I used Floquil. What result are you looking for that you’re not getting with Tamiya?
Outcome - thinning more made a big difference. The new (but still cheap) airbrush was better, especially on the low feed response. I need a lot of practice. But I think the base coat problems are mostly solved. I'm practicing on the road dirt layer, I thinned that more, it was pure Flat Earth XF-52. I added 3 drops of Dark Grey XF-42 and 3 more drops of Buff XF-57 to the fade mix, along with the extra thinner. It wasn't too much as it turned out fairly subtle. I know this is a loco thread, I did coat a loco but no photos until it's re-assembled. I'm satisfied with the results, and it's not quite the end as I can go nuts now with the washes and dry brushing.
Last edited:
diesel
Weedy Liver
China Railways ND2, which prototype was a Romanian built import. It's really an exquisite model especially for Bachmann. The main problem here was too much overspray on the mud coat. When I tried to take some off, it went patchy. I'll have to think about how to deal with that. Maybe I can do something with chalks and/or dry brushing.

It's one of the few China Railway locos that I have, for which I obtained a sound decoder. So although it became a guinea pig, I'm trying not to really mess things up.
It's one of the few China Railway locos that I have, for which I obtained a sound decoder. So although it became a guinea pig, I'm trying not to really mess things up.
TLOC
Well-Known Member
Let’s show something in progress I have no completed diesels to show off
UP #2704 is a Scaletrain’s unit

Client wants the trucks and fuel tank medium to lightly weathered, the grills darken but not uniformly done. Some variation in the grills and screens. Wants the yellow faded and that’s where I’m at. Too many spots that while the right fade is there the spots are unacceptable to me and need to be cleaned up. Another spray or 2 maybe 3. It looks like the spots were there because either I sprayed at too high a PSI that caused drying in spotting or the paint was overly thinned.
Wea


 any thoughts
UP #2704 is a Scaletrain’s unit
Client wants the trucks and fuel tank medium to lightly weathered, the grills darken but not uniformly done. Some variation in the grills and screens. Wants the yellow faded and that’s where I’m at. Too many spots that while the right fade is there the spots are unacceptable to me and need to be cleaned up. Another spray or 2 maybe 3. It looks like the spots were there because either I sprayed at too high a PSI that caused drying in spotting or the paint was overly thinned.
Wea
diesel
Weedy Liver
Just wondering if you do panel outliner - I recently tried the Tamiya stuff and I liked it - after the fact, I read the instructions (all too common ha ha) and they said it works best on gloss coat, perhaps that is why it's a bit smudgy. But it really did cling to the cracks pretty well. Perhaps it could even be done with a thinned enamel...

CambriaArea51
Well-Known Member
Looks great Tom. What I've noticed on overhead shots of the Gevo engines is that they run hotter and the paint gets burned off the radiators causing them to show a white looking color then later showing light rust . I know it's for a client but just some thoughts for others in the future.Let’s show something in progress I have no completed diesels to show off
UP #2704 is a Scaletrain’s unit
View attachment 246075
Client wants the trucks and fuel tank medium to lightly weathered, the grills darken but not uniformly done. Some variation in the grills and screens. Wants the yellow faded and that’s where I’m at. Too many spots that while the right fade is there the spots are unacceptable to me and need to be cleaned up. Another spray or 2 maybe 3. It looks like the spots were there because either I sprayed at too high a PSI that caused drying in spotting or the paint was overly thinned.
WeaView attachment 246076View attachment 246077View attachment 246078View attachment 246079View attachment 246080View attachment 246081any thoughts
Affiliate Disclosure: We may receive a commision from some of the links and ads shown on this website (Learn More Here)