The wife's HO Atlas layout...

ModelRailroadForums.com is a free Model Railroad Discussion Forum and photo gallery. We cover all scales and sizes of model railroads. Online since 2002, it's one of the oldest and largest model railroad forums on the web. Whether you're a master model railroader or just getting started, you'll find something of interest here.


At least the fact that your card had been cancelled, means that your bank's security knows that it is fraudulent. Hopefully you'll get your money back quickly. Had a minor similar thing happen once that security picked up. Someone tried to book 90c to my C/card and they called me and cancelled the card when I told them it wasn't me. No doubt if it had gone through the next attempt would have been much bigger.
 
That is the common practice. Try the stolen card/information on something that is small, bottle of coke, pack of cigarettes and so on, if that succeeds, they go bigger.

Generally, when a fraud alert company see's something that is small, they will act. That is why I got hit so hard last November. There was no try and see mentality, and that did not look out of place to my financial institution in terms of my spending habits. What put the stop to it, was someone trying to buy something online that attracted a $1 search or admin fee or something. They blocked my card for $1, but let all the upwards of $300 purchases go through.

Anyway, the good new is that the matter was identified and I am getting an "emergency card" and "emergency cash" within the next couple of days. That means I can get back to the layout without being completely distracted.
 
Hey Tony. Sorry to hear about your card. If there is anything I can do,please let me know. Happy to hear that the card company is trying to get it cleared up for you. Hope your day gets better.

Scott


Morning Scott,

Thanks, appreciate your offer but it is just a waiting game at the moment. As dumb as this may sound, the hardest part is the likely hood of running out of cigarettes, and that wont be pretty :)

I'm waiting for an email from Visa regarding emergency cash via Western Union. If that turns up today, w should be okay until the card arrives. If not, well so be it.
 
Hi Suzie,

Thanks for the inspiration and run down on the PSX-4 and decoders.

I've been sitting up all night waiting for an email, which hasn't arrived as yet. The upside to that is that I have been working on the "close to the track" scenery with the aim of getting as much of that done before I lay the new Peco Track to reduce (if not totally nullify) any chance of unwanted "stuff" getting on or in it. It makes sense to me anyway.
 
Digging the tunnel Tony, looks like it's going to turn out really nice. So, with the addition of the foam pieces you added, will you plaster over the whole thing using plaster cloth or straight up plaster? Can't wait to get your review of the Peco track too.
 
Dudepants,

I will first use plaster cloth, to keep it all together then go over that with real plaster to form the contours etc. This has a long way to go though and, to be honest, I am not sure how it will end up. Right now, it looks "way too high" for it's surroundings so I may have to reduce the slope of the tunnel walls so I can flatten the top portion out a bit. Always hard to picture the end result until you start putting the paint and ground cover on it - that tends to bring things into perspective a bit better.

At the moment though, I am/have connected the left side of the layout to the right side via the main road and putting in a little ground cover etc across the front of the layout. Even though that is all I have done, it does look different and my wife likes it, so that's a plus. :) I'll get some pictures up of the progress over the next couple of days.

The Peco Track ... I am itching to get it in but want to get the scenery along side the track done first. This afternoon I soldered two pieces of the track together and it went flawlessly, yep, flawlessly! The track itself has a much better feel about it too, it seems a lot less flimsy than the Atlas Flex. What I mean by that is this, I could shape the Peco and it would remain in that shape, when I tried doing that with the Atlas it would try to return to a straight piece.

I was a little worried about the Peco Flex not having provision for track nails, but as mentioned above, there really isn't any need for them. Now I don't know if this is just my imagination or not but I ran a car along the Peco and it seemed to run a lot smoother, as if the track was better spaced. I don't know, I can't explain it.
 
Last edited by a moderator:
Progress Update XXX

Morning guys,

Things are beginning to move along a little more fluently now, with 95% of the landscape form work completed. After reading a post regarding engines falling off layouts and the min distance track should be from the edge of a layout, I cast a very critical eye over mine.

There is one section, about 4' long that is perilously close to the layouts edge, at one point a mere 3/4" (for about 6"). At another about 1/2" from a drop into a gully. Obviously something needed to be done, and this was it:

Img_0076_zpsda201f86.jpg


Img_0080_zps153a6ca9.jpg


Img_0079_zpsfdc88b97.jpg


Had a helluva time hand digging those 17 Post holes into solid rock! Seriously, each post has its own hole in which it sits.

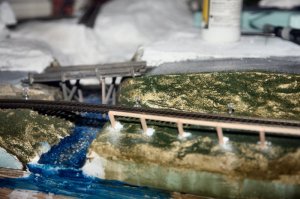
This is the first of 2 sections of "safety railing" to go in. Now I'm sure some are thinking, that is not to scale, and you are right in that observation. What isn't, perhaps, clear from the pictures is the height the rail extends above the track itself. Once the track is laid, this railing will only be between a scaled 3 - 3 1/2' over the top of the track. Once it is painted and weathered, it will naturally blend into the scenery better, and the obvious scale issue will not, should not, be so obvious.

Also, you can see that I have finished the road bridge and set it in place and begun the water. Keep in mind that it was a VERY clear sunny day with unbelievably blue sky when I took that shot :)

Well, thanks for looking and keep watching, please. Feel free to leave a comment as well, both good and constructively critical are always welcomed.

 
Work on the Lake begins...

Have begun working on the water and depths for the lake. I'm not sure how this is gong to turn out and probably need to blend the colors together more. That being said, most of the lakes around my area don't have a gradual increase i depth.

The slip for my boat was only about 20 feet out from the shore. The depth beneath my boat in the slip was 67'

At the top end of the lake:

Img_0082_zps51fdf244.jpg


Just after he Rail and Road Bridges looking N/E:

Img_0083_zps3137aa50.jpg


Am now going to spray the entire area with a mist of water and let that naturally bleed the colors together. For tose interested, I used Tamiya Acrylics for the lake floor coloring.

I will be SOOO happy when I get my camera's constant lighting instead of using an old antiquated, ineffectual floor lamp for illumination. Then I'll be able to set my F Stop and get much sharper and detailed pictures.
 
Darn Suzie, this looks excellent - now all I have to do is buy the PSX-4 and a quantity SC1's. There is a show happening about an hour away from us in a couple of weeks so am hopeful of picking those items up when I am there.

Will one PSX-4 be enough for this? I am assuming I need an separate SC1 for each of the mast heads as well, is that right?


Suzie,

Sorry for the late reply and thank you. Hopefully I can pick them up at a local Show I am going to this coming Sunday.
 
Afternoon all,

Just a quick update on what has been happening here. A lot of minor things have been done on the layout over the past few days, mainly on the lake end and getting a more realistic water appearance. Have also been working on the "top" of the tunnel, getting that sculptured so it doesn't look so "top heavy" and out of proportion to what will reside below it. I haven't posted any pictures as there really hasn't too much of a visible difference; however, I will get some posted some time today.

At the moment I am back on the town end of things, re-arranging buildings and working out the placement for them to maximize the area, yet keep it "uncluttered". One thing that will be immediately obvious is my relocation of the Station. That has been moved up onto the inner line just to right of the cliffs. This was done to give a through station rather than having to backup, as Jim suggested. Obviously, this is going to mean a re think on the track work, although that should not be a huge change, just a matter of moving the turnout down a little.

The left and right sides of the layout have now been "joined" by a make shift road. I say makeshift, as it's width will probably change once I get the Peco track laid.

All in all, things are still moving, but not quite as quickly as before. As said, I will post a few shots of the progress later this afternoon, this evening. Always changes and things to do :)
 
I have been following your thread and like to watch your steps. I think your road bridge turned out real good and your fence is something I may copy.

Img_0079_zpsfdc88b97.jpg


Keep it up!!!! lasm
 
lasm,

Thank you, the road bridge id turn out fairly well and, believe it or not, that little fence actually does work. It has already prevented a car from hitting the floor, so feel free to copy it by all means; however, I doubt that I am the first to d this:)
 
I gotta agree with lasm, it's looking really good Wombat. That fence is great. I really do enjoy watching the whole process.
 
Thanks Dudepants ... it's becoming a slow process but is getting there. Still making some minor aesthetic alterations as I go, nothing major though. I know I said it above BUT I will get some updated shots on here.

Looking forward to going to the local Train Show on Sunday where I hope to pick up a few things, mainly scenery stuff like tree's and so forth. Anyway, thanks for following this build and hopefully, one day, I can get it completed and actually running.
 
An Over due Update

Evening Guys,

This is a long over due update to the progress of the layout. Unfortunately my real world life has impacted this progress for the last week.

Anyway, essentially I have been working o the lake and trying to get it to look some what realistic. Te photo's don't show the merging of the water colors as I hoped they would, or as they are, but I think you will get the idea.

I have also started work on the tunnel top and removable section but that will be the subject of my next update.

I have also included a couple of shots showing the re-arrangement of the town area, including the relocation of the station to have a "through station".

Tomorrow (or today depending on when you read this) I am getting new reading glasses so I will be able to get int o the laying of the track and, hopefully, will have at least the main outside line running within a day or two.

The Lake/Water:

Img_0123_zps91f0e02f.jpg


Img_0124_zpsf2300b07.jpg


Img_0126_zps8a51d197.jpg


Img_0128_zps8908b07c.jpg


Img_0127_zps52ba11ea.jpg


Other Changes:

Img_0129_zps1cf55ebd.jpg


Img_0130_zps7a9e3052.jpg


That is it for now. Thanks for following this build and look forward to any comments that you may have.
 
Mike,

Have found them on the internet and will get her one in due course. Over the week end she decided to buy a crane and work caboose as well. Looks like I am going to have to knock a wall out for the extensions I will need for all of her engines and rolling stock :)

Whoops, most importantly, thank you. I wish the shots were clearer. I really need more than just a desk lamp in here.


Affiliate Disclosure: We may receive a commision from some of the links and ads shown on this website (Learn More Here)

Back
Top