The D&J Railroad -- From Scratch

ModelRailroadForums.com is a free Model Railroad Discussion Forum and photo gallery. We cover all scales and sizes of model railroads. Online since 2002, it's one of the oldest and largest model railroad forums on the web. Whether you're a master model railroader or just getting started, you'll find something of interest here.


Or, the rail sections you think are separated are actually connected. Try measuring the resistance between the sensing rail in sections B1 and B2 with the board out of the circuit. If that's an open circuit, then the fault is probably on the board, but if it's a short, then obviously the fault is in the track rather than the board. And is there any possibility that the wiring between track and board could have a short?
 
Last edited by a moderator:
I had used this particular board when I was installing the detection in section 3 and it exhibited the same behavior on those two sections. I thought maybe it was the track but when I swapped in a new/good one, the problem went away. It certainly is in the board. I did go over it with a magnifying glass and couldn't see any debris on the board that could be jumping circuits.
Now, if I have to send this back to Digitrax for repairs, the layout will be down for several weeks.


Track cleaning on the D&J Railroad.
I picked up a Centerline track cleaning car and gave it a good running today. Several times around the layout at about 6.5 scale miles each lap. Here is a video of one lap.

 
Last edited:
This one takes the longest to wire up and program, but it sure looks good.

IMG_6264_zpse1a4d0c2.jpg
 
Last edited:
Anyone noticed that now, when you upload a Peebucket photo (or more correctly, it's link) it takes you to the poster's Peebucket account and gives you access to other pics as well?
 
Upgraded the laptop that is running the signal software. I was using an old Toshiba Satellite laptop, but it was running so slow. I swapped it out with my Dell Inspirion that is a wider screen and a couple years newer. Had to reload the software secret code to activate it in the new laptop then link up the PS3 to the right com port. Ran a few tests with the signals and all is good.
I haven't had time to work down there since Monday but I hope to get some more signal installation done this weekend.
Did a little work on some coal hoppers tonight and prepped a BLMA cantilever signal bridge to install tomorrow.


Need to ask about the wood risers or slopes up and down. Is there a step by step guide,book available? Now using Woodland foam risers and have trouble with the end section ends "peaking" at 3 inches height causing a bad fit to the track ends of trestles. Various wood shims aren't working under the piers. Your excellent photos and wood working show smooth rise to up and down. The trestle and piers are Atlas kits, the foam roadbed is Woodland. My son and I are new to model trains, thanks for the help. The local hobby shop is of no help, he only wants to sell us stuff.
 
Hi tigerclaw. As far as grades on the layout, I have quite a bit of room to transition into and out of the grade. That is the real plus for larger layouts. When you have to wrestle with smaller space and limited room for grades, you do run into problems of smooth transitions. With that, bench-work isn't automatically smooth with larger spaces. I have had to make fine adjustments to get my track work smooth. It's an ongoing process as the wood settles into the humidity or lack of humidity. I have been going through some struggles with kinking track as the wood has been shrinking due to low humidity. It's been a process of mostly pulling the track up, trimming a fraction of an inch off the end, reconnecting it then gluing it back down. There have been a few places that I have had to make adjustments with the bench-work itself. The original construction with drywall screws has aided that effort whereas nails would have made it difficult to make exacting settings. In making the bench-work adjustments, I use a torpedo level to make sure the track is level side to side in the straight sections and a long straight edge to ensure there is no up and down in the roadbed. I have additional levels that I use for the grades to ensure it is smooth and consistent.
 
Last edited:
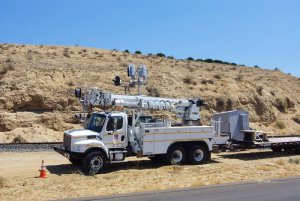
Installing signal bridges. The pictures tell the story.

Equipment and material is assembled at the installation site.
IMG_6267.JPG


The heavy duty crane hoists the cantilever into place and electricians go to work hooking things up.

IMG_6271.JPG

Traffic is back up and running.

IMG_6276.JPG
 
Last edited:
Here's a UP truck working to install new signals on Tehachapi. It occurs to me that the Bachmann hi-rail could easily be kitbashed with a Boley city power truck crane-auger to come up with something like this.

UP with auger 2.jpg
 
I've just come to this thread, and I've read all 32 pages. Very impressive. I'm not very knowledgeable about model trains (I'm just starting a new layout, which is why I'm interested in your saga) but I know about plywood. Ply will expand more in the major dimension (the direction of the outer plies) than in the minor (the direction of the 90 degree core). BUT it won't expand very much. 1/8" in an 8' sheet would be remarkable. But there are some variables. Marine grade won't expand at all, nor will underlayment (1/32" spacing on an 8' sheet is the standard gap.) Exterior grade will expand a bit more (1/8" is the standard gap), and utility grade, which is actually hard to find, might expand a bit more. If you've got screw pops, I'd be far more suspicious of your dimensional timbers, especially if you used wood from the southern states, which is notorious for its instability. Even KD to 19% (industry standard) it tends to cup and warp. Non KD is virtually useless. The other possibility for instability is the Homasote. It's less stable than plywood. I'd be very surprised if your plywood expanded enough to warp your rails.
 
Last edited by a moderator:
hi ianc and thanks for the info. Yes, the track in the staging yard and sorting yard is tacked down to homasote. I'm getting a bit of track twisting in both of those places which is actually worse than where the track is on the 3/4" plywood. It was easier to fix the track on the homasote because it was just tacked down instead of glued as the mainline is. The one place where the drywall screws actually pulled out of the 2x4 is still a mystery to me.
 
hi ianc and thanks for the info. Yes, the track in the staging yard and sorting yard is tacked down to homasote. I'm getting a bit of track twisting in both of those places which is actually worse than where the track is on the 3/4" plywood. It was easier to fix the track on the homasote because it was just tacked down instead of glued as the mainline is. The one place where the drywall screws actually pulled out of the 2x4 is still a mystery to me.

What did you use for the studs and the uprights? I see a lot of knots in the very early pictures showing wall construction. Let me make diagnosis from 3,500 miles away. Whatever you used for studs has warped a bit. Not much, not enough to open cracks in the drywall, but your technique of supporting the layout on plywood brackets attached solidly to the studs means that a 1/8" twist in the stud would result in a 1 1/2" movement at the outer edge of a 12" width. Naturally, it can't move that much, because you've got the outside supported by uprights nailed to the concrete floor and cross-braced, and you've got it skirted ( although Masonite won't do much to resist wracking), but trust me, studs exert tremendous force when they twist. That's why everyone uses screws for drywall these days - back in the day, when studs were old-growth Douglas fir - they were as stable as steel, and you could use nails. Not anymore. Now if you use nails on dimensional timber you'll get pops everywhere. So in your case, if I'm right, the studs wanted to twist, the outside edge resisted the movement of each bracket, so something had to go, and your roadbed heaved. Take a look at the join of the brackets to the studs.
 
Hmmm, sounds interesting. I've been down there installing more signals tonight. Didn't get as much done as I wanted to.
I'll take a close look at the joint of the wall stud and the plywood where the screw pulled out.
 
And by the way, if the join of the brackets to the studs looks okay, back off the screws in two or three of the brackets and see what happens. That shouldn't allow the layout to sag, but if the studs want to twist you should see it. If nothing happens, then I'm wrong and I'll give it some more thought. But I don't believe that your plywood is at fault. I've gone back into my spec books for TrusJoist beams, and the expansion of an 8' length of 1/2" fir ply 6" wide (which looks to be about what you have) should be no more than 1/64". Unless you routed every joint so there was no gap at all, and your basement has a hell of a humidity change, I can't believe the plywood caused any buckling. Plywood is the most stable material imaginable, apart from OSB. (Which, by the way, will be my choice for roadbed, as it's cheap, stable, and will take spikes more easily than plywood.)


All the roadbed plywood is 3/4". Most of it is cut about 8 - 10" wide for the roadbed. So it's either the plywood is changing dimensions or the rail. I'm inclined to think its the plywood. Last year, the basement reached the same temps, in the upper 60s, but I think the humidity might have been a bit higher. Its 26% down there now. The house is much dryer than it has ever been in the 3 years I've been living there.
Even if the vertical studs of the walls wanted to twist, I would think the panels of 3/8" plywood that is attached to them would bend somewhat and absorb the twist without putting strain on the roadbed that is laid across the tops of them.


Affiliate Disclosure: We may receive a commision from some of the links and ads shown on this website (Learn More Here)

Back
Top