The D&J Railroad -- From Scratch

ModelRailroadForums.com is a free Model Railroad Discussion Forum and photo gallery. We cover all scales and sizes of model railroads. Online since 2002, it's one of the oldest and largest model railroad forums on the web. Whether you're a master model railroader or just getting started, you'll find something of interest here.


Post 61 shows that I was just about finished laying the mainline around the basement. That was August of 2012. I started laying track in February 2012. The problems in the benchwork span the whole time frame of when it was built.
 
Last edited:
So some of the track was being installed during a likely very humid time and now it is a very dry time. Any correlation between the areas where you are having issues and when the track was put down?
 
Looking back over my posts here, it looks like I didn't start layin track until late April or early May and finished sometime in Aug. The warpage problem spans the entire layout.


Well it seems reasonable that the plywood sub-roadbed can shrink but the metal rails cannot. So I guess the plywood must have shrunk enough to first close the rail gaps and then buckle the rails. I'm just surprised that it can shrink that much.

I found one article that said a 4' x 8' sheet of plywood would shrink about 1/4" in length when the humidity was cut in half.

So since you estimate that your humidity has dropped that much, would 1/4" change in length account for the places where the rail has buckled?
 
I was thinking the same as fcwilt regarding the track itself problem but that doesn't explain the bulging and pulling of screws in the plywood. Could it be possible that as ply is made up of layers laid at right angles to each other that the cross grain plies are shrinking and applying enough force against the longitudinal layers to cause them to bow?
 
Ummmmm. I don't know.
I did more work on the layout this evening and fixed a few more track buckles. The true test of good track is a long cut of TOFCs. I did that tonight and caught a video. One of the flats near the end wobbles quite a bit. I'll have to do some work on that one.

 
Last edited:
I saw one in the middle wobbling also. You might check the trucks/wheels on those cars before anything else. I didn't see many vertical issues with the track. Keep those picture and films coming.
 
It would be interesting to see if a humidifier corrected or alleviated the plywood problem. Go easy on the re-gapping till you find out.
 
Hi Ken,

I thought you might find this interesting.

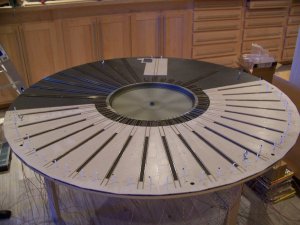
My layout is not as far along as is yours but I have been making progress. I have been working on the turntable "module" recently and have reached the point where the wiring is finished and the testing under TC has begun.

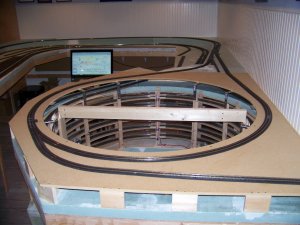
The module, shown here in an earlier not yet finished state, drops into the hole you can see in the other picture.

For this little demo video I created a "Schedule Sequence" which has TC move the loco from the turntable bridge to several different storage tracks and back.

OK now it's up and running at YouTube.

http://youtu.be/AmhW8ajcIFk

Frederick
 

Attachments

  • 100_0722-1.jpg
    100_0722-1.jpg
    524.7 KB · Views: 333
  • TT IR Sensors-2-1.jpg
    TT IR Sensors-2-1.jpg
    546.1 KB · Views: 318
Last edited by a moderator:
Would have liked to have watched that but buffering took over 5mins to get just 10% complete. Intrigued by the concept of mounting the TT on the top of the helix.


You will need to download the file and play it locally. I'm still learning how to use the new camcorder and I chose a needlessly high resolution setting - the file is 600+ MB - I need to remake it and find out how to create a smaller file.
 
OK tried a different setting on the camcorder - now the file is down to around 150 MB - trying to upload it to YouTube - well see how that goes.
 
I got 12 more detection sections setup and one signal head responding in TCS tonight. It gets easier each time. I have a bad BDL168 though. Two sections, zone B section 1 and section 2 seem to be linked together in the board. When a loco is in section 1, both the section 1 and section 2 LED on the test board light up as well as the block indicators on the computer screen. It does it in the reverse too, i.e. when a loco is in section 2, the section 1 LED is lit.
 
Last edited by a moderator:
Very nice. What component reverses the polarity when the turntable goes 180?

A DCC Specialties PSX-AR. I could have made use of the split-ring commutator feature as you would with a DC system but it was simpler to just install a DCC reverser and not have to worry about how any of the tracks were wired.


I got 12 more detection sections setup and one signal head responding in TCS tonight. It gets easier each time. I have a bad BDL168 though. Two sections, zone B section 1 and section 2 seem to be linked together in the board. When a loco is in section 1, both the section 1 and section 2 LED on the test board light up as well as the block indicators on the computer screen. It does it in the reverse too, i.e. when a loco is in section 2, the section 1 LED is lit.

If you have some sort of magnifying device you might examine the board for "whiskers" - these are little tiny bits of the copper cladding that bridge two traces and create a short - its just something that sometimes happen when making a circuit board.


Affiliate Disclosure: We may receive a commision from some of the links and ads shown on this website (Learn More Here)

Back
Top