The “Give Tony Grief” Thread

ModelRailroadForums.com is a free Model Railroad Discussion Forum and photo gallery. We cover all scales and sizes of model railroads. Online since 2002, it's one of the oldest and largest model railroad forums on the web. Whether you're a master model railroader or just getting started, you'll find something of interest here.


Okay - well, I think this worked out pretty well, if I don't say so myself :)

View attachment 167687

Once the decals dry properly, I'll give them a light coat of Dullcote to seal them in place and so when I drill the holes I don't rip them up :rolleyes:

Now to wait for the Switches so I can drill the right sized holes and we should be set to wire er up :)
Looks good Tony.


That did turn out well. I wasn’t so sure when you said you were going to use a decal.

wonder if you put a piece of tape before you drill would decrease the odds of it damaging it.
 
That did turn out well. I wasn’t so sure when you said you were going to use a decal.

wonder if you put a piece of tape before you drill would decrease the odds of it damaging it.

That is the plan Mike, and to stop the drill bit from sliding around the styrene.
But wouldn't that be likely to lift the decal ?

Not the way I have done it I don't think - I have given the decals and styrene a good coating of Dullcote so the drill shouldn't hurt the decal at all - hopefully :rolleyes: :oops: :D
 
Okay so will this CDU work? If so, how many will I need? I am guessing I will need two of them going by the terminals shown??

I am thinking that I will use two (2) CDU's - one for the rear set of points and another for the front set.

CDU2C.jpg
 
Thanks and they are only $20 each so I might, MIGHT I said, buy a couple and play with one to see what is what - just to keep you happy my friend ;) :)


Tony is living the Boy Scout Motto…Be Prepared! It’s nice to reach over and grab a spare whatever you’re working on than waiting for it to arrive. Usually when I have to wait for something to come in, it’s a moment killer for me.
 
I'm not the most patient person in the world, that is for sure - so I do try to have more than I need of something just in case I need it. I really do work on the principle of - "... it is better to have too much and not need it, than not enough and run out ... :)

Most people think I am extravagant and that's okay - but I don't think I'll ever be caught short :)
 
Late to this thread... Ran out of time so I jumped from page 25 to 35, so I missed a lot, but I wanted to revisit the control panel.

I ended up printing my layout on a poster sized piece of paper (Office Max), then mounted it to a piece of MAsonite. Drilled holes where the turnouts are, and inserted toggle switches to control the turnouts centrally.
 

Attachments

  • 1683121165421.png
    1683121165421.png
    1.5 MB · Views: 165


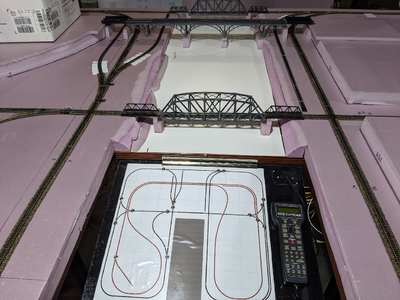
The Control Panel - have been giving this some thought and have concluded that building one doesn't have to be hard or complicated. Basically, all a control panel is, is something to tell you which tracks are open and which tracks are closed, so to speak. Therefore, and working on generally accepted standards being Green means Go, if a track has a lit GREEN LED then that is the open track or track that will be used. If a track doesn't have a GREEN LED lit, then it can be assumed that is the CLOSED track.

As such, a Control Panel only really needs GREEN LED's, one for each track and that is it. Wired so when one track is LIT the other is NOT. I don't think you can get much simpler than that.

Sure you can have RED LED's as well but why, other than for looks?

Dscn0022.jpg


So far so good - Just need to drill the holes for the LED's and that is it for the Panel :)

The switches are ON/OFF/ON variety.


Affiliate Disclosure: We may receive a commision from some of the links and ads shown on this website (Learn More Here)

Back
Top