My poor track laying causing derailments, any fix?

ModelRailroadForums.com is a free Model Railroad Discussion Forum and photo gallery. We cover all scales and sizes of model railroads. Online since 2002, it's one of the oldest and largest model railroad forums on the web. Whether you're a master model railroader or just getting started, you'll find something of interest here.


That outer gap is substantial, but would be fine on tangent track. At a kink or on a curve, especially as they get sharper...

One other common miss is allowing the outer rail to dip somewhere along a curve. It only needs to lose 0.5 mm to make all the difference. Believe me, I learned this the hard way...several times.
 
You’ll get there, we all do. Practise will improve your game
Thanks, I appreciate the encouragement. I've been pleasantly surprised with the outcomes of my work on scenery and buildings. My biggest struggles have been with track laying. And my soldering is definitely improving, although I would not use the word "good" yet.

One thing I have learned is to get the right tools and not skimp on the cost. With bad tools, I'm not even giving myself a chance to succeed.
 
One other common miss is allowing the outer rail to dip somewhere along a curve. It only needs to lose 0.5 mm to make all the difference. Believe me, I learned this the hard way...several times.
Yes, I did that too. It was the first place I had to do a lot of work to fix my mistake. Every time my Pacific went over it, the leading bogie would lift off the rails on the low side, and of course miss the rail when it came back down.

I'm pretty sure I've made every mistake possible. I like to say that experience is the thing you get right after you could have really used it.


Yes, I misremembered (it's been a few weeks since I laid track). I went back and checked my notes and that is the way I was doing it. Which means that the rail that has the worse gap will not slide.
Sad but true. I've had the best luck with cutting, filing and forming a piece of scrap styrene shape and super-gluing it in place. I paint my rail a light brown color so the styrene blends in.
 
OK, so I cut and filed two tiny pieces and slid them into rail joiners. This was not easy with my hand tremor. (I figured I would try this first before ripping up the entire length of flextrack.) I had one idea that I thought was good: I did the track cutting inside a plastic bag so that the tiny piece would not fly off and be lost.

I pulled up a couple of inches either side of the gap, enough to give me room to remove the old joiners and insert the new ones. I have glued the track back down and weighted it (one can of kidney beans and one can of black beans, if anybody wants the recipe.) Tomorrow I will add pins so that nothing goes anywhere, reattach the feeder wires, and repair the ballast.

(BTW I also fixed the track behind. The gaps were not nearly so bad and it just needed a little easing, but I figured if I'm going to be doing ballast, I might as well do both.)


PXL_20250920_190657594.MP.jpg
 
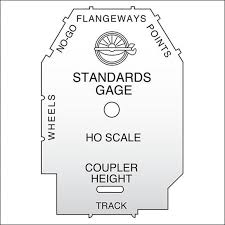
Not sure if you have these tools but they are a good investment. These tools greatly improved my track laying along with practice.
NMRA Track Guage.
1758400923913.png


and a few of these ( these are Kadee but there are others)

1758401018726.png


and a few jewelers' files ( Harbor Freight $4)

1758401173885.png
 

Attachments

  • 1758400991288.png
    1758400991288.png
    25.8 KB · Views: 85
Because I am a complete beginner, this was my first attempt, I was having a hell of a time not getting the rails to pull apart when I curved them (I hadn't yet learned I should have soldered them first) and I had no idea how much I could get away with.
You're not the first, and I doubt the last, to have this problem. First, don't sweat it, there are numerous "fixes" as you've now found out.

Before you fix any track test it for continuity and ensure all track joins are firmly in place, no gaps, especially on curves. Cutting track is not really difficult, but as with soldering or weathering, it takes practice.

I now have my own extremely reliable track Quality Controller in an OO Industrial Tank engine (I model both HO and OO). If there's a problem, she finds it. I ran some trains on my new (under construction) layout, everything ran fine, no problems at all, till the little pocket rocket ran and discovered I had two rail joiners misaligned that bigger locos had managed to ignore.

If you're unsure of something, or want to do something, just ask, there's no such thing as a dumb question, just the one you didn't ask.

There's a wealth of knowledge here, and members will happily answer any concerns/questions you have or at least point you in the right direction.

You're doing great, so keep it up.
 
I have the files (and have been using them a lot today). I should definitely get the NMRA gauge (ETA: and just ordered one).

But what is the thing in the middle?
The photo in the middle is also a track gauge manufactured by Kadee. There are several different manufacturers, but these were at the local hobby shop. I use these, one on each side of the gap/joint to hold the rails in gauge while soldering. Then use the NMRA gauge and spare truck off a car to check to make sure the rails didn't change if the ties got to hot. I am also not great with the soldering gun. Then use the files to clean up any slag solder.


Yes, that near left one looks bad on inspection. I hadn't even spotted that. (This was my very first join, so I made all kinds of mistakes). I'm wondering if I can pull up just enough track - say, an inch either side of the joiners - to open up enough space to remove the old joiners and insert the new.


Yep, I learned about pre-joining after I struggled so much with the first one and then watched a bunch of videos I should have watched before. The idea about staggering the joins is new to me and makes a lot of sense. I will put it in my back pocket for next time. I'm intrigued about the suggestion to have the sliding and fixed rails opposite each other - I see the value - because everything else I read/watched before now said that the sliding section should always go to the outside.


Well, it's definitely personal but it's not offensive, it's just true :-) Again, this was my very first joint, and my experience with soldering was minimal too. And not only were (to some extent, still are) my skills poor, so was my soldering iron, which I have since replaced. I have also watched a bunch of videos since then and had a lot more practice, so at this point I would say that my soldering is close to adequate.

Speaking not to the problem, but your attitude and acceptance of criticism: May I applaud you. "definitely personal, but not offensive, just true." Probably the best way to seek and ask for help I've seen in quite a while in a currently divisive world.

I spent a long time in college before I came to realize "criticism" might only be just that. Criticism is also observation...of what you have done, what you could do better, what you SHOULD have done and should have done better.

I think you have the right attitude and a good feel for yourself. Beginner? Yeah, ok. We all were. Willing to learn and ask? Yeah.

You've got it. You will be good at this model railroading thing, I think.
 
Last edited:
There's a wealth of knowledge here, and members will happily answer any concerns/questions you have or at least point you in the right direction.
I have absolutely found that to be true, and this thread is a great example. Thanks for all the support and encouragement.
 
I let the adhesive dry overnight, and then put in a couple of track pins for extra security. Now I need to reattach the feeders, clean up some stray solder, run some tests, and if all is good then repair the ballast. I also took the opportunity to slip in the missing sleeper.

(The other picture is the curve inside the really problematic one. The gap was not nearly as bad but I figured, while I've got the tools out and the ballast jar open... That one I was able to fix more easily by easing the track inward a little to slightly decrease the curve. There is a bit of a kink at the join, but not nearly as bad as the zoomed in picture makes it look)

Anyway, it's not beautiful or perfect, but it's a whole lot better than it was before. Fortunately it's in the furtherest back corner of my layout, so the most important thing is that nothing derails there.

PXL_20250921_120953597.MACRO_FOCUS.jpg
PXL_20250921_120931671.jpg
 
Its hard to tell, but in the second photo of post #34 where the two pieces of track come together it is not in a rail joiner. It appears the one on the right is on top of the joiner giving you a sharp bump.

Same thing with the first photo.
Anyway, it's not beautiful or perfect, but it's a whole lot better than it was before. Fortunately it's in the furtherest back corner of my layout, so the most important thing is that nothing derails there.
If this section is in the farthest part, this is where you want things spot on perfect. This is one of the reasons I'm never in a hurry to ballast. I have track that has been laid over 2 years ago with no ballast. This way If a problem arises it is a easy fix to repair.

Something that helped me out considerably with rail joiners track work, soldering was to purchase some sectional track that was cheap on EBay and practice cutting joining and learning to solder feeders to it. Pracrtice, practice, practice as the old saying goes. You will get there.


I just noticed something that may be causing you some grief - The track nails are too close to the join, I'll bet you put them there on purpose to hold things in line. The problem is - they are pushing the track down and making a "dip" at the join (at least, from what I can see in the photo). Adding to any other problems you have there... I usually put track nails partway in, and only on the outside not between the tracks, and I remove them after gluing/ballasting.

Also to follow some comments above about the joiners, I hope you are feeding the curve at both ends.

My honest opinion, rip it all up and start again with the right techniques, tools, magnification, and adequate lighting. You said it's at the back of your layout. Make it right now, so you won't have to struggle with it later.

Looking at the time line, it appears that you have not been able to apply the advice about soldering. It's not rocket science, but it always goes badly if certain basic principles are not followed. I strongly suggest taking some time away from the layout to research it, and take a bunch of junk track and practice on it. Buy a new iron if yours isn't the right tool.

Another note - I always "form" the joiners with pliers so they are tight when they go on. They are often way too loose to be used the way they come from the box. We have a saying in electronics "solder is not glue". The thing you are soldering should be very tight and immobile, with minimal gaps between the contact surfaces.

As you build a railway, take a long, long pause and make a thorough inspection and tests before going to the next work stage. Very, very few modellers were able to lay flex track correctly the first time. You have to go through the mistakes unfortunately. It's very much a hands on learning thing.
 
Last edited:


Affiliate Disclosure: We may receive a commision from some of the links and ads shown on this website (Learn More Here)

Back
Top