Help Me Plan My Layout

ModelRailroadForums.com is a free Model Railroad Discussion Forum and photo gallery. We cover all scales and sizes of model railroads. Online since 2002, it's one of the oldest and largest model railroad forums on the web. Whether you're a master model railroader or just getting started, you'll find something of interest here.


When choosing plywood, avoid the softwood varieties, they will absorb atmospheric moisture more readily and go for the ones with more plies in whatever the thickness is, may cost more, but the payoff is in not so much, the weight carrying ability, but much more importantly for model train track, it's stability (how much it will deform (sag/twist) between supports). Also never put the joins between the sections of your subroadbed (because you will need to splint them underneath with another piece of ply) where there will be a vertical transition curve at the bottom or top of a grade.

I picked up some 1/2 inch plywood with 4 plies at the builder's supply store. I suppose it is Douglas Fir, as it is locally made. Not really a hard wood, but they recommended it. Thanks for the tip on the not joining the sections of subroadbed on vertical transitions. I got two big curves of subroadbed cut out of plywood today after I braced the legs and anchored the benchwork to the wall in several places. It is solid now.
 
When choosing plywood, avoid the softwood varieties, they will absorb atmospheric moisture more readily and go for the ones with more plies in whatever the thickness is, may cost more, but the payoff is in not so much, the weight carrying ability, but much more importantly for model train track, it's stability (how much it will deform (sag/twist) between supports).

After some thought on this..... When I get all of the subroadbed cut out I will apply a coat of water seal or maybe a coat of paint the color of railroad ballast. That should seal the plywood and make it less susceptible to absorbing moisture and warping or deforming.
 
Sealing the underside and edges before fixing down is a good idea, but leave the top side till it's all in place. The recommendation for plywood is that it be allowed to acclimatise to it's surroundings before final fixing. An earth colored acrylic latex paint is ideal.


Sealing the underside and edges before fixing down is a good idea, but leave the top side till it's all in place. The recommendation for plywood is that it be allowed to acclimatise to it's surroundings before final fixing. An earth colored acrylic latex paint is ideal.

Will do.

Thanks for your input. :)
 
That is one thing I do like about the foam. I don't have to worry about the expansion and contraction. But if you plan on using switch machines then foam can be a pain. As I put turnouts down I am drilling for switch machines but I really thing , since I can reach everything, that I may just use manual throws.


Sent from my iPhone using Tapatalk
 
That is one thing I do like about the foam. I don't have to worry about the expansion and contraction. But if you plan on using switch machines then foam can be a pain. As I put turnouts down I am drilling for switch machines but I really thing , since I can reach everything, that I may just use manual throws.
Sent from my iPhone using Tapatalk

My basement is very dry year round so I doubt I will have moisture issues, but it won't hurt to seal the plywood. Manual throws are old school. I lean to the side of the new technology. I was even kicking around doing a computer controlled layout...... but I have my hands full enough as it is. Still I might wire it up with enough blocks and whatever else I need that if I decide to add that later I won't have to tear it up and redo a bunch of stuff.
 
My basement is very dry year round so I doubt I will have moisture issues, but it won't hurt to seal the plywood. Manual throws are old school. I lean to the side of the new technology. I was even kicking around doing a computer controlled layout...... but I have my hands full enough as it is. Still I might wire it up with enough blocks and whatever else I need that if I decide to add that later I won't have to tear it up and redo a bunch of stuff.

If you think you might automate you layout I would be glad to provide whatever assistance I can.

My layout is automated using:

- Train Controller Gold (software)
- RR-CirKits Simple Serial Bus devices (electronics for occupancy detection, turnout control, signal control, relay control, etc)
- Tortoise turnout motors
- Tomar LED signals

There are a few things you can do now which are not much work or expense and make you layout ready to add computer control at some future date, without a lot of undoing what you have already done.

Frederick
 
If you think you might automate you layout I would be glad to provide whatever assistance I can.

My layout is automated using:

- Train Controller Gold (software)
- RR-CirKits Simple Serial Bus devices (electronics for occupancy detection, turnout control, signal control, relay control, etc)
- Tortoise turnout motors
- Tomar LED signals

There are a few things you can do now which are not much work or expense and make you layout ready to add computer control at some future date, without a lot of undoing what you have already done.

Frederick

That would be great. What should I be doing now to make the layout "computer ready" should I decide at some point to automate. I operate and maintain our IT network at the school where I teach...... and I can't get enough of frustration. ;)
 
That would be great. What should I be doing now to make the layout "computer ready" should I decide at some point to automate. I operate and maintain our IT network at the school where I teach...... and I can't get enough of frustration. ;)

There are really only two things that you really should do now, that are easy to do when building the layout, laying track, etc and hard(er) to do after the fact.


1. The layout needs to be "blocked" - that is divided into sections of track that are electrically isolated from one another (both rails).

There are some simple "rules" to follow in deciding what is/is not a block.

The first and perhaps most important rule is "turnouts are never part of a block".

Generally blocks are sections of track between turnouts that are long enough to hold "a train".

However sometimes your track arrangement is such that you might have sections of track that are only a couple of feet long. While not long enough for a train it is long enough for a loco and a car or two, which can be useful at times. I have a number of such sections on my layout.

Also the computer program, Train Controller, can handle trains that occupy more then one block.

If you have a track plan I could suggest a blocking scheme.


2. The blocks should be "prepared" for occupancy detection.

Since the blocks are electrically isolated each block will need it's own set of power feeders, picking up power from the DCC power bus.

The cheapest way (and best way IMO) to "prepare" is to place a RR-CirKits occupancy detection coil on one feeder of each block. These coils are $1.75 each. (http://www.rr-cirkits.com/description/CT-Coil.jpg).

As you can see from the picture there is a"hole" through the coil that the feeder wire goes through. Then the two connections to the coil (at some later date if desired) can be connected to a RR-CirKits WatchMan occupancy detection board using a pair of wires extracted from CATx cable.

The advantage to coils is that the power wiring to the block is totally isolated from the occupancy detection wiring. So you can "optimize" the location of your DCC power bus and block power feeder runs without worrying about the CATx wiring to the WatchMan.

The CATx wiring, if kept a decent distance away from your power wiring, is very forgiving. The wiring from multiple blocks can be run together for a good ways.

As long as you have placed one of these coils on a feeder wire to each block you will be able to add, at a future date, the wiring and electronics for occupancy detection WITHOUT having to undo any of the wiring you have already done.

If you wanted to avoid having to work under your layout to attach the wires to the coils, you could attach the CATx wiring to each coil and just run the wiring to some sensible place for future connection to the WatchMan devices. The unconnected CATx wires will have no adverse effects whatsoever.


It probably goes without saying that you need to plan on having turnout motors, like a Tortoise, for each turnout, if you desire computer control.


Feel free to ask any and all questions you may have.


Frederick

 
Last edited by a moderator:


There are really only two things that you really should do now, that are easy to do when building the layout, laying track, etc and hard(er) to do after the fact.


1. The layout needs to be "blocked" - that is divided into sections of track that are electrically isolated from one another (both rails).

There are some simple "rules" to follow in deciding what is/is not a block.

The first and perhaps most important rule is "turnouts are never part of a block".

Generally blocks are sections of track between turnouts that are long enough to hold "a train".

However sometimes your track arrangement is such that you might have sections of track that are only a couple of feet long. While not long enough for a train it is long enough for a loco and a car or two, which can be useful at times. I have a number of such sections on my layout.

Also the computer program, Train Controller, can handle trains that occupy more then one block.

If you have a track plan I could suggest a blocking scheme.


2. The blocks should be "prepared" for occupancy detection.

Since the blocks are electrically isolated each block will need it's own set of power feeders, picking up power from the DCC power bus.

The cheapest way (and best way IMO) to "prepare" is to place a RR-CirKits occupancy detection coil on one feeder of each block. These coils are $1.75 each. (http://www.rr-cirkits.com/description/CT-Coil.jpg).

As you can see from the picture there is a"hole" through the coil that the feeder wire goes through. Then the two connections to the coil (at some later date if desired) can be connected to a RR-CirKits WatchMan occupancy detection board using a pair of wires extracted from CATx cable.

The advantage to coils is that the power wiring to the block is totally isolated from the occupancy detection wiring. So you can "optimize" the location of your DCC power bus and block power feeder runs without worrying about the CATx wiring to the WatchMan.

The CATx wiring, if kept a decent distance away from your power wiring, is very forgiving. The wiring from multiple blocks can be run together for a good ways.

As long as you have placed one of these coils on a feeder wire to each block you will be able to add, at a future date, the wiring and electronics for occupancy detection WITHOUT having to undo any of the wiring you have already done.

If you wanted to avoid having to work under your layout to attach the wires to the coils, you could attach the CATx wiring to each coil and just run the wiring to some sensible place for future connection to the WatchMan devices. The unconnected CATx wires will have no adverse effects whatsoever.


It probably goes without saying that you need to plan on have a turnout motor, like a Tortoise, for each turnout, if you desire computer control.


Feel free to ask any and all questions you may have.


Frederick

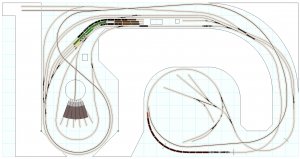
The track plan is below. Where would you put the blocks?

latest layout.jpg
 
As I recall this plan was developed in 3rdPlanIt - which is the software I use.

Do you have the 3PI file? I could add the blocking information to it.

Frederick

I only have the image. Bob (the Moderator) designed it for me and posted this image along with other variations. He did an amazing job.
 
I remember you saying at the start of this thread that you are new to this hobby and I have to say you are doing excellent for being new. You are building like a veteran. Great work.
 
I remember you saying at the start of this thread that you are new to this hobby and I have to say you are doing excellent for being new. You are building like a veteran. Great work.

Wow, high praise. Thanks. I appreciate all of the help and encouragement you and others have given me on this forum. I have a long way to go and am looking forward to moving the railroad along. :)


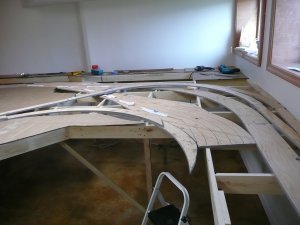
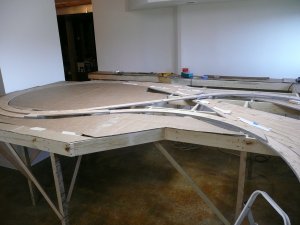
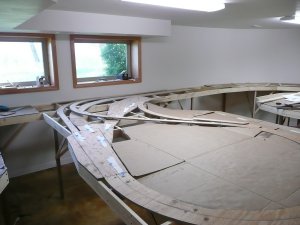
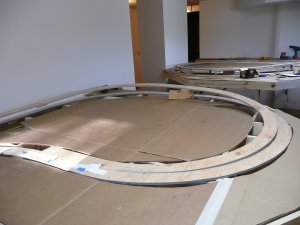
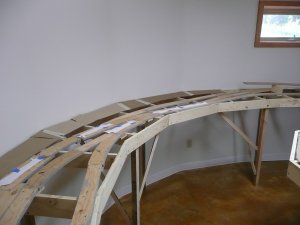
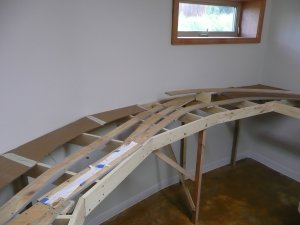
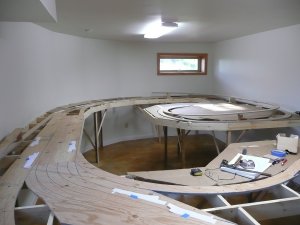
More progress. Almost all the subroadbed on the main lines are completed. The elevated portion of the track will end up being mostly some kind of viaduct, but I think I will use the plywood sub roadbed first then change it out a section at a time. Other wise it may be a very long time before I can run train that route as the viaduct with likely take a while to finish. The long curved sections around the curved wall took a lot of time to work out and cut the subroadbed to fit, two full working days. But I think it came out pretty close to the track plan.

Subroadbed4.jpg

Subroadbed5.jpg

Subroadbed6.jpg

Subroadbed8.jpg


Affiliate Disclosure: We may receive a commision from some of the links and ads shown on this website (Learn More Here)

Back
Top