DSD's Layout Progress Thread

ModelRailroadForums.com is a free Model Railroad Discussion Forum and photo gallery. We cover all scales and sizes of model railroads. Online since 2002, it's one of the oldest and largest model railroad forums on the web. Whether you're a master model railroader or just getting started, you'll find something of interest here.


Hi Erik,glad to see you are thinking backdrop early in the game. The sky blue approach is actually very practical and should not be discounted because it is not interesting enough. That said:


One pretty much non-negotiable is that I didn't want it permanently affixed to the newly installed and painted wall, so that I wasn't left with a lot of repair work if we someday move and sell the house.

Not entirely coincidentally, the wall coloring we picked is a passable sky blue from Sherwin Williams (called "balmy"). We chose it on its own merits, but it has the advantage that if I wanted to I could skip a backdrop entirely and just let the wall itself pass for a cloudless sky, although without the sort of natural variations in shade and color that would characterize a real sky.


But I do want some clouds in there, and I MIGHT sketch in some distance hills and trees or other more specific images.

With that "druther" -- for a backdrop, not just a blue wall -- pretty much set in stone, and the "given" or not wanting the actually attach it to the wall, the next question has been how to affix it. I've been focused on portable solutions attached to the individual layout sections and had pretty much worked up detailed plans for a system of large sections of foamcore, framed behind by thick wooden molding trim or perhaps 1 x 2, and brackets on the rear portions of benchwork in which the portable backdrop segments would rest, held in place underneath by inexpensive hidden spring clamps. I think it's basically a workable idea, one I borrowed heavily from the Jerome and Southwestern MR project layout back in the 1980s with some additional tweaks of my own.

Then I got an idea out of left field last night. Chatting with another mrr while we were being hosted last night by fellow forum member Greg@mnrr -- whose layout, guys, is a nice, compact gem of a system -- my conversation partner mentioned plans for a backdrop hung up with Velcro poster tabs, like these:


Chewing that over as I was waking up this morning, I got a variation of an idea: Find a kind of cloth with a smooth surface -- I've got a couple of ideas in mind -- cut it to the proper width if need be (36 inches wide should work), paint the backdrop on it, and hang it on the wall using those Velcro gizmos. Besides several running along the top,additional mounting tabs would be installed periodically along the bottom of the backdrop to anchor it. The important thing is that the glue on those strips (if you aren't already familiar with them) is 3M's "command adhesive" which holds strong but also removes easily and cleanly if you want to remove the item using it, leaving the wall unmarred.

I'm going to the fabric store w/ DSM tomorrow to scope out what kind of fabrics would be best suited for this idea. I know that underneath the fabric on both inside corners and outside corners, some kind of special support will be needed behind the fabric to create rounded outside corners and coved inside corners. I have sort of an idea how I might go about this, but there are still details I'll need to understand, first.


If I find a suitable fabric, I might start with just a very short piece and see if the idea works mechanically as well as it is sounding in my head.
.


I made a free standing backdrop using hardboard for this layout. The frame is 2 x 2 and 1 x 4. I used it for the very same reason you mentioned; did not want to make permanent fixtures:

I built them where they were going to be and raised them up on simple 2 x 2 legs. The front 2 x 2 is temporary, used as a clamp because the hardboard is glued and screwed into the back 2 x 2.
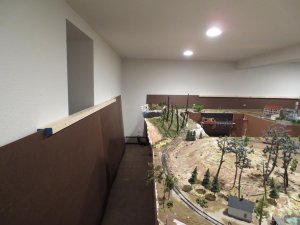
backdrop2 002.jpg

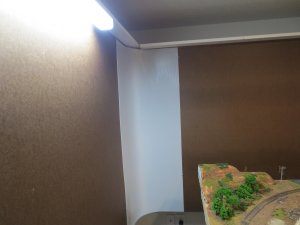
I did the corners like this, using some plastic I bought at Menards. I used a light coat of sheet rock mud over where the glue went. The backdrop was glued with rubber cement to the hardboard and around the corners:
backdrop13 005.jpg

The plastic was glued on with pl400 or something similar.

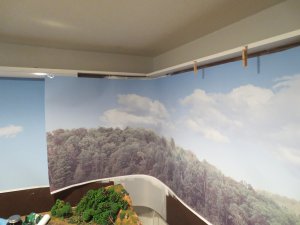
Here is how it went up:
aa project 016.jpg


This is an earlier backdrop I made out of vinyl. It is tablecloth material available at party supply stores. It is good from viewing at a distance but does not capture details. I used spray paint for sky and clouds, acrylic tube paints for scenery:

[video=youtube;gOSrRVuvkNQ]https://www.youtube.com/watch?v=gOSrRVuvkNQ[/video]

Over time, the fabric did slightly stretch and some wrinkles developed. I think that might happen with regular fabric as well.

THOSE 3m picture hangers--we use them as well around the house. If there is much weight on them, they unexpectedly give up. We had a couple hanging for years and then bang they fell. Something to think about.

Hope this helps, lasm
 
Last edited by a moderator:
David -- thank you very much. I realize now I should have read your backdrop build more carefully and will go back and do that.

On the 3M picture hangers -- good to know that they don't stand up to a lot of weight. If I stick with that approach, I'll keep that in mind in not choosing a solution that is too heavy....

I'm going to go and read that build more closely now, and I might throw out some questions in the process.

Thank you again....
 
Now, after reading the pages where you describe the build, I'm trying to get a handle on how the backdrop assembly supports itself. I'm inferring that it does so because the unit has two "walls" that are attached at right angles, so it has 3-point stability. Am I understanding that correctly? If so, I have two reactions. The first is, "well, Duh, Erik..." and the other is "GENIUS!!!!"

Questions:

1. How carefully did you have to pick over the lumber you used for the supporting structure to avoid bows, twists, etc.? I've been picking over the dimensional lumber for my new L-girder system pretty carefully, but it's been challenging to say the least. ("Whaddya mean? That home center lumber has at least ONE straight edge!" :rolleyes:)

2. For the horizontal portions -- did you use a single, long horizontal piece, or did you have to splice two pieces together end to end for greater length?

3. What would you think of using foamcore instead of hardboard for the backdrop surface? I can find foamcore as large as 4x8 feet, although it's probably more expensive per square foot than the hardboard.... Again, either material would require some kind of special treatment (such as you did) for coving the inside corners....


Hi Erik,

This picture shows the legs that supports the hardboard. It is the left side on the bottom. The small chunk of 2 x 2 is all that was used to support the board. That is below the layout so a screw holds it there, too; it was glued as well. There must be a screw at the top, too.

aa project 002.jpg

I see I put a 1x4 along the top and some lights in, too. The 1 x 4 at the joint was temporary and was used as a clamp because behind it is a 1 x 6 that runs the same way and is glued it and permanent:

backdrop3 001.jpg

And here is a better look:

backdrop13 006.jpg

There is only one support under each 4 x 8 piece! The two 4 x 8 sheets are attached with a 2 x 2 running the top and the bottom. (question 2)The joints are staggered and one 8' piece is centered over the joint along the top and one 8' piece along the bottom is staggered so the joints do not line up. They are glued to the hardboard. They were initially screwed in with the "clamp" piece, which was removed. There is also a vertical 1 x 6 where the large sheets are joined together. I spent over a week glueing and clamping and waiting to set, a little at a time. In some cases, after the glue was set I took the screws out and covered the holes with a bit of mud.

I was able to lift them alone, one end at a time to put the legs under, but they are heavy!

As far as straightness, (question 1) I purchased the wood from a local supplier and he delivered so I picked through the pile and used the best pieces in full 8' lengths and the ones that were a little crooked, cut them smaller.

The hardboard works for sure and I am not sure about foamcore because I have not used it (question 3)
 
Hi Erik, thought I would add this, shows how I put the two sheets of hardboard together also some detail of the hardboard on the stand, beginning at about 4:20

[video=youtube;PzAxuV-my38]https://www.youtube.com/watch?v=PzAxuV-my38[/video]
 
Finished the last L-girder support unit this afternoon. Also chopped off some extra bits that I have eliminated from the layout sections. Going to have to buy some small pieces of molding or other lumber to make positioning cleats on the sections. Then I will set to work on the self-supporting backdrop system, based mainly on LASM's design. Probably next weekend.

Sent from my LG-D850 using Tapatalk
 
So yesterday and today I centered the last two sections on their respective support systems, then attached cleats on the underside that keep them positioned properly, while allowing me to remove the sections, turn them on their sides to make it easier to do work on the underside, etc.

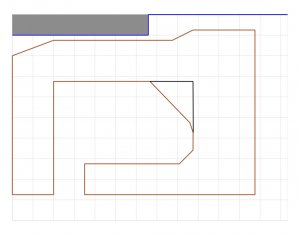
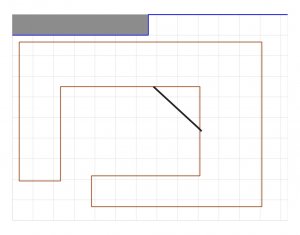
I've also put the sections back in place in the room. I've actually changed where some of them hook up to each other, so the overall footprint looks a little different; instead of this....

OLD outline.jpg

it's now this....

NEW Outline.jpg

Where the gap is, instead of a lift-out, it will be a hinged swing gate.

The main reason for the change was to give better access where the room has a jog in the wall in the upper right-hand corner of the image.
 
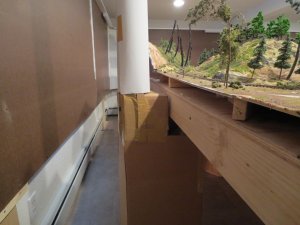
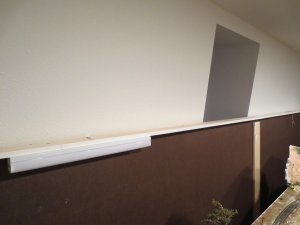
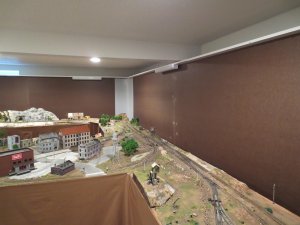
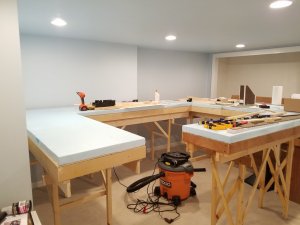
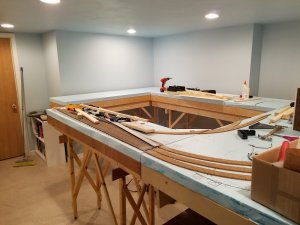
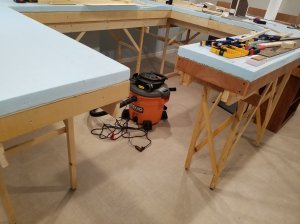
And here are some pictures:

20160410_130600.jpg

20160410_130612.jpg

20160410_130624.jpg

I still have to level the sections so they match up properly. Then I'll secure them to each other.

Previously they were bolted together, but I'd like something that would be quicker to detach. I'm thinking about drilling holes between the sections that would accommodate carabiners or maybe some kind of cotter pin or similar gizmo. I'm sure I'll come up with something.

I've also decided to way simplify the backdrop construction. Instead of a freestanding backdrop framework, I'm going to attach backdrops to the L-girder structures, using either foamcore or possibly Gatorfoam (I have to price that out -- I'm concerned it might be a lot more than I want to pay). Jeff Wilson has a book "Building a Ready-to-Run Model Railroad" that has a simple but effective looking foamcore backdrop that looks adaptable to my situation. And by attaching it to the underframe rather than the actual layout sections, I can still remove the sections -- which is the whole reason I took the time to replace the original legs with these L-girder contraptions.

*Added: Where the wall takes that jog, instead of attaching the backdrop to the framework, I'll use a single big piece of foamcore painted with sky and clouds and hang it against the wall with command adhesive Velcro like I mentioned before.

*Also added: I really do like LASM/David's system, but for me it began to feel like over-building, which is why I backed away from it.
 
Last edited by a moderator:
Erik:

Your layout room is much too clean and organized for a model railroad under construction. You really have made some real progress on the bench work and installing roadbed. Great looking room and lighting.
Keep up the good work!

Regards.

Greg


Looks like things are moving ahead. I agree with Greg. The room is way to clean and organized. Keep the updates coming.
 
Looks very nice. Are you planning on a lift out? I missed that part of your plan.

Thanks. The original footprint had a small lift out (18x18 inches). As reconfigured -- because the two sections where the gap is don't meet up in the same way -- the opening now is going to have a swing gate, although it might temporarily be a simple lift out to at least work out the track connection. (see Post #147 above). The swing gate will take some more careful engineering.
 
I actually got all the sections leveled in about 20 minutes or so yesterday before supper. I was figuring it would take a lot longer -- and was very happy to be wrong. The next immediate step will be to secure the sections -- finding an alternative to bolts that will be secure but also very easily detachable. I might use some angle braces and bolts to connect the supporting structures, which won't have to move as much.

*Added: Another thing I want to do sooner rather than later is to put some simple fascia on the rear ends of the two sections that are against the wall -- just up to the level of the top of the first layer of foam. Unlike the front fascia it won't be painted; the purpose will simply to be to offer a little more protection for the bare benchwork and exposed foam on that side. Thinking I will get to that next weekend -- if one of my freelance clients pays his outstanding bill this week!

As for clean and organized... Well, you can't see all the leftover lumber just stacked up on some of the sections I guess! But in all seriousness, that can be a challenge for me -- it's easy to blow off end of work session cleanup, and then that actually deters me from moving on to the next task! Also, I have various shelving units and other storage units that will ultimately go under the benchwork, but until I'm finished with some of the tasks requiring easier access they'll wait. You should see the adjacent room that's right now housing much of that stuff and is supposed to be reconfigured into a library. We don't call it The Scary Room for nothing!
 
Last edited by a moderator:
Latest update...

Secured sections to each other with 5/16 pins and hairpin fasteners. They're tight but quicker to remove than bolts with wing nuts. Now that they're together, I'll take them apart again so I can do two things. One is to run bus wires under each section. The other is to cut holes in two sections to accommodate 2x2 risers that will support some upper level tracks. I'm hoping to get to both of those next weekend. Maybe sooner if time in the evening permits.

Sent from my SAMSUNG-SM-G930A using Tapatalk
 
A pain in the rasp....

My track plan has two main stretches where there will be two levels of track. I hadn't really thought that through back when I adhered the foam to the plywood section tops. As a result, I'm having to to back and cut strategically located holes through the foam and plywood so that I can put 2x2 risers through to support the upper level. My plan is to attach metal angle braces to the vertical risers and then affix the upper level subroadbed to the horizontal leg of the angle.

Today I cut through the first of what will probably be about a dozen holes. Took a lot longer than I had planned.

The holes will all be adjacent to section cross-members so that the verticals can be screwed to the cross-members.

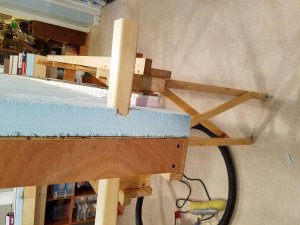
Here's the first one -- the 2x2 poking through is just to check the fit. I still have to calculate the proper length (height) so that I can cut the actual riser to the correct size before installing it. (The picture is actually sideways -- I have the section on its side to make it easier...)

20160423_164509.jpg

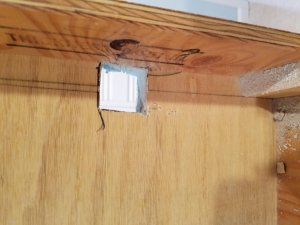
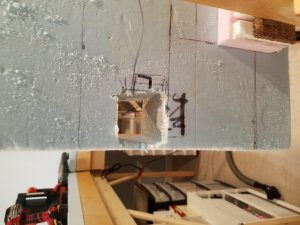
And here's the hole I cut to accommodate the riser, seen from both the underside and the top side.

20160423_164520.jpg

20160423_164527.jpg

Cutting the hole was definitely a chore. I first lined up where to cut by drilling holes through. Then, after some false starts with my saber saw -- which didn't really work for this because of the tight quarters -- I used a 1-inch wide spade bit to cut a circular hole, then with a combination of filing, chiseling, and some work with a hand saw (one that uses reciprocating saw blades) managed to carve out the rest of the hole.

I'm thinking for the next ones I'll get a 1.5-inch spade bit and start with that. I'll also see if I can find some other handsaw blades -- especially thinner ones.

If anyone has suggestions on how to make this job go faster, I'm all ears! Of course, I'm sure that with practice it will get faster, anyhow...
 
Are you just drilling one hole and working out from that? If so, drill a hole within each corner instead.
 
I actually did drill out the corners, but the hand saw blade is too wide to fit in the holes. That's when I decided to drill out the center with the spade bit. Then I just sort of hack away at the wood (and the foam) until I have a rough square, then smooth out the edges with the file. I am going to check out the hardware store for additional helpful hand tools, like a more slender blade. I also have seen miniature circular saw type blades for a Dremel moto tool, and might investigate those. But I think they wouldn't stand up to the plywood.
 
Thinking over the work process this morning, I may try cutting out the foam separately where I plan to put risers. I am also probably going to limit the number of risers and use stacked foam instead in some places.

Sent from my SAMSUNG-SM-G930A using Tapatalk
 
Hi Erik, a sawsall would probably work. They rent them at a lot of rentall places, or you can buy one for about $100.

It is a reciprocating saw with a longer blade that would go through everything. It would depend on your clearance, may work for 3 sides of the holes.


Hi Erik, a sawsall would probably work. They rent them at a lot of rentall places, or you can buy one for about $100.

It is a reciprocating saw with a longer blade that would go through everything. It would depend on your clearance, may work for 3 sides of the holes.

You could get one for $29.00 at Harbor freight that you'll be hard pressed to kill. Ive been literally beating the crap out of one for 6yrs now and it just wont die lol


Affiliate Disclosure: We may receive a commision from some of the links and ads shown on this website (Learn More Here)

Back
Top