
You are using an out of date browser. It may not display this or other websites correctly.
You should upgrade or use an alternative browser.
You should upgrade or use an alternative browser.
DSD's Layout Progress Thread
- Thread starter DairyStateDad
- Start date
ModelRailroadForums.com is a free Model Railroad Discussion Forum and photo gallery. We cover all scales and sizes of model railroads. Online since 2002, it's one of the oldest and largest model railroad forums on the web. Whether you're a master model railroader or just getting started, you'll find something of interest here.


Absolutely. I would have used plywood for the L-girder supports I'm building, but it was easier and cheaper to go with the dimensional pine at this juncture. I'm also finding L-girder designs are a bit more forgiving when it comes to the imperfections of dimensional lumber.
Just one more support system to build now... I will probably do that piecemeal during the week. I'll post a few more pictures tonight or tomorrow when I get a chance...

For this purpose, wouldn't have any freestanding independent base worked? Likewise making L-girder type bench work does not preclude it from having detachable legs and being portable.



Affiliate Disclosure: We may receive a commision from some of the links and ads shown on this website (Learn More Here)

DairyStateDad
Mumbling in the corner
Well, today was supposed to be the day I went to buy the lumber for the new support system I will be installing my layout sections on, but I pretty much burned the whole morning and early afternoon off in finishing the basement cleanup -- the drywall dust from the renovation managed to get everywhere in the unfinished part of the basement. That's all taken care of now -- a combination of shop vac, Swiffer and conventional broom with sweeping compound. I'm working my weekend job tonight and have a full day of other commitments tomorrow. Monday afternoon DairyStateMom and I head for Missouri to see DairyStateKid-M's graduation from Army MP AIT school at Ft. Leonard Wood. Family Day is Wednesday and Graduation is Thursday morning; then we'll head back. So I'm setting aside next Saturday to do the layout work.
When I built the first four sections of the layout, I attached the legs directly to the sections, which I know is a common way of doing things. When I built the 5th section, I tried a different approach, which I saw in an MR layout reprint book that came out in 2009 and was originally in Linn Westcott's benchwork book. The idea is a modified L-girder-and-leg assembly that the section or sections rest on. I really liked the way that turned out; for one thing, it's easy to lift the sections off the base so you can do things like deal with wiring on the underside. When I took the layout apart and stored the sections for the renovation, I decided I would scrap the old legs and build similar assemblies for the first 4 sections. So that's what I'll be doing. ... More in a week or so!
When I built the first four sections of the layout, I attached the legs directly to the sections, which I know is a common way of doing things. When I built the 5th section, I tried a different approach, which I saw in an MR layout reprint book that came out in 2009 and was originally in Linn Westcott's benchwork book. The idea is a modified L-girder-and-leg assembly that the section or sections rest on. I really liked the way that turned out; for one thing, it's easy to lift the sections off the base so you can do things like deal with wiring on the underside. When I took the layout apart and stored the sections for the renovation, I decided I would scrap the old legs and build similar assemblies for the first 4 sections. So that's what I'll be doing. ... More in a week or so!
DairyStateDad
Mumbling in the corner
One down, two to go
So, with the layout room all redone, I'm finally on my way with changing the supporting structure for the rest of the layout sections.
The new support structures are a variation on L-girder benchwork specifically designed for sectional layouts. It first appeared in Linn Westcott's benchwork book and subsequently in a track plan collection that MR came out with in 2009. For a while now I've been wishing I'd used that approach instead of the bolted-on legs, and when I had to take the layout down for the room remodel, that was my chance to make the switch.
So here's the first new support structure -- it will go under two 3-x-4 foot sections that are bolted together to make a single 3-x-8 foot unit.
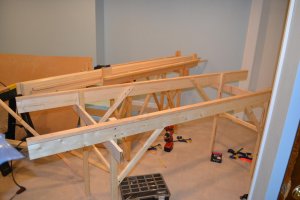
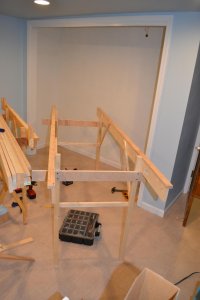
I will have to flip it over with my son's help in the morning to put in T-nuts and leveling feet, and then I'll move stuff around so I can actually put the layout section on it. After that I'll build the other two L-girder supporting units.
Not to brag or anything, but I think the joints on this one are all really square, and I'm pretty happy with how it turned out.
So, with the layout room all redone, I'm finally on my way with changing the supporting structure for the rest of the layout sections.
The new support structures are a variation on L-girder benchwork specifically designed for sectional layouts. It first appeared in Linn Westcott's benchwork book and subsequently in a track plan collection that MR came out with in 2009. For a while now I've been wishing I'd used that approach instead of the bolted-on legs, and when I had to take the layout down for the room remodel, that was my chance to make the switch.
So here's the first new support structure -- it will go under two 3-x-4 foot sections that are bolted together to make a single 3-x-8 foot unit.
I will have to flip it over with my son's help in the morning to put in T-nuts and leveling feet, and then I'll move stuff around so I can actually put the layout section on it. After that I'll build the other two L-girder supporting units.
Not to brag or anything, but I think the joints on this one are all really square, and I'm pretty happy with how it turned out.
Burlington Bob
Well-Known Member
Looks like a great start for a great project. Please post plenty of pics as you go because I'm thinking very seriously of doing at least a couple of modules that can be taken apart if needed. Sometime anyway.
DairyStateDad
Mumbling in the corner
I've mounted the section -- really, 2 sections that are bolted together as 1-- on the first L-girder framework and started building the L-girder unit for the second section. I will post more pix later.
Side note to Burlington Bob...
I think building layouts in sections makes so much sense for all kinds of reasons, and I really like this system of mounting them on these L-girder platforms.
That said, if I were starting from scratch, I would do several things differently. I would make the sections smaller and lighter, mainly. The framework for my sections is pretty deep -- 3-4 inches -- and the sections are 3x4 feet and 2x6.75 feet, respectively, with the 2 3x4 sections basically permanently bolted into a single 3x8-foot unit.
Starting over, I would make the framework only 2 to 3 inches deep and favor sections mostly 2x4 feet and no larger than 2.5x5 feet.
One thing I learned the hard way is that unless you have a truly perfectly level floor and you can really cut your leg pieces to perfectly precise length, don't bother with casters. I tried that originally, and it was a total bust. I don't know how the dominoes layout folks do it.
Side note to Burlington Bob...
I think building layouts in sections makes so much sense for all kinds of reasons, and I really like this system of mounting them on these L-girder platforms.
That said, if I were starting from scratch, I would do several things differently. I would make the sections smaller and lighter, mainly. The framework for my sections is pretty deep -- 3-4 inches -- and the sections are 3x4 feet and 2x6.75 feet, respectively, with the 2 3x4 sections basically permanently bolted into a single 3x8-foot unit.
Starting over, I would make the framework only 2 to 3 inches deep and favor sections mostly 2x4 feet and no larger than 2.5x5 feet.
One thing I learned the hard way is that unless you have a truly perfectly level floor and you can really cut your leg pieces to perfectly precise length, don't bother with casters. I tried that originally, and it was a total bust. I don't know how the dominoes layout folks do it.
Burlington Bob
Well-Known Member
Erik, I've been thinking of modules ranging from 1'x6' to 1-1/2'x4' with 1"x3" or 4"frames with a 1/4" plywood and foam base. One of the pluses of N scale. Should make them pretty light weight and manageable. If I cut the frame material out of plywood, it should make them pretty stable as well. Either way, I AM going to be like a steer and try! (Aforementioned reference has nothing to do with driving.) I will be very interested in how you do yours!
I will be very interested in how you do yours!
DairyStateDad
Mumbling in the corner
I am a strong proponent of framing the sections using ripped plywood in place of dimensional lumber. All of my sections were built that way. The sizes you're planning sound very practical and manageable.
Another thing I would probably do differently would be to top them with two layers of 1 inch foam instead of 1 layer of 2 inch foam. I got that idea from Model Railroader's Red Oak project layout. Because they used 2 layers, they were able to make the bottom layer of foam a little smaller than the top layer, creating a channel or raceway to run the bus wire in rather than putting it under the layout, which looked pretty neat to me.
ADDED:
Of course, a downside with that approach is that the bus wire then is hidden behind the fascia, which poses accessibility problems of its own. In any case, that's all academic in my situation as I've already built it with 1 layer and I'm stringing the wire on the underside the traditional way. But a benefit to switching to the L-girder support system i'm building is that it will be easier to remove a section, or turn it up on its side, so I can more easily deal with wiring and some other underside work.
Another thing I would probably do differently would be to top them with two layers of 1 inch foam instead of 1 layer of 2 inch foam. I got that idea from Model Railroader's Red Oak project layout. Because they used 2 layers, they were able to make the bottom layer of foam a little smaller than the top layer, creating a channel or raceway to run the bus wire in rather than putting it under the layout, which looked pretty neat to me.
ADDED:
Of course, a downside with that approach is that the bus wire then is hidden behind the fascia, which poses accessibility problems of its own. In any case, that's all academic in my situation as I've already built it with 1 layer and I'm stringing the wire on the underside the traditional way. But a benefit to switching to the L-girder support system i'm building is that it will be easier to remove a section, or turn it up on its side, so I can more easily deal with wiring and some other underside work.
Last edited by a moderator:
Burlington Bob
Well-Known Member
I've read where others have used two or more layers as well and it made different heights easier to do also.

DairyStateDad
Mumbling in the corner
Looking good Eric!
I'm with you on the plywood framing, it's the only way to go!
Absolutely. I would have used plywood for the L-girder supports I'm building, but it was easier and cheaper to go with the dimensional pine at this juncture. I'm also finding L-girder designs are a bit more forgiving when it comes to the imperfections of dimensional lumber.
Just one more support system to build now... I will probably do that piecemeal during the week. I'll post a few more pictures tonight or tomorrow when I get a chance...
DairyStateDad
Mumbling in the corner
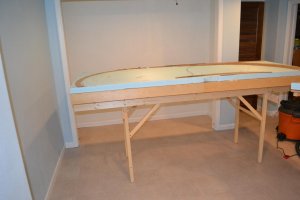
So here are some more pictures.
The first section lined up on top of the first L-girder support:
As seen from the end, the section is centered over the L-girder system:
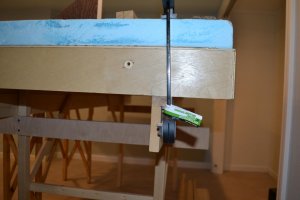
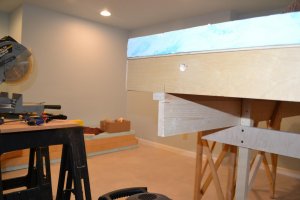 .
.
It turns out that the L-girders are just a tad longer than the sections. My bad for not measuring!
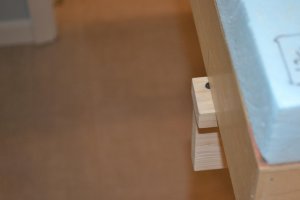
But I've decided not to try to trim those off at this juncture, and I've measured for the other two sections to make sure they'll match the length of their L-girders.
I expect someone might ask, 'Isn't that a fairly heavy-duty support for simple sections? Why not just attach legs to the sections or perhaps mount them on shelves on the walls?'
Reasonable questions. The trouble with attaching legs directly to the sections is that one big advantage of a sectional layout -- removing the units to work on them or tipping them up to make wiring easier -- suddenly disappeared. The L-girder assembly makes it possible to lift off a section and then put it back. As for attaching them to the wall, having just renovated the basement, I knew right away that I didn't want to do anything that would permanently damage -- however slightly -- the new walls. The new system remains completely freestanding.
The first section lined up on top of the first L-girder support:
As seen from the end, the section is centered over the L-girder system:
.It turns out that the L-girders are just a tad longer than the sections. My bad for not measuring!
But I've decided not to try to trim those off at this juncture, and I've measured for the other two sections to make sure they'll match the length of their L-girders.
I expect someone might ask, 'Isn't that a fairly heavy-duty support for simple sections? Why not just attach legs to the sections or perhaps mount them on shelves on the walls?'
Reasonable questions. The trouble with attaching legs directly to the sections is that one big advantage of a sectional layout -- removing the units to work on them or tipping them up to make wiring easier -- suddenly disappeared. The L-girder assembly makes it possible to lift off a section and then put it back. As for attaching them to the wall, having just renovated the basement, I knew right away that I didn't want to do anything that would permanently damage -- however slightly -- the new walls. The new system remains completely freestanding.
DairyStateDad
Mumbling in the corner
On the underside, cleats screwed into the sections keep them lined up properly with respect to the L-girders so they don't slide off and can be easily returned to their proper location. The original design for this system calls for the cleats to run the length of the section, but I just put a couple in, one on each side of the section, just bridging two section cross-members. I used glue and screws to install them.
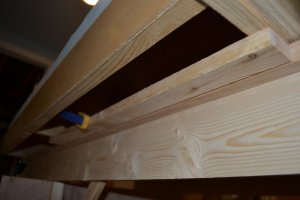
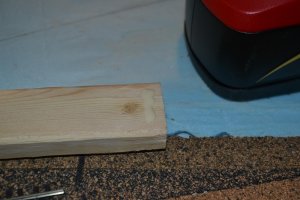
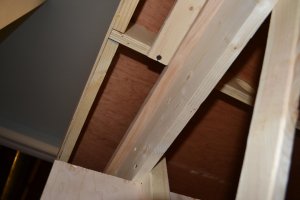
The cleats are simply 1 x 2 furring. They aren't attached to the L-girders in any way, just snug up against them.
I have enough that I could make them the full length of each of the other two sections, and I will think about that.
The cleats are simply 1 x 2 furring. They aren't attached to the L-girders in any way, just snug up against them.
I have enough that I could make them the full length of each of the other two sections, and I will think about that.
Iron Horseman
Well-Known Member
Well almost. I guess my question is the opposite. Why go to all the effort of making an L-girder framework and then put a plain old flat top box on it. One of the huge advantages of the L-girder is that it (normally) eliminates the plywood prairie effect.I expect someone might ask, 'Isn't that a fairly heavy-duty support for simple sections? Why not just attach legs to the sections or perhaps mount them on shelves on the walls?
For this purpose, wouldn't have any freestanding independent base worked? Likewise making L-girder type bench work does not preclude it from having detachable legs and being portable.
DairyStateDad
Mumbling in the corner
Reasonable questions IH. The short, comprehensive answer is probably "learning curve."
The longer, more detailed answer is that the original sections (and the original legs, which were bolted on so they were detachable) were built for a completely different track plan that I grew disenchanted with after building them but before laying any track.
Not wanting to waste the work done on the original sections, I came up with a completely different approach to the layout that made use of them. That required me to build a fifth section to complete the round-the-room circuit that the new plan required. It was when I built that section that I tried the L-girder system as a base, and I really liked the outcome -- specifically, being able to lift off the section if I needed to do something with it, access the underside, etc.
Detachable legs have a benefit, to be sure, but it's a bit more of a hassle to detach and reattach them than just to remove the sections from the L-girder support, at least the way this one is designed. (I actually have a jpg on my computer from one of the Kalmbach publications depicting this L-girder system, but I'm reluctant to post it out of concern for copyright violations. I have from time to time looked around the web to see if there are any other depictions of this design but haven't found them.)
I've mentioned above some of the things I'd have done differently with the sections themselves if I had known what I know now; one alternative I didn't mention is that I might have built simply the section boxes without a top and instead used cookie cutter roadbed. As it is, though, one of the reasons I decided to take this opportunity to make the sections easier to remove and replace than they had been with the original bolted-on legs is that there are places in some of the sections that I want to punch holes through the top and install risers attached to the section framing pieces [NOT the L-girder assemblies] for upper level track that goes over lower level track. Again, being able to simply flip up the sections on their sides will make that a lot easier. (For other elevated track that doesn't have to make room for track beneath it, I'm using Woodland Scenic risers as well as layers of the same foam that is the base layer for the rest of the layout's top surface.)
And my reasons for going with sections in the first place remains the same -- namely, that I wanted the capability of moving the layout to a new home without having to tear it entirely apart. Whether that ends up happening, or we simply wind up being carried out of here feet first, is a big unknown at this time ...
The longer, more detailed answer is that the original sections (and the original legs, which were bolted on so they were detachable) were built for a completely different track plan that I grew disenchanted with after building them but before laying any track.
Not wanting to waste the work done on the original sections, I came up with a completely different approach to the layout that made use of them. That required me to build a fifth section to complete the round-the-room circuit that the new plan required. It was when I built that section that I tried the L-girder system as a base, and I really liked the outcome -- specifically, being able to lift off the section if I needed to do something with it, access the underside, etc.
Detachable legs have a benefit, to be sure, but it's a bit more of a hassle to detach and reattach them than just to remove the sections from the L-girder support, at least the way this one is designed. (I actually have a jpg on my computer from one of the Kalmbach publications depicting this L-girder system, but I'm reluctant to post it out of concern for copyright violations. I have from time to time looked around the web to see if there are any other depictions of this design but haven't found them.)
I've mentioned above some of the things I'd have done differently with the sections themselves if I had known what I know now; one alternative I didn't mention is that I might have built simply the section boxes without a top and instead used cookie cutter roadbed. As it is, though, one of the reasons I decided to take this opportunity to make the sections easier to remove and replace than they had been with the original bolted-on legs is that there are places in some of the sections that I want to punch holes through the top and install risers attached to the section framing pieces [NOT the L-girder assemblies] for upper level track that goes over lower level track. Again, being able to simply flip up the sections on their sides will make that a lot easier. (For other elevated track that doesn't have to make room for track beneath it, I'm using Woodland Scenic risers as well as layers of the same foam that is the base layer for the rest of the layout's top surface.)
And my reasons for going with sections in the first place remains the same -- namely, that I wanted the capability of moving the layout to a new home without having to tear it entirely apart. Whether that ends up happening, or we simply wind up being carried out of here feet first, is a big unknown at this time ...
DairyStateDad
Mumbling in the corner
Was hoping to get the last support assembly built over the course of the week, but it was not to be. Will gear up to do it on Saturday.
DairyStateDad
Mumbling in the corner
SUBTHREAD: Backdrop Thoughts
As I've mentioned, having to dismantle the beginnings of my layout in order to rehab the basement room where it goes has had some advantages, one of which is that I'm getting the opportunity to put in a backdrop before pushing everything against the wall.
So in keeping with my motto (OTIMSP), I've been contemplating different approaches to the backdrop.
One pretty much non-negotiable is that I didn't want it permanently affixed to the newly installed and painted wall, so that I wasn't left with a lot of repair work if we someday move and sell the house.
Not entirely coincidentally, the wall coloring we picked is a passable sky blue from Sherwin Williams (called "balmy"). We chose it on its own merits, but it has the advantage that if I wanted to I could skip a backdrop entirely and just let the wall itself pass for a cloudless sky, although without the sort of natural variations in shade and color that would characterize a real sky.
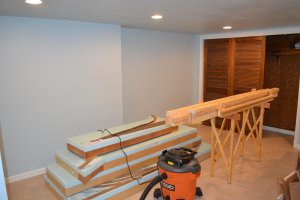 .
.
But I do want some clouds in there, and I MIGHT sketch in some distance hills and trees or other more specific images.
With that "druther" -- for a backdrop, not just a blue wall -- pretty much set in stone, and the "given" or not wanting the actually attach it to the wall, the next question has been how to affix it. I've been focused on portable solutions attached to the individual layout sections and had pretty much worked up detailed plans for a system of large sections of foamcore, framed behind by thick wooden molding trim or perhaps 1 x 2, and brackets on the rear portions of benchwork in which the portable backdrop segments would rest, held in place underneath by inexpensive hidden spring clamps. I think it's basically a workable idea, one I borrowed heavily from the Jerome and Southwestern MR project layout back in the 1980s with some additional tweaks of my own.
Then I got an idea out of left field last night. Chatting with another mrr while we were being hosted last night by fellow forum member Greg@mnrr -- whose layout, guys, is a nice, compact gem of a system -- my conversation partner mentioned plans for a backdrop hung up with Velcro poster tabs, like these:

[If the image blows out try this: http://www.staples.com/Command-Poster-Strips-White-12-Pack/product_563844]
I immediately saw why that should work very well -- I use them to hang up a series of RR posters that are now on the wall to the stairs down to my train room.
Chewing that over as I was waking up this morning, I got a variation of an idea: Find a kind of cloth with a smooth surface -- I've got a couple of ideas in mind -- cut it to the proper width if need be (36 inches wide should work), paint the backdrop on it, and hang it on the wall using those Velcro gizmos. Besides several running along the top,additional mounting tabs would be installed periodically along the bottom of the backdrop to anchor it. The important thing is that the glue on those strips (if you aren't already familiar with them) is 3M's "command adhesive" which holds strong but also removes easily and cleanly if you want to remove the item using it, leaving the wall unmarred.
I'm going to the fabric store w/ DSM tomorrow to scope out what kind of fabrics would be best suited for this idea. I know that underneath the fabric on both inside corners and outside corners, some kind of special support will be needed behind the fabric to create rounded outside corners and coved inside corners. I have sort of an idea how I might go about this, but there are still details I'll need to understand, first.
I would NOT expect to use traditional fabric (like muslin), but I might be persuaded otherwise. But I'm leaning more toward some kind of vinyl material or other non-woven material that would be sturdy, not display a texture, not be too pricey, and could take paint well. I'm assuming tempera or fabric paint to color it -- I think I'd want to start on a white background so that I can create the sort of lighter blue to white look at the horizon and darker blue toward the apogee, rather than just buying a blue fabric and painting on the clouds. To me making this work well will require a fabric that will be really smooth and not hang draped or wrinkled, but would be stretched pretty taut over the wall. And I think I might get lucky and be able to do it from a single long length of the stuff, although we'll see what the fabric store has.
If I find a suitable fabric, I might start with just a very short piece and see if the idea works mechanically as well as it is sounding in my head.
Any experiences you have that might be relevant to this idea? I'd love to hear them.
As I've mentioned, having to dismantle the beginnings of my layout in order to rehab the basement room where it goes has had some advantages, one of which is that I'm getting the opportunity to put in a backdrop before pushing everything against the wall.
So in keeping with my motto (OTIMSP
), I've been contemplating different approaches to the backdrop. One pretty much non-negotiable is that I didn't want it permanently affixed to the newly installed and painted wall, so that I wasn't left with a lot of repair work if we someday move and sell the house.
Not entirely coincidentally, the wall coloring we picked is a passable sky blue from Sherwin Williams (called "balmy"). We chose it on its own merits, but it has the advantage that if I wanted to I could skip a backdrop entirely and just let the wall itself pass for a cloudless sky, although without the sort of natural variations in shade and color that would characterize a real sky.
.But I do want some clouds in there, and I MIGHT sketch in some distance hills and trees or other more specific images.
With that "druther" -- for a backdrop, not just a blue wall -- pretty much set in stone, and the "given" or not wanting the actually attach it to the wall, the next question has been how to affix it. I've been focused on portable solutions attached to the individual layout sections and had pretty much worked up detailed plans for a system of large sections of foamcore, framed behind by thick wooden molding trim or perhaps 1 x 2, and brackets on the rear portions of benchwork in which the portable backdrop segments would rest, held in place underneath by inexpensive hidden spring clamps. I think it's basically a workable idea, one I borrowed heavily from the Jerome and Southwestern MR project layout back in the 1980s with some additional tweaks of my own.
Then I got an idea out of left field last night. Chatting with another mrr while we were being hosted last night by fellow forum member Greg@mnrr -- whose layout, guys, is a nice, compact gem of a system -- my conversation partner mentioned plans for a backdrop hung up with Velcro poster tabs, like these:
[If the image blows out try this: http://www.staples.com/Command-Poster-Strips-White-12-Pack/product_563844]
I immediately saw why that should work very well -- I use them to hang up a series of RR posters that are now on the wall to the stairs down to my train room.
Chewing that over as I was waking up this morning, I got a variation of an idea: Find a kind of cloth with a smooth surface -- I've got a couple of ideas in mind -- cut it to the proper width if need be (36 inches wide should work), paint the backdrop on it, and hang it on the wall using those Velcro gizmos. Besides several running along the top,additional mounting tabs would be installed periodically along the bottom of the backdrop to anchor it. The important thing is that the glue on those strips (if you aren't already familiar with them) is 3M's "command adhesive" which holds strong but also removes easily and cleanly if you want to remove the item using it, leaving the wall unmarred.
I'm going to the fabric store w/ DSM tomorrow to scope out what kind of fabrics would be best suited for this idea. I know that underneath the fabric on both inside corners and outside corners, some kind of special support will be needed behind the fabric to create rounded outside corners and coved inside corners. I have sort of an idea how I might go about this, but there are still details I'll need to understand, first.
I would NOT expect to use traditional fabric (like muslin), but I might be persuaded otherwise. But I'm leaning more toward some kind of vinyl material or other non-woven material that would be sturdy, not display a texture, not be too pricey, and could take paint well. I'm assuming tempera or fabric paint to color it -- I think I'd want to start on a white background so that I can create the sort of lighter blue to white look at the horizon and darker blue toward the apogee, rather than just buying a blue fabric and painting on the clouds. To me making this work well will require a fabric that will be really smooth and not hang draped or wrinkled, but would be stretched pretty taut over the wall. And I think I might get lucky and be able to do it from a single long length of the stuff, although we'll see what the fabric store has.
If I find a suitable fabric, I might start with just a very short piece and see if the idea works mechanically as well as it is sounding in my head.
Any experiences you have that might be relevant to this idea? I'd love to hear them.
Lynnb
Well-Known Member
Looking good Erik. There's one thing with drywall , no matter what you do to drywall you can repair it relatively easy, patch plaster prime and paint. My first room I raised my layout so the backdrop I painted is unseen and I will probably paint a backdrop somewhat where as the second room has panelling which stops me from painting at all unless I get some white sided hardboard as a backdrop canvas. Do what you want but I say go for the backdrop.
Greg@mnrr
Section Hand
Erik:
Just a thought to add to your backdrop ideas. Have you considered using a thin foam or gator board for the backdrop? It too could be attached to the drywall using the 3M adhesive products.
One of the types of Gator Board has a plastic coating so it resists warping, unlike foam core which can be affected by moisture. Either can be painted for the sky background and come as large as a 4 X 8 sheets.
Thanks.
Greg
Just a thought to add to your backdrop ideas. Have you considered using a thin foam or gator board for the backdrop? It too could be attached to the drywall using the 3M adhesive products.
One of the types of Gator Board has a plastic coating so it resists warping, unlike foam core which can be affected by moisture. Either can be painted for the sky background and come as large as a 4 X 8 sheets.
Thanks.
Greg
Iron Horseman
Well-Known Member
Well, on the modular layout I take to shows the back drops are affixed to the bench work not the walls (as obviously there are no walls in an exhibition hall). If you made their base color the exact color of the wall it might not be very noticeable where the back drop ends.Any experiences you have that might be relevant to this idea? I'd love to hear them.
Affiliate Disclosure: We may receive a commision from some of the links and ads shown on this website (Learn More Here)