Building the Pinnacle Creek Mining & Timber Co. RR

ModelRailroadForums.com is a free Model Railroad Discussion Forum and photo gallery. We cover all scales and sizes of model railroads. Online since 2002, it's one of the oldest and largest model railroad forums on the web. Whether you're a master model railroader or just getting started, you'll find something of interest here.


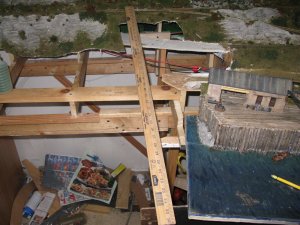
A Reach Too Far: I'm not usually one to quibble about a 36 inch reach into the layout. I'm 5'11" with a pretty good reach. But, we have a problem, one that must be addressed before I can continue with the left side of the layout.

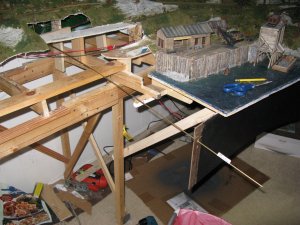
I usually get out the two-step stool and simply reach over the layout. This time I will not be able to brace myself on the layout because of scenery issues. I need to get to that turnout on the upper track. This photo shows that it is 36 inches to the new edge of the layout. Simply too far to reach. So I'm going to have to build one of those manual push/pull lever deals. I could electrify the turnout, but I'm not keen on the idea. Never done one of these before so it should be a bit interesting. Jim
IMG_4016.JPG
 
Last edited by a moderator:
waltr-could you go over alittle more in detail on what you actually used and how you control those turnouts, from the picture i dont fully understand how you hooked it up.

Ive seen it done using piano wire and using a tiny tube, even this method i didnt understand how piano wire pushes the turnout, i understand how it pulls it:confused:

Sorry if im stupid here, and sorry jim for eating up your thread with a dumb question...

I actually need to make a bunch of these since i have alot of different turnouts behind other tracks that i would end up knocking cars off the tracks reaching over to flip the ground throw, since all i use is ground throws (the budget way)
 
Last edited by a moderator:


Thanks Waltr, I went through your whole thread. It's a good one. Your turnout switch idea is one I looked at and figured it was too tough for my pea brain. As always I try to do the improbable with easy to procure items for the minimum of cost. I think my switch machine will be less than a gallon of gas.

I'm going to go with Joe's tube idea. I saw how to do it years ago but never did it. As usual I will do it my way and if it works then maybe I've discovered something new? I don't have piano wire in my plan so you guys will have to wait a day and see what happens. Thanks, Joe, no worries. Jim:)
 
Thanks Waltr, I went through your whole thread. It's a good one. Your turnout switch idea is one I looked at and figured it was too tough for my pea brain. As always I try to do the improbable with easy to procure items for the minimum of cost. I think my switch machine will be less than a gallon of gas.

I'm going to go with Joe's tube idea. I saw how to do it years ago but never did it. As usual I will do it my way and if it works then maybe I've discovered something new? I don't have piano wire in my plan so you guys will have to wait a day and see what happens. Thanks, Joe, no worries. Jim:)

I've seen this done with the auto Choke cables (single not stranded wire) you can sometimes find at parts stores. Then you have a fascia mounted knob you just push in and out.
 
Jim, Hope you don't mind if I explain a little on how my turn-out controls work.

They are basically a stiff wire inside of a flexible tube. Just like the throttle control on a lawn mower or choke cable on older cars (yea, I remember those). Any of these will work for a turn-out control as will bicycle brake and sifter cables.
The 'trick' is have the tube ends mounted firmly. Then the wire can be pushed or pulled at one end and respond the same on the other.

The ones I used were purchased from The Humpyard (see the link in my thread). And if anyone would like better pictures and explanation please ask in my thread.
 
Jim
Go to the Hobby shop and get nylon push rod for model airplanes. Inner and outer nylon tube. They work very well even when in a curved path.

Steve
 
I would go with the push rods as well. The tube is usually teflon which stops it from binding. There is a braided type which is much more flexible and slides very easily. It also comes with threaded ends which comes in handy or you can get clevises, balls and all types of ends for them. It will make a foolproof switch machine for about $5-$10.
 
Hey guys, thanks a million! You are making this thread what I wanted it to be. A free exchange of How to's. I'm familiar with all your ways of making a switch machine. But it is a valuable tool here now for anyone who stumbles on your ideas. Way to go!

Naturally, this leads to the inevitable, "I do it differently," from me. None of our ways are wrong. They are all correct given we all have different abilities, resources, and needs. And, for you newcomers, please remember that my way is not the way to do any of this stuff. It is simply my way. While I think my way has many merits, namely inexpensive alternatives to modeling techniques from the 1930's, please feel free to use them all, some, or none. No worries.

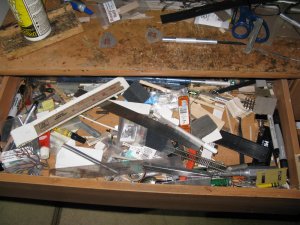
So that leaves us back to the three foot stretch. When any new project rears its head I always start first with my top drawer of my work desk.
Usually, what I need has found a hidy hole in the top drawer. This project is no exception. I did go to my LHS yesterday and purchase a long brass tube, for $3.

When I studied my swith machine I had a few things in mind. First, it had to work flawlesly. Second, Five dollars was the most I would spend. Third, it had to come from supplies gathered through the years. (see top drawer)
Naturally money spent 5 years ago does not get added into my five dollar limit. Money spent is the $3 yesterday at the LHS.

Later, Jim:)IMG_3993.JPG
 
Last edited by a moderator:


I don't really write down anything, I keep it in my head and if luck will let it be it usually works out. This switch machine is no different. Given my limitations on money I really had to put on thinking cap.

The reason all our different switch machines will work is that they, for the most part, work on a certain type of turnout/switch. If you all remember I had to use Peco #4, insulfrog, 100's. A standard #6 from any manufacturer would not have worked in my small space available. If you don't know, and lucky for my purposes, this Peco turnout has a positive "snap" action when you work the lever. What I mean is there doesn't need to have a 'pressure' on the turnout holding the turnout tracks together. This Peco model does that for me.

So, it seemed to me that all I needed was a way to simply move the lever back and forth. I think you can see that needing zero pressure would allow me to build a right angle device that only had to move in and out/back and forth.

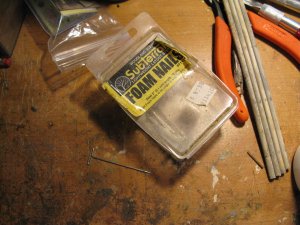
I drilled a hole in the lever arm. I used a large drill bit and carved out an area beneath said lever arm. Now I had to find a piece of metal small and strong enough, no bending, to move the lever arm. In the top drawer I found some brass rods. Too weak, too short. My eye fell upon one of my best model railroading purchases, the Woodland Scenic Foam Pins. They were long enough and strong enough.
IMG_4018.JPG

I cut the 't' top off to just leave a small right angle arm. This pin fit through the lever arm and below the plywood track bed. First, problem solved.

Years ago when working in Z and N scales I had purchase brass tubing from my LHS for culverts and such. Number 127 would fit perfectly over the foam pin. On top of the #127 would be the next size up #128. Perfect! So here is tube in a tube. Jim:)

IMG_4009.JPG
 
Last edited by a moderator:
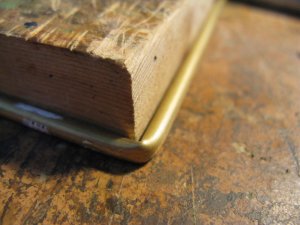
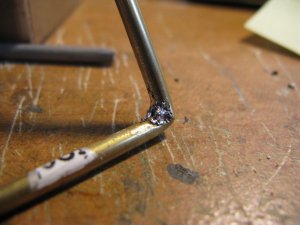
With tube in tube I had to bend both tubes into a right angle. No problem.

IMG_4010.JPG

With the 'right angle' came a slight rip in the outer brass tube #128. I burnished the brass and added some solder to strengthen the bend.

IMG_4011.JPG

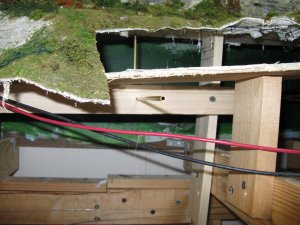
Looking beneath the trackbed we can see how this all fits together to this point. Jim :)

IMG_4012.JPG
 
Last edited by a moderator:
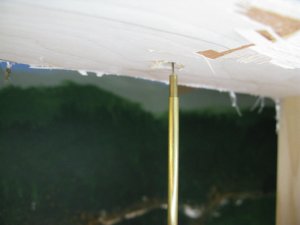
Here we have basically the last step. Drill a hole for the #128 tube in a tube. By lifting the WS Foam Pin final assembling is quite easy.


So here we are finished. I've shortened the reach to a manageable distance and with some camoflage I can make a handle for the tube.

IMG_4014.JPG

Finally, remember the long brass tube of #127 I bought yesterday? Just so happens that I have enough extension to reach the fasia and have a bit left over for the top drawer. Either way I finish this off, I know it works, twenty five flawless activations. I know it cost only pennies. So I've met my goals an have built the switch machine that fits my needs. Good luck on choosing any of these examples of switch machines. Thanks again guys. Now I can start on the scenery again. Cheers, Jim:)

IMG_4019.JPG
 
Last edited by a moderator:
I hope you don't mind me putting in this link here Jim, but seeing there's been this discussion about turnout control, for those that might be interested in a manual, fully interlocking system (turnouts, semaphores, signal lights), this Australian maker does this http://modratec.com/ . I have seen this in action on his stand at our train show.
 
In this day of electronic gizzmo's I find it good that the mechanical operation of devices is still understood and used. Pushrods, bellcranks and overcenter locks still are simple and cheap to make and use. I'm afraid sometimes that this simple technology is lost or not thought of in our rush to use all the new electronic devises.

Steve
 
I totally understand if you have enough money and do not care how much you spend on your layout then yes, go out and buy switch machines.

For me, im like jim, I want to be a budget modeler, I like to watch what i spend my money on, so I can save my money for the more expensive items like dcc locos for example. If theres a way to make something cheap, with whats available around the house, or just spending alittle bit of money needed to get the job finished and its just as reliable then why not right!!
 
Toot, No worries. Good link that can be of value to most of us.

Thanks, Steve and Joe. Why spend $20 when you can build the same operating quality for $5? Jim :)
 
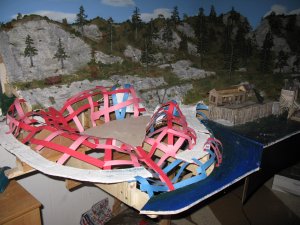
Next step. Tangled webs we weave. This all the netting I could salvage from the tear down. I love this stuff, but Lowe's is out of it right now and I will do the rest of the layout, not much, using the file folder paper stock criss-cross webbing method. So take a peek and see if you can figure this photo out. Jim:)

IMG_4084.JPG
 
Last edited by a moderator:


FUN CONTEST TOMORROW (Sun.) BEGINS AT 0900 PDT. First person with the answer wins. No I can't tell you what the prize is. Jim:D

PS The contest has nothing to do with the photo posted above. Jim
 
Last edited by a moderator:


Affiliate Disclosure: We may receive a commision from some of the links and ads shown on this website (Learn More Here)

Back
Top