
You are using an out of date browser. It may not display this or other websites correctly.
You should upgrade or use an alternative browser.
You should upgrade or use an alternative browser.
Building the Pinnacle Creek Mining & Timber Co. RR
- Thread starter HOexplorer
- Start date
ModelRailroadForums.com is a free Model Railroad Discussion Forum and photo gallery. We cover all scales and sizes of model railroads. Online since 2002, it's one of the oldest and largest model railroad forums on the web. Whether you're a master model railroader or just getting started, you'll find something of interest here.


Jim , I love watching the progress no matter what !!!!
Mike



Affiliate Disclosure: We may receive a commision from some of the links and ads shown on this website (Learn More Here)
HOexplorer
Well-Known Member
Waltp, More of challenge to do without. Some new modelers are using this thread and many don't have the where-with-all use anything but plywood sheets. So I'm giving this last layout a chance to use this old technique and see what comes of it. If this layout comes out looking like crap then the rush out to buy foam will be on. I recommend foam of course, but on we go. Jim
Fifer
Member
Waltp, More of challenge to do without. Some new modelers are using this thread and many don't have the where-with-all use anything but plywood sheets. So I'm giving this last layout a chance to use this old technique and see what comes of it. If this layout comes out looking like crap then the rush out to buy foam will be on. I recommend foam of course, but on we go. Jim
Jim , I love watching the progress no matter what !!!!
Mike
HOexplorer
Well-Known Member
Good on ya Mike thanks.
This photo shows my mixing in addition yellow to my normal WS Earth Blend ground cover. Don't be afraid to mix colors if you don't feel good about what comes out of the bottle.
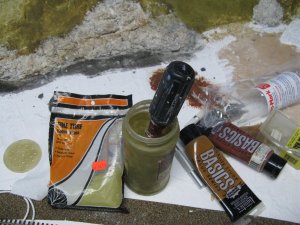
The basic ground cover in the front right in this photo is almost like the Alaska ground cover in the previous layout. I left out some 'greens' I didn't think would be needed in this layout's local.
On the left front you can see some the initial ground cover I just applied. As you may see the ground cover has been made a bit lighter on the left and off in the distance. Jim
This photo shows my mixing in addition yellow to my normal WS Earth Blend ground cover. Don't be afraid to mix colors if you don't feel good about what comes out of the bottle.
The basic ground cover in the front right in this photo is almost like the Alaska ground cover in the previous layout. I left out some 'greens' I didn't think would be needed in this layout's local.
On the left front you can see some the initial ground cover I just applied. As you may see the ground cover has been made a bit lighter on the left and off in the distance. Jim
Last edited by a moderator:
Sirfoldalot
Days Gone Bye!
OK, I'm a little confused ...
Is this sprinkled, painted on ...
What holds it in place?
What's the mixture consist of in the jar?
Thanks
Is this sprinkled, painted on ...
What holds it in place?
What's the mixture consist of in the jar?
Thanks
HOexplorer
Well-Known Member
Hi Sherrel, This is what's called 'grass' or turf. Woodland Scenics makes this stuff in all shades. I've added the yellow turf to the darker Earth Blend. The stuff being mixed with the screwdriver is then shaken on liquid cement that is sprayed on. Spray and shake! Jim
Sirfoldalot
Days Gone Bye!
GOT IT!
I thought you were mixing liquids in the container .. Maybe wasn't paying close enough attention.
Starting to assemble a package for you.
Can you use additional plastic "shaker" jars?
Can you use very fine, almost powder, sawdust? (Have three grades)
I thought you were mixing liquids in the container .. Maybe wasn't paying close enough attention.
Starting to assemble a package for you.
Can you use additional plastic "shaker" jars?
Can you use very fine, almost powder, sawdust? (Have three grades)
HOexplorer
Well-Known Member
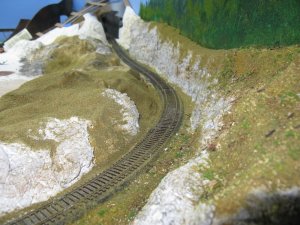
Some folks like the ballast process, some do not. Me, I enjoy ballasting. Here is my choice for this layout. It is called Cumbres & Toltec Decomposed Granite from Arizona Rock & Mineral Co. It is HO scale no. 109-2. $6.50 at my LHS.
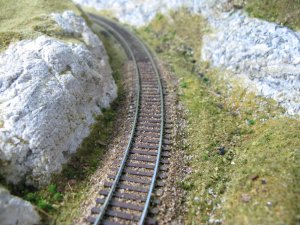
As usual I've put down the ballast on a short strip of track to see if I 'really' like it. The main focus of the layout on the other side is desert SW so this ballast will fit in nicely there. Sometimes on big layouts with different geologic themes the ballast may be different colors in different geologic areas. My layout is small enough that this ballast running up through gray rock will be okay as the run through gray is only about 8 feet. Actually the contrast when seen on the rest of the layout may look quite good.
In the photo you see a finished ballast job. Remember the year is now 1941 and the days of perfect ballast jobs wasn't really in vogue. Ballast spreaders where not quite the machines they are today. So in this layout we want to keep everything pre-WWII that we can.
I use the tried and true Joy dish soap and spray glue to hold this all together. I use a simple tea spoon for applying the ballast and a soft brush to get it level between the ties. Don't have a soft brush? Try tapping the rails with that tea spoon after you've smoothed the ballast out with your finger. The tapping drives your wife nuts, but gets the ballast to settle in preparation for gluing. I use an eyedropper for my glue. I just add Joy to the glue. Some methods say to spray the Joy/water solution on the ballast and then the glue. I've found that that is an unnecessary step. Just another shortcut for you to get your layouts finished in a timely manner. Jim
As usual I've put down the ballast on a short strip of track to see if I 'really' like it. The main focus of the layout on the other side is desert SW so this ballast will fit in nicely there. Sometimes on big layouts with different geologic themes the ballast may be different colors in different geologic areas. My layout is small enough that this ballast running up through gray rock will be okay as the run through gray is only about 8 feet. Actually the contrast when seen on the rest of the layout may look quite good.
In the photo you see a finished ballast job. Remember the year is now 1941 and the days of perfect ballast jobs wasn't really in vogue. Ballast spreaders where not quite the machines they are today. So in this layout we want to keep everything pre-WWII that we can.
I use the tried and true Joy dish soap and spray glue to hold this all together. I use a simple tea spoon for applying the ballast and a soft brush to get it level between the ties. Don't have a soft brush? Try tapping the rails with that tea spoon after you've smoothed the ballast out with your finger. The tapping drives your wife nuts, but gets the ballast to settle in preparation for gluing. I use an eyedropper for my glue. I just add Joy to the glue. Some methods say to spray the Joy/water solution on the ballast and then the glue. I've found that that is an unnecessary step. Just another shortcut for you to get your layouts finished in a timely manner. Jim
Last edited by a moderator:
Silverton
Member
Jim, I know this is a very small sample of the layout, but I must say I like the Scultamold rock formations better than the last layout. To me, it has a more realistic look. As for the ballast, I do like the granite color contract to the surrounding ground cover. As always, good job. - Chris
HOexplorer
Well-Known Member
Chris, I like this stuff. My personal jury is still out as far as what I prefer. The stucco patch is so easy to do and that makes up some folks minds right there. Sculptamold is easier to color.
Portals: I needed some timber portals that would allow HO and On30 without looking to out of whack for HO. I settled on S scale as a compromise and came up with this:
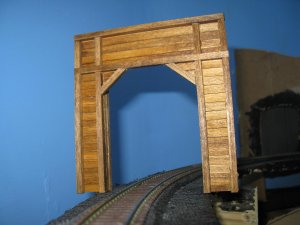
Total build time is about 1 hour. This includes measuring, cutting, staining, and stain and glue (AC) drying times. And, yes, all rolling stock goes right through! Jim
Portals: I needed some timber portals that would allow HO and On30 without looking to out of whack for HO. I settled on S scale as a compromise and came up with this:
Total build time is about 1 hour. This includes measuring, cutting, staining, and stain and glue (AC) drying times. And, yes, all rolling stock goes right through! Jim
Last edited by a moderator:
HOexplorer
Well-Known Member
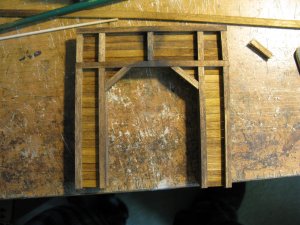
Chris, Thank you. Here is some photos. First is the finished product with grime Stoker. I also added an insert in the middle of the top piece. Nope all scratch not plans.
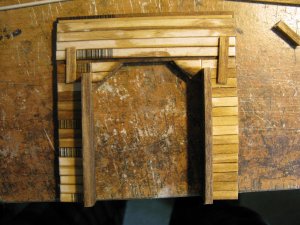
In this second photo is the backside. The portal was built in two pieces. I glued two little strips of wood on as braces.
Jim
In this second photo is the backside. The portal was built in two pieces. I glued two little strips of wood on as braces.
Jim
Last edited by a moderator:
HOexplorer
Well-Known Member
Stoker brought up a good point: grime. Let's take a closer look.
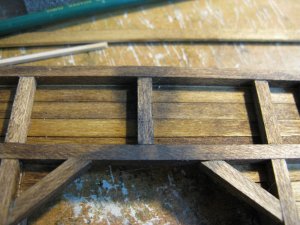
In this photo you see grime/smoke/steam/whatever from steam and my one diesel on the top of the opening. Simple enough? Maybe, maybe not. To create this grime was easy. I first put on a dark stain of 'weathered' wood color. While it was drying I apply Bragdon's black weathering powder. More in the center and less on the sides of the grime affected area. To do this in the middle darker section I applied the black powder with my finger. Then to feather that out toward the edges I use a fairly stiff small paint brush.
Something to remember when you do this. Notice that on this portal the wood is fairly new or recently installed. Your weathering must reflect the age of the wood. Look near the top of the portal and notice the weathering seems to be in a V shape around the center vertical post. This is actually how the grime gets there in real life. The bottom cross bar prohibits the grime from hitting the bottom of the upper panel. So basically I left the bottom two horizontal boards untouched. And of course all grime is applied 'lighter' towards the top of the portal. All applications of black were with a brush up there.
Interestingly there is optical illusion present because of the dark shadow by the middle vertical wood piece. However, the two sides are weathered the same. On this mini-subject of lopsidedness if you do get one side of a structure weathered out of whack don't worry. You can always say that the grime is lopsided because you accounted for prevailing winds! DON'T laugh! I've used that line many times! Jim
In this photo you see grime/smoke/steam/whatever from steam and my one diesel on the top of the opening. Simple enough? Maybe, maybe not. To create this grime was easy. I first put on a dark stain of 'weathered' wood color. While it was drying I apply Bragdon's black weathering powder. More in the center and less on the sides of the grime affected area. To do this in the middle darker section I applied the black powder with my finger. Then to feather that out toward the edges I use a fairly stiff small paint brush.
Something to remember when you do this. Notice that on this portal the wood is fairly new or recently installed. Your weathering must reflect the age of the wood. Look near the top of the portal and notice the weathering seems to be in a V shape around the center vertical post. This is actually how the grime gets there in real life. The bottom cross bar prohibits the grime from hitting the bottom of the upper panel. So basically I left the bottom two horizontal boards untouched. And of course all grime is applied 'lighter' towards the top of the portal. All applications of black were with a brush up there.
Interestingly there is optical illusion present because of the dark shadow by the middle vertical wood piece. However, the two sides are weathered the same. On this mini-subject of lopsidedness if you do get one side of a structure weathered out of whack don't worry. You can always say that the grime is lopsided because you accounted for prevailing winds! DON'T laugh! I've used that line many times! Jim
Last edited by a moderator:
Hmmmm? I wonder if I can blame prevailing wind on an optical illusion.
HOexplorer
Well-Known Member
toot, Seems to me we are experiencing an optical delusion here!
I just took this photo to see if all this would look okay when built and in place. It never hurts to check clearances 'before' gluing everything down. Jim
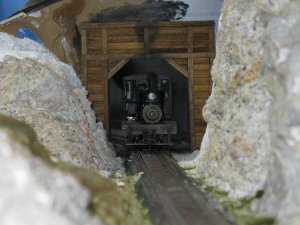
I just took this photo to see if all this would look okay when built and in place. It never hurts to check clearances 'before' gluing everything down. Jim
Last edited by a moderator:
Sirfoldalot
Days Gone Bye!
Jim ... HO or On30?
DairyStateDad
Mumbling in the corner
Jim, I probably missed it, but did you specify where you got the wood for the portal? I was reading this morning about an On3 building made from coffee stirring sticks, and I was wondering if that's what you used here. Regardless, this, as everything I've seen you do, is really fine work.
From the DairyStatePhone
From the DairyStatePhone
HOexplorer
Well-Known Member
Sherrel the loco in the portal is the standard Bmann On30 Shay. I was using it to check clearances. Of course the HO stuff will go through.
Erik, I have used and still have sticks I got from Michael's. They aren't the little ones you see at the donut/coffee shops. The sticks I used on the portal were basswood 1/16"x1/4" and come in about 2' lengths from my LHS. The sticks from Michael's are the same measure I believe. I sort of have to build this layout in S Scale because it is between O and HO thus allowing me to run both scales on the same layout. Jim
Erik, I have used and still have sticks I got from Michael's. They aren't the little ones you see at the donut/coffee shops. The sticks I used on the portal were basswood 1/16"x1/4" and come in about 2' lengths from my LHS. The sticks from Michael's are the same measure I believe. I sort of have to build this layout in S Scale because it is between O and HO thus allowing me to run both scales on the same layout. Jim
HOexplorer
Well-Known Member
Thanks Chris, I used the Woodland Scenics plaster cast portal that was on the last layout as a guide. I simply cut the sticks and glued 'em together. I like to stain first because glue overflow will make the stain not work. Regardless of your scale this is not that hard of a build. It is fun too. Jim
Affiliate Disclosure: We may receive a commision from some of the links and ads shown on this website (Learn More Here)