Weathering...


Rotorranch

MRR Refugee
I am trying to get my head around weathering.

All my life, I have been around cars and racing. I've always tried to make stuff pretty and shiny. Dirty, nasty and rusty weren't an option!

Lately, I've decided my trains were too pretty. So I've been trying my hand at some light weathering. I've seen some of the stuff some of you guys and gals do, and it looks so much more real.

I've been trying some things on some scenic parts, structures and cheapie rolling stock I have, but I'm still not real happy with the results yet.

I really don't want to screw up any of my nice and/or expensive stuff while learning! :eek:

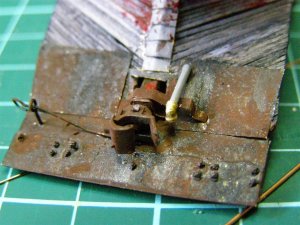
I'll be posting some pics of some of the stuff I've done so far. I'm hoping to garner some construcive criticism and suggestions on how to improve my techniques.

First off is some Woodlands Scenic "Junk".

MVC-795F.jpg


MVC-794F.jpg


MVC-789F.jpg


MVC-793F.jpg


Rotor
 
Last edited by a moderator:
Hey Rotor It is looking good so far. I would rust up the metal some more and then give everything a black wash. When I do rusted metal I use chalks mixed with hairspray painted over a gunmetal colored base . If I want the rust to look flakey I add a bit of dry chalk to the wet. Everything is usually covered after with a black wash to bring out the details. Here is what it looks like when finished.
 

Attachments

  • Ron's pics1 306 (Large).jpg
    Ron's pics1 306 (Large).jpg
    135.4 KB · Views: 245
Rotor, the first thing that jumped out at me in the photos is that the results are too shiny. Rusted things are dull and flat. A coat of some sort of dull coating is needed. Flat lacquer or maybe just chalks.
 
Also, things are rarely just two or three colors (like the brown and yellow... scrap pile?). A little extra variegation does a world of good. Black wash would help. But even as-is, with a little plant matter or something nearby, most of what you've posted would blend right in. :)

The best way to weather is probably to look at prototype photos (or real life) and try to replicate what you see. How would this part have weathered? What forces are acting on it to make it decay? How would it fail? Freshly rusted steel is bright, but older rust darkens. Hand grabs may be cleaner where the brakeman holds onto them. It's just an extra layer of attention to detail to get absorbed in.
 
I find that my best results come from avoiding the stock colors right out of the bottle or tube. They are almost never the same as what I'm trying to duplicate. Experiment. Mix some umbers with siennas to varying degrees.

What you've got there is difficult to weather convincingly anyway. Never is every item in a scrap pile evenly rusted and weathered. Rarely is an item straight up Sienna, with no original base tone underneath. Use different colors for dabbing rust over different bases. Search "rust" on Flickr and find something that replicates the look you want, and study the colors.

Trial and error, and error, and error...but you will find the combo with some persistence. Don't give up! You will get there.
 
Everything posted above is great advice. I'd say look up photos of scrap piles or visit a local junk yard if possible. I airbrush my cars and buildings a dirt color as a base then chalk them with browns and usually a black. More color and variation is always a plus


---
- Sent from my phone
 
Also, don't just limit yourself to just one media, like just paints or dry colors. Use anything that will give you the effect you want. I've used real dirt, soot, real ash, etc to get the effects that some of my customers wanted. Remember too that weathering is very subjective, what I would consider over weathered, someone else would consider under-weathered. Consider also that weathering isn't always equal from one side to the other. This can be due to the territory the unit is run in, weather itself, as in a driving wind blowing dirt and dust onto just one side, etc. Here is an example;

I one time painted a SRR GP-38, from pictures I took of the locomotive as it worked the yard in Selma, Al. What's so unusual about that? One side of the loco was squeaky clean and shiny, and the other side was dirty as sin! It had been sitting by the car repair shop there halfway under an awning when a real hard, prolonged rain had occurred, and the shiny side looked as if the loco had gone thru a washer. The dirty side had been protected by the awning, and had not had any of the accumulated road dirt washed away!
 
Last edited by a moderator:
All points are noted and appreciated.

RW&C... the Timberline Scenery Co Weath-Rite weathering agent that I used did dry to more of a yellow color than I liked, particularly on the pallet of fish plates. A black wash would definitely help that.

Deanej, I did hit it with Dull-cote... maybe I need another coat. I think perhaps the sulight makes it look a little shinier in the pics than it appears in person.

Rotor
 
Last edited by a moderator:
Next up is a couple of hoppers I've been playing with weathering. I'm happy with some of it, but not all of it turned out like I hoped.

MVC-010F.jpg


MVC-004F.jpg


MVC-005F.jpg


MVC-006F.jpg


MVC-013F.jpg


I really need to get some better lighting in the train room for taking pics. :eek:

As before, all tips welcome.

Rotor
 
Last edited by a moderator:
Better yet, take a piece of flex track, and take it outside. Weathering photos always look best in natural sunlight!

And you did a great job on the weathering!
 
Looking good.. The flash is indeed a bit harsh - try lighting the scene with a modelling lamp instead! ;)

I agree completely...The flash is too harsh...I tried to diffuse it with a piece or white paper, but then it was too dark. I need to set some lights up in the train room for taking pics. I tried some halogen work floods, but couldn't ever get that right.

I'm sorta new at photographing models too, as well as weathering them! :rolleyes: But I'll keep trying! ;)

Rotor
 
Better yet, take a piece of flex track, and take it outside. Weathering photos always look best in natural sunlight!

And you did a great job on the weathering!

I usually do take pics outside, using some EZ Track, but it was gray and rainy today, so I tried on the unfinished (but running) layout. I'm not happy with the results of the pics, and will re-shoot some pics in better light. I'm thinking about building a photo set module on a piece of 1x4 or 1x6, with a backdrop, and try some sceniking ideas as well.

I know there is improvement to be accomplished with the weathering, and that's one of the reasons I'm posting these. Also why I'm practicing on Bachmann and Life-Like train set cars! LOL

I figure you guys can and will see stuff I don't.

Thanks for the suggestions and critique!

Rotor
 
When I'm taking pics in low light, I just turn the flash off. If the camera's properly supported (not even a tripod, just something solid to sit on) it won't blur. Some cameras straight-up don't do low light, they get all grainy and the colors wash out, but my old Olympus does okay. :)

A cheap hardware-store stamped metal flood light will also do whole bunches of good.

The blurry pics are all my fault. I was trying to hold the cam in one hand, and a Maglight in the the other... that just don't work! LOL

The lighting is just too low in the train room to shoot pics without auxillary light. A single bulb overhead fixture is all that's ini there right now.

My buddy borrowed my clamp on reflector light a few months ago, and hasn't returned it yet, and I didn't want to fool with trying to drag the floor lamps from the living room. Guess I was just being lazy. :eek:

Anyway, I'm going to work on some better lighting, and hopefully the pics will be better next time!

I'm using an ancient Sony Mavica that takes floppy discs! :rolleyes:

It takes great pics, but I just simply didn't have everything right for these.
Rotor
 
Last edited by a moderator:
Admittedly I do take photographs under studio lighting because I'm a photographer, however that said, I don't have a lot of space so I set up this very small studio for taking model railroad photographs.. My display case page..
 
Thank you..

I used the display case because it's easy to store without getting ruined and/or dusty, it just sits on top of my modelling bureau with my favorite piece of rolling stock in it most of the time, but obviously the top perspex piece is removed for when I do photographs..

The only thing I will say if your going to go down this route, is make sure you print the photo's on semi-gloss or matt photo paper so you don't get a reflection from the paper, then just simply mount them on a board with double sided tape..
 
hey rotor. i have the same challenge with lighting and photos. i dont have a great camera so im putting a digital SLR on my Christmas list again this year. while going outside can easily solve the lighting problem, getting close in on details is impossible with a point & shoot.

as for the models/weathering. i totally dig what you've done so far. Im by no means an expert, but these are some things i have learned from experienced: weather the trucks and wheels seperately. i could be wrong but the trucks and wheels look very close in color - although that may just be the photo. maybe use some thinner to fade out the logos. an airbrush is an awesome tool for fading out logos and dulling down the factory finish. Washes are also a good way to do this. usually applied in stages and sometimes more than once. i have been trying to step my weathering skills up for a couple of years now. A LOT of it is trial and error - like you, i have a healthy stack of tyco and lifelike models to sacrifice. I always start with a prototype. i have found just about everything i have ever needed on this site: http://www.rrpicturearchives.net/
from rolling stock to power. i also do a fair amount of railfanning at the howell wye, so i get a lot of great proto photos on my own.

here is a thrall high side gondola project i worked on about a year ago. i was not 100% satisfied but it just means i need more practice.

1.jpg

College Park JCT fall 2010.

2.jpg

ebay score!!!

6.jpg

final. i held off on the graffiti and the reflectors...maybe next time.
 
Last edited by a moderator:


Back
Top