Weathering Rolling Stock, a Continous thread

ModelRailroadForums.com is a free Model Railroad Discussion Forum and photo gallery. We cover all scales and sizes of model railroads. Online since 2002, it's one of the oldest and largest model railroad forums on the web. Whether you're a master model railroader or just getting started, you'll find something of interest here.


Final post for today. This is a car I will sadly finish and return to James after I get it right. I love this car. Totally out of my era but this is a beautiful model. Another Intermountain car with a build date of 1954 or 61. Hard to read in the picture and the memory has forgotten the date. Did I say I love this car?

This is a very very early work in process car. Generally these pictures are way to soon except for me. I have the base fade and the 1st primary color right. The streaks, need work, lots of work and my wife looked at it on the bench and said finish it when we get home in a couple weeks. Where the heavier colored panels will be rusted panels when done.That was almost 3 weeks ago. Thankfully James was aware I am slow and he is in no rush.

I show this here now to illustrate that weathering is a process and a process of layers. Each layer can and will change the overall appearance.Hopefully you will be amazed looking at the finished car and looking back on this car.
View attachment 152815View attachment 152816View attachment 152817View attachment 152818View attachment 152819View attachment 152820View attachment 152821
Here is the last picture of the day. I posted this in the MRH forums in pictures for this week.

View attachment 152822


Yup the Cotton Belt car looks great! I love this old era car with all the grab irons etc. Not a bad car for the $ with all the details. Intermountain hit this one out of the park and as well as you did with the start of the weathering!

The last picture of the 2 hoppers look great as well! I think you achieved the look needed. Although I do agree with you on the greeen hopper to weather the top a tad bit more. Looking great Tom! Awesomeness! Safe travels and talk to you soon!


Hi

My last gondola got a bit of a reaction on the Facebook page HO scale shelf modeler. Many thought I had overdone it beyond being realistic. The ends had lots of suggestions, the sides, the floor and the load got great comments. Thankfully Arcylic is very forgiving.

from this
View attachment 141809View attachment 141810
To this after some rework
View attachment 141807View attachment 141808
Today I had a Facebook friend send me some reference pictures he took for me today 2/28/2022, in Edson Alberta Canada. Here they are:
View attachment 141811View attachment 141812View attachment 141813View attachment 141814
These pictures show exactly the type of help I was asking for on FB and the type of sharing we can do here at modelrailroadforums.com.

I have more gondolas to work on but the prototypes are heavily used but not abused with dings, dents and rust.

TomO
This shows taken pictures of the real thing is never a waste. "clean" cars come from the shops and are hardly ever seen. Besides a little dirt (weathering) makes everything more realistic. Specially tankcars with their liquids spoiled, make a great weathering project.
But it all starts with looking. Taking photo's help a lot
 
Tom
Sure thing and thank you.The last steel scrap load I built the pictures of the build were terrible so those are deleted.

1. I determine the load. You say, No s..t Sherlock! But, I build pipe, aluminum billets, steel scrap architectural shapes, steel coil and real steel shavings for metal scrap loads for gondolas and some of those for flat cars

2. for the steel scrap load, I take a sheet of Evergreen .060 thick sheet #9060 for the gondola loads built the past week and cut it to fit into the loading bay of the gondola minus a couple scale feet.

(other thicknesses will work but I have 20 sheets left from a tilt-up wall panel warehouse build that I over purchased)

To test fit I put the still unpainted piece into the gondola bay, when I turn the gondola over the styrene strip should fall out
View attachment 141815
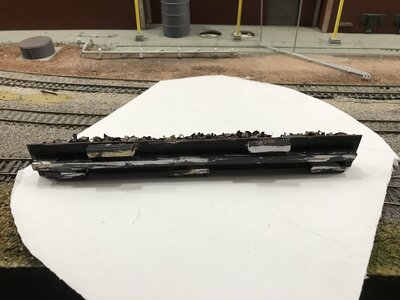
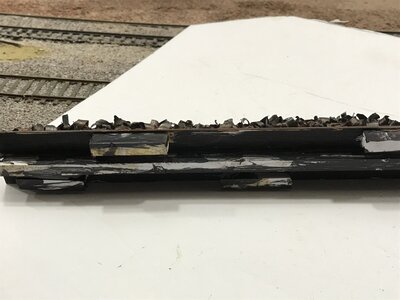
3. I then cut some, or use scraps I have of .250x.250 #199 solid strips also from Evergreen and glue 7 pieces on the underside of the scrap load base. 1 piece the length down the middle and 3 pieces on each side making the sheet balanced when in the gondola

4. I then will sloppily hand paint the unseen underneath portion with black arcylic. The upper base itself gets a dark umber #71.040 of Vallejo Air or #302 dark rust from the Panzer Aces line from Vallejo. I prefer to hand brush Vallejo Air as it dries my airbrush tip way too often. This layer is full strength no dilution with water. I also will use Hull Red from Tamiya but cut 50% with Isopropyl Alcohol and I will use the airbrush for that. I hadn’t picked up an airbrush since the late 70’s until last week when I started practicing. In the picture above that is Tamiya Hull Red after practice. I have 8 more bases created using 4 Vallejo and 4 of the Tamiya. I may not be the best but I am efficient
View attachment 141830
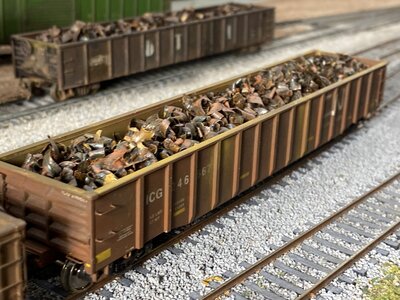
5. my steel scrap shavings were sent to me by a Facebook friend in Ohio. The local metal shops in my area would not even sell me a coffee pail full as I did offer to pay. I set them out for a week or so after putting them in a emptied and cleaned peanut butter jar filled with 70oz Isopropyl alcohol shaken every day for a week.
View attachment 141829


This removes the oils. Setting them out will oxidize some thus getting a bit of real rust.

6. next I take Elmers glue-all and thickly apply to the scrap load base. I then sprinkle on the steel shaving about one layer thick. With a 1”x2”x 5”stick, Ipress with the end of the stick the steel plate shaving hoping to get the pieces to adhere. I use a 1x2x12” long as an edge piece and push that against the load getting even edging. I did experiment today using Mod Podge instead of the Elmers glue-all. 1 load with the verdict still out
View attachment 141831But it is much more expensive then the Elmers Glue-all I buy in the gallon

7. I continue applying layers of steel shavings until I get the shape and look of a load just peaking out above the gondola sides but instead of full strength the glue is applied 50/50 water to glue, just like gluing down ballast. I do soak it as I do not want the shavings coming off. This dries for 48+ hours depending on your environmental conditions.

8. With everything secured down, the glue dried, and it fits, REMOVE IT. It is steel after all, so a magnet works and now you know why I cut the base a few scale feet shorter.
View attachment 141832
I now create a wash of Vallejo Air dark umber and dab it on with a brush. Pay particular attention where the glue might be seen, it is white unless you tinted it first. Let dry, do it again until YOU are satisfied.
View attachment 141828

Harder to write then do. Multiples help to quicken. I am not a airbrusher yet but it would speed up the painting portions.

Doing architectural scrap pieces is similar except each piece I glued separately using Aileen’s tacky Glue
View attachment 141833Does your railroad cover scrap loads? If so let me know what successfully works for you. I have tried wedding veil tulle like modelers have used for chain link fencing. Nope, crummy look, looks like tullel!

Sorry this is so wordy but the pictures of each process didn’t work out. Thanks for tuning in

TomO

Tom, when you use real metal waste as a load, does that mean you do not use any weight for the cars?
 
If the car is weighted out of the box and runs fine empty adding a load won't hurt. If the car is light, depending on the load weight you may or may not have to add weight. A couple examples, the gondola (Atlas) fine empty, the load just adds weight. The Intermountain flatcar is light out of the box a load that is heavy is good. A light load as in these boxes need weight to be added.
IMG_3723.jpg
IMG_3871.jpg
IMG_3872.jpg
 
Tom one thing you could do is have different color hatches (replaced) from other units. Also the walkways get replaced. In this video ( start at 3:00) and at about 3:40 there's a car with a walkway section replaced.
Thanks Tom. A great suggestion and I have seen that on a few roof top pictures of covered hoppers.


If the car is weighted out of the box and runs fine empty adding a load won't hurt. If the car is light, depending on the load weight you may or may not have to add weight. A couple examples, the gondola (Atlas) fine empty, the load just adds weight. The Intermountain flatcar is light out of the box a load that is heavy is good. A light load as in these boxes need weight to be added.View attachment 153194View attachment 153195View attachment 153196
Oh how true you write Tom.

The Scaletrains bulkhead shown in pictures above has a bit more heft the NMRA recommends and IMO that’s great. I have an unshown bulkhead from Athearn that is so light it’s ridiculous.

I do 1 ounce per 10 scale feet.

Other then gondolas of real scrap metal shavings I do not worrying about the loads over weighing the car. More weight the better in rolling stock!
 
This shows taken pictures of the real thing is never a waste. "clean" cars come from the shops and are hardly ever seen. Besides a little dirt (weathering) makes everything more realistic. Specially tankcars with their liquids spoiled, make a great weathering project.
But it all starts with looking. Taking photo's help a lot
I use a site called railcarphotos.com. U have to sign up to search, but much of the current photos are available without signing up for free.

I now live in an area away from the railroads and the yard in Madison, Wi. of the WSOR has no overpasses. Where it does go under an overpass is a 6 lane highway, so no picture taking from there. So I now have to rely on the internet.
 
Tom


Tom, when you use real metal waste as a load, does that mean you do not use any weight for the cars?
No, I still weigh the car to 1 oz per 10 scale feet before any load is added. What I do for real metal scrap is bring the base up higher and use less metal shavings. I can tolerate 1 ounce or 1.5 over the 1 oz per 10 scale feet but not 2 or 3. Too tough on the truck frames holding the wheelsets

I just took these pictures of a load, you may need to zoom in. Just scrap styrene to bring the base up higher. They were taken with the IPadPro
 

Attachments

  • 276C4EBD-0ADA-4E0C-95E5-6F636A21A0E5.jpeg
    276C4EBD-0ADA-4E0C-95E5-6F636A21A0E5.jpeg
    367.2 KB · Views: 91
  • A47293E5-658E-4B7B-AF35-BBBB763879CB.jpeg
    A47293E5-658E-4B7B-AF35-BBBB763879CB.jpeg
    319.7 KB · Views: 94
  • B70BDEB5-CC1B-46E1-A526-9A6E3EFAA26D.jpeg
    B70BDEB5-CC1B-46E1-A526-9A6E3EFAA26D.jpeg
    294.9 KB · Views: 105
  • 9AE07BB0-80E9-4C72-B486-E27D96265385.jpeg
    9AE07BB0-80E9-4C72-B486-E27D96265385.jpeg
    509.2 KB · Views: 107
Last edited:


I use a site called railcarphotos.com. U have to sign up to search, but much of the current photos are available without signing up for free.

I now live in an area away from the railroads and the yard in Madison, Wi. of the WSOR has no overpasses. Where it does go under an overpass is a 6 lane highway, so no picture taking from there. So I now have to rely on the internet.
I bet I live further away from any American RR... Long live the internet. Apart from that I do have a magazine that comes monthly and a lot of excelent books. And from now on I have all your knowledge here in the forum.


Affiliate Disclosure: We may receive a commision from some of the links and ads shown on this website (Learn More Here)

Back
Top