
You are using an out of date browser. It may not display this or other websites correctly.
You should upgrade or use an alternative browser.
You should upgrade or use an alternative browser.
Smudge's First attempt at painting a building
- Thread starter Smudge617
- Start date
MikeGTW
Signalman, ESQ
Smudge disregard that bit about spraying with white paint Don't know what I was thinking ofThat was my fault, I didn't sand the tabs before I painted them, which I did for the other side, so their not quite so noticeable. Going to try doing some mortar lines and darkening some of the bricks to make them stand out a bit, but I'd better wait till Willie has had a look.
However you could use shellac or easier just use good old elmer's white glue or any PVA glue but thin it to about 80 or 90% with water and brush it on those ends let dry the paint will then look the same but what do I know not much and been wrong before
Smudge617
Well-Known Member
It's certainly worth a try, won't do any harm I don't think. One thing I have learned is that there are many ways to skin a cat. And many ways to correct mistakes.Smudge disregard that bit about spraying with white paint Don't know what I was thinking of
However you could use shellac or easier just use good old elmer's white glue or any PVA glue but thin it to about 80 or 90% with water and brush it on those ends let dry the paint will then look the same but what do I know not much and been wrong before
")
Snowman
Well-Known Member
Yes, there sure are. I can see you've added the "ground spatter" effect to your first shed, for example, and you'll find an airbrush very helpful with that (get a double action model, BTW).It's certainly worth a try, won't do any harm I don't think. One thing I have learned is that there are many ways to skin a cat. And many ways to correct mistakes.
As an example, here's another tab lock kit which might come from a UK manufacturer: https://arcanesceneryandmodels.co.uk/wp-content/uploads/2016/05/a010_1.jpg
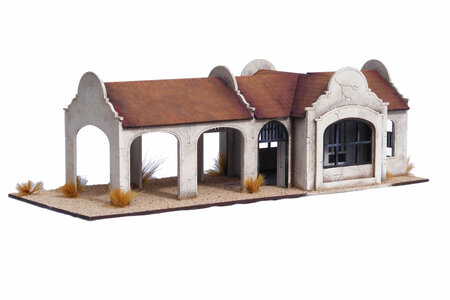
....and though it's more the character of a building you might see in Spain, or the US southwest...or in the movie "Butch Cassidy and the Sundance Kid"...the builder has that ground spatter effect on there.
Attachments
Smudge617
Well-Known Member
I used a brushes for the first one and just air brushed the dull kote on after my poor attempt at weathering.Yes, there sure are. I can see you've added the "ground spatter" effect to your first shed, for example, and you'll find an airbrush very helpful with that (get a double action model, BTW).
As an example, here's another tab lock kit which might come from a UK manufacturer: https://arcanesceneryandmodels.co.uk/wp-content/uploads/2016/05/a010_1.jpg
....and though it's more the character of a building you might see in Spain, or the US southwest...or in the movie "Butch Cassidy and the Sundance Kid"...the builder has that ground spatter effect on there.
The second one I'm doing everything with the airbrush I have, not an expensive one I admit, but seems to do the job.
I think the building is a Mexican village building or Hacienda
I've looked at the link you gave me for Arcane Scenery, its only a 30min drive from me, got some amazing kits, Japanese, Asian, American buildings and paddle steamers, if someone wants a really different diorama, we'll worth it, especially if 2 or 3 people got together, and postage to the US is a lot cheaper than from the US to here, I think TLOC is the gamer, he'd have a field day there.
I've marked a few building's I might just get a them in the next few months and put them away for the future.
Smudge617
Well-Known Member
Well, I finally finished loco shed No. 2. I think it turned out ok, and much nicer than the first one, but I'll let you guys be the judge of that, still need to do a few touch-ups here and there, forgot to put some grime on the entrance, but only a few minutes work to do that and colour match the roof tabs.
And I have actually made sure the sides now meet as they should, which. when I took the photo's, they weren't.


And I have actually made sure the sides now meet as they should, which. when I took the photo's, they weren't.
logandsawman
Well-Known Member
Smudge, the new one is much nicer than the first version. Have you ever tried dry brushing? It is a technique where you get some paint on the small artists brush (not super small) and wipe it on paper until just about dry, then swipe it on your model.
I think it is the best way to add some weathering effects, I use it at the bottom of the building, near the ground line, (like where your green is above) where the rain would fall and maybe make the bottom of the building look like a little mold or mud or something is going on. Like from mud splashing up or just being damp being close to the earth. I like to use black paint, or gray.
Ideally, it goes on lightly and darkens the bottom.
Keep up the good work!
Smudge617
Well-Known Member
Thank you, never tried that technique, but I'll definitely do that on my next build. I'm thinking of adding lights to this one too. I've got the lights I need, think it will look good on the layout.Smudge, the new one is much nicer than the first version. Have you ever tried dry brushing? It is a technique where you get some paint on the small artists brush (not super small) and wipe it on paper until just about dry, then swipe it on your model.
I think it is the best way to add some weathering effects, I use it at the bottom of the building, near the ground line, (like where your green is above) where the rain would fall and maybe make the bottom of the building look like a little mold or mud or something is going on. Like from mud splashing up or just being damp being close to the earth. I like to use black paint, or gray.
Ideally, it goes on lightly and darkens the bottom.
Keep up the good work!
TLOC
Well-Known Member
Well Mr Smudge67 my friend, I think you are on good footing with both builds. They look good.
I will agree that weathering is a time consuming process and needs to be in layers. Whether you apply those layers with an Air Gun (air brush?) or hand brushing, it is the layering effect that you are looking for. Doesn’t matter how you get there.
Use a prototype picture or have a really great mental picture of what you want to to and how to get there. I have a great mental image of what I want. But, I can’t seem to coordinate that image with the processes to get there. I get heavy handed in the application. That is why an actual picture is the best helper for me.
A bit of advice is to pick a process and just go with it. Any learning issues are easily fixed. There are no mistakes, starting over is part of the fun.
I air brush using Arcylics from Tamiya. I use 91 or 99% Isopropyl Alcohol to thin the colors 50/50. It will often take 3-4 applications (layering) together the base to where I want it.
For the rust and streaking I use the Vallejo Air line of paints BUT I hand brush it thinned with water also about 50/50 or sometimes 40% paint and 60% water. It is a feel type thing in my case. I rarely put the Vallejo Air in the airbrush.
I do this for rolling stock and for structures.
I have found that You Tube is a great help in learning how to weather. The videos that have really helped me are Boomer Diorama. He has a few weathering how to videos, so if you look check the playlist and then click on the How To videos. He’s a bit different, explains very well and tells you it’s a process to have fun with. Also, there are many ways to get there
There are many other Tubers that I check in on but I keep coming back to Boomer. I truly believe you will benefit from his videos. Along side Luke Towan IMO Boomer’s video production quality is best of You Tube.
Have fun
TomO
Being TLOC I am not a gamer, just model railroading at this time
Smudge617
Well-Known Member
Thanks for your advice, I always enjoy watching your work, not sure I'll ever get to your standard tho' I've lined up a list of youtubers I need to watch, Boomer being top of the list. I use vellejo air colours, and a 50/50 mix, mainly because my air brush is a cheapie, I'm never going to have the space to build dioramas like you or Willie, so no point in investing in a decent airbrush. I may do another Engine shed, not sure yet, I've also have a goods shed to complete as well as the Walthers I have, not sure when I'll complete them as I'm back to work Sunday.Well Mr Smudge67 my friend, I think you are on good footing with both builds. They look good.
I will agree that weathering is a time consuming process and needs to be in layers. Whether you apply those layers with an Air Gun (air brush?) or hand brushing, it is the layering effect that you are looking for. Doesn’t matter how you get there.
Use a prototype picture or have a really great mental picture of what you want to to and how to get there. I have a great mental image of what I want. But, I can’t seem to coordinate that image with the processes to get there. I get heavy handed in the application. That is why an actual picture is the best helper for me.
A bit of advice is to pick a process and just go with it. Any learning issues are easily fixed. There are no mistakes, starting over is part of the fun.
I air brush using Arcylics from Tamiya. I use 91 or 99% Isopropyl Alcohol to thin the colors 50/50. It will often take 3-4 applications (layering) together the base to where I want it.
For the rust and streaking I use the Vallejo Air line of paints BUT I hand brush it thinned with water also about 50/50 or sometimes 40% paint and 60% water. It is a feel type thing in my case. I rarely put the Vallejo Air in the airbrush.
I do this for rolling stock and for structures.
I have found that You Tube is a great help in learning how to weather. The videos that have really helped me are Boomer Diorama. He has a few weathering how to videos, so if you look check the playlist and then click on the How To videos. He’s a bit different, explains very well and tells you it’s a process to have fun with. Also, there are many ways to get there
There are many other Tubers that I check in on but I keep coming back to Boomer. I truly believe you will benefit from his videos. Along side Luke Towan IMO Boomer’s video production quality is best of You Tube.
Have fun
TomO
Being TLOC I am not a gamer, just model railroading at this time
Last edited:
CambriaArea51
Well-Known Member
Well, yes you should. If your going to paint and weather a descent air brush makes a big difference. With that said you don't have to go crazy either. I have a simple Craftsman compressor I got for $100 and a Paasche H airbrush which go for about $60-80. I've done a lot of work with that and been very happy with it.so no point in investing in a decent airbrush.
Smudge617
Well-Known Member
You may be right, your airbrush is $150 here, but I'm not going to be doing loads of painting/weathering, if I was, I'd agree with you a decent airbrush would be worth the investment, but I only have 3 smallish builds and half dozen freight wagons to do, I won't be doing anymore after that. I can manage with the one's I have till then.Well, yes you should. If your going to paint and weather a descent air brush makes a big difference. With that said you don't have to go crazy either. I have a simple Craftsman compressor I got for $100 and a Paasche H airbrush which go for about $60-80. I've done a lot of work with that and been very happy with it.
logandsawman
Well-Known Member
Smudge, TomO and Tom - I had a cheap airbrush for a while but ditched it when we moved, it just took up too much space, and I sometimes ran into the problem of the mist being spotty.
If I had more room, it would be seriously considered.
Not sure if the lumpy mist was a paint or airbrush issue???
I did at times get a nice mist. I was always meticulous about cleaning stuff.
If I had more room, it would be seriously considered.
Not sure if the lumpy mist was a paint or airbrush issue???
I did at times get a nice mist. I was always meticulous about cleaning stuff.
Smudge617
Well-Known Member
I have that issue with mine too, realised the paint needed thinning even more, tho' I had meticulously followed the instruction's from the manufacturer.Smudge, TomO and Tom - I had a cheap airbrush for a while but ditched it when we moved, it just took up too much space, and I sometimes ran into the problem of the mist being spotty.
If I had more room, it would be seriously considered.
Not sure if the lumpy mist was a paint or airbrush issue???
I did at times get a nice mist. I was always meticulous about cleaning stuff.
Patrick
Alien Attitude.
Looking good Smudge! 
My buildings are getting better as I practice. I have been thinning my acrylics to remove the semigloss feature in the ones I have. Some of my paint was abandoned by the youngest daughter from some projects she was doing with her oldest daughter before she got remarried and moved away. I do have flats, but tend to mix the ones she left.
My buildings are getting better as I practice. I have been thinning my acrylics to remove the semigloss feature in the ones I have. Some of my paint was abandoned by the youngest daughter from some projects she was doing with her oldest daughter before she got remarried and moved away. I do have flats, but tend to mix the ones she left.
TLOC
Well-Known Member
Suggestion if I may? Save up for an airbrush. If nothing else buy one of the rechargeable battery ones from Amazon. Here is the one I have.

It’s not a fine detail brush but for structures and rail car weathering it’s good enough.
I do mainly use the regular type of airbrush and a construction compressor but the above brush will do. If you rather deal with Micro Mart I have a modeling buddy who uses and likes them. I have a 20% off code I could let you use if you want.
TomO
Smudge617
Well-Known Member
Thanks, I may well take you up on that offer.Suggestion if I may? Save up for an airbrush. If nothing else buy one of the rechargeable battery ones from Amazon. Here is the one I have.
View attachment 144951
It’s not a fine detail brush but for structures and rail car weathering it’s good enough.
I do mainly use the regular type of airbrush and a construction compressor but the above brush will do. If you rather deal with Micro Mart I have a modeling buddy who uses and likes them. I have a 20% off code I could let you use if you want.
TomO
logandsawman
Well-Known Member
Smudge, I came on this image again, here just used brushed paint on the whole structure, did the dry brush technique on the bottom of the building and a couple random streaks. This was one of my first buildings but I was really happy with the technique, looks like I used gray.Thank you, never tried that technique, but I'll definitely do that on my next build. I'm thinking of adding lights to this one too. I've got the lights I need, think it will look good on the layout.
Maybe the dry brush technique is most relevant to wood?
Here I spray painted the building with a rattle can from the hardware store then used a brush with some different effects:
You know, I do something different every time and that way get a lot of different looks, the big stone building (ABOVE) I put in some white mortar in places by painting with acrylic antique white, then wiping off to leave mortar between cracks. I think I used some thinned india ink with water (or alcohol, which is a typical technique I use) to get the gray kind of cascading down.
I made a video of this build, not sure if it shows any weathering technique, but it would be in the video link in my signature.
Also there are some brownish areas were either dry brushed with brown or was "rust" weathering powders to dull it down a little.
I did not like the stone building at first, but it grew on me now I am really happy with it (even though it got destroyed in one of our moves).
I am in the habit of doing different things each time and I think if you consider yourself an artist (which you should) that is OK.
Dave LASM
Smudge617
Well-Known Member
WOW! really like these, I'm definitely going to try this dry brush technique, it looks great, I'm still trying to build a goods shed, but at the minute that;s stalled for now. I've been trying to get this mortar effect that you guys manage to do so well, so far no success, probably because I'm using laser cut kits, so there's nowhere for the wash to stick to, hopefully when I get round to the Walthers build I'll have better luck.Smudge, I came on this image again, here just used brushed paint on the whole structure, did the dry brush technique on the bottom of the building and a couple random streaks. This was one of my first buildings but I was really happy with the technique, looks like I used gray.
Maybe the dry brush technique is most relevant to wood? View attachment 145014
Here I spray painted the building with a rattle can from the hardware store then used a brush with some different effects:
View attachment 145015
You know, I do something different every time and that way get a lot of different looks, the big stone building (ABOVE) I put in some white mortar in places by painting with acrylic antique white, then wiping off to leave mortar between cracks. I think I used some thinned india ink with water (or alcohol, which is a typical technique I use) to get the gray kind of cascading down.
I made a video of this build, not sure if it shows any weathering technique, but it would be in the video link in my signature.
Also there are some brownish areas were either dry brushed with brown or was "rust" weathering powders to dull it down a little.
I did not like the stone building at first, but it grew on me now I am really happy with it (even though it got destroyed in one of our moves).
I am in the habit of doing different things each time and I think if you consider yourself an artist (which you should) that is OK.
Dave LASM
GuilfordRailman
Well-Known Member
I’ve had some difficulties too with the mortar effect on some of the structures I’m working on. I’ve had a little luck with weathering powders but because of my lack of experience with weathering, the results aren’t probably as good as they could be.WOW! really like these, I'm definitely going to try this dry brush technique, it looks great, I'm still trying to build a goods shed, but at the minute that;s stalled for now. I've been trying to get this mortar effect that you guys manage to do so well, so far no success, probably because I'm using laser cut kits, so there's nowhere for the wash to stick to, hopefully when I get round to the Walthers build I'll have better luck.
