Resurrecting Proto 2000 Loco's with Cracked Gears

ModelRailroadForums.com is a free Model Railroad Discussion Forum and photo gallery. We cover all scales and sizes of model railroads. Online since 2002, it's one of the oldest and largest model railroad forums on the web. Whether you're a master model railroader or just getting started, you'll find something of interest here.


RIGuyUK

Well-Known Member
Hi All

Last night I replaced cracked gears in 2 P2K loco's that I bought cheaply, I thought I'd make a tutorial to show those who may be hesitant to do this, just to show how easy and quick it is.

To start with, here are the culprits, along with the tools used...

GP7 GN
GP18 RI
Athearn 60024 Gears
Flat head jewellers screwdriver
2.3mm (3/32) reamer in a pin chuck
HO Back to Back gauge
Synthetic oil

I found the axle shafts to be slightly larger than the gear bore, hence the reamer.

Grab your choice of beverage and as always, work in a good light.

PXL_20230314_221346849.jpg


First thing first we need to take off the truck sideframes and insulating plates, using the flat head screwdriver to prize these out from the bogie frames, they can be seen in the background.
PXL_20230314_221846718.jpg


Next we have to remove the keeper plates from the bottom of the trucks, using the screwdriver again to prise the lugs away - I insert at the front of the keeper plate, towards one side, then gently twist which will release the lug. This exposes the gears...

PXL_20230314_221855582.MP.jpg


Lift each wheelset out and examine the plastic gear for any signs of a crack...you can clearly see the crack on each shoulder of the gear below...

PXL_20230314_221955496.jpg


The wheels and stub axles simply pull out, throw the old gear - or keep to add to a gondola load!

Using a reamer, in this case 2.3mm, gently open up the bore, do this from both sides...

PXL_20230314_222405215.jpg


Clear any swarf way then fit the stub axles into the gear...

PXL_20230314_222203029.jpg


Check the back to back measurement on your gauge...

PXL_20230314_222241813.jpg


And replace the axle back into the truck frame...

PXL_20230314_222306990.jpg


Repeat for all other axles (I replace all gears even if only one is cracked), then add a spot of oil to each exposed gear...
PXL_20230314_223033903.MP.jpg


Refit the keeper plates, run the loco on a rolling road to distribute the oil and to check all is well, re-assemble the insulating plates and sideframes and enjoy your reborn locomotive!

I hope this guide is useful and dispels any fears of how difficult it sounds. To do the 2 loco's it took me less than 20 minutes, including re-assembly
 
Hi All

Last night I replaced cracked gears in 2 P2K loco's that I bought cheaply, I thought I'd make a tutorial to show those who may be hesitant to do this, just to show how easy and quick it is.

To start with, here are the culprits, along with the tools used...

GP7 GN
GP18 RI
Athearn 60024 Gears
Flat head jewellers screwdriver
2.3mm (3/32) reamer in a pin chuck
HO Back to Back gauge
Synthetic oil

I found the axle shafts to be slightly larger than the gear bore, hence the reamer.

Grab your choice of beverage and as always, work in a good light.

View attachment 164390

First thing first we need to take off the truck sideframes and insulating plates, using the flat head screwdriver to prize these out from the bogie frames, they can be seen in the background. View attachment 164391

Next we have to remove the keeper plates from the bottom of the trucks, using the screwdriver again to prise the lugs away - I insert at the front of the keeper plate, towards one side, then gently twist which will release the lug. This exposes the gears...

View attachment 164392

Lift each wheelset out and examine the plastic gear for any signs of a crack...you can clearly see the crack on each shoulder of the gear below...

View attachment 164393

The wheels and stub axles simply pull out, throw the old gear - or keep to add to a gondola load!

Using a reamer, in this case 2.3mm, gently open up the bore, do this from both sides...

View attachment 164395

Clear any swarf way then fit the stub axles into the gear...

View attachment 164394

Check the back to back measurement on your gauge...

View attachment 164401

And replace the axle back into the truck frame...

View attachment 164400

Repeat for all other axles (I replace all gears even if only one is cracked), then add a spot of oil to each exposed gear...View attachment 164404

Refit the keeper plates, run the loco on a rolling road to distribute the oil and to check all is well, re-assemble the insulating plates and sideframes and enjoy your reborn locomotive!

I hope this guide is useful and dispels any fears of how difficult it sounds. To do the 2 loco's it took me less than 20 minutes, including re-assembly
Have to admit, never used a reamer when I changed mine, long nosed pliers worked for me, or a small vise.


I don't recall the need to ream out those new Athearn gear sets?

I do recall an experiment to reglue those split gears, then the need to ream them out before trying to push the original axles into the repaired gears. In used some special Loctite glue that appeared to work, but I have not tested them for long time usage yet.

I might be interested in trying out that new super glue that Gorilla glue is touting so highly? (and I am particulary interested in the 'repair' idea as their are some gear/axle combinations for Proto engines that not available from Athearn)
 
Last edited:


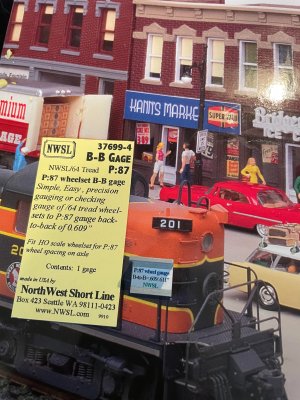
Where can I find the wheel gauge tool used by the author to check the wheel alignment after installing the new gear? It looks like a 90 degree bracket.
 
The Athearn gears option is definitely the cheaper option  if you can find them (and over here in the UK that is a big if...) as the Walthers drop in replacement wheel sets are far more expensive (about the equivalent of $20 US to do a GP9 for example) and you are left with a box of gearless wheelsets, believe me, I know...

I have never had any trouble with six axle Proto locos though, there is supposedly a Walthers replacement wheelset available for them too, if you can find them.
 
Last edited:
Where can I find the wheel gauge tool used by the author to check the wheel alignment after installing the new gear? It looks like a 90 degree bracket.
You need to get one of these

 
Excellent tutorial, even though a few years old now. I agree with reaming out the gear bores, as I believe they are too tight to begin with, and I'm fairly confident that this contributes to the gears eventually cracking.

Here in the U.S., one can use a #42 drill bit as a reamer, which may be a little difficult for some to find, or one can use a 3/32" diameter drill bit, which even most basic drill bit sets contain. The #42 bit will yield a quite acceptable press fit without being too tight, or a 3/32" drill bit will yield a slightly easier press fit, which should still yield enough grip on the shaft for most purposes. I have tried both, and been successful with both.

I have also reamed out existing gears that haven't cracked yet, and re-assembled. Not so much for cost-savings, but more due to the fact that sometimes these new gears are hard to find. Especially during the first two or three Covid years (2020 and after), when of course, I needed gears to repair some of my locos and some of my friends locos.

And now for the 'Piece of Resistance' (that's French for....."Well, Blow Me Down!" 😁:p). I actually HAVE fixed cracked gears, and my method has worked quite successfully to boot. And no, it's not glue. Once again, necessitated by the first Covid year or two, when nobody but nobody had any gears in stock anywhere. Matter of fact, I have fixed gears in maybe two or three of my Life-Like HO locomotives, and also put some in at least one or two friend's locos! And they all run just fine!

It simply involves making some collars from 3/16" O.D. K&S aluminum tubing, that press over the hubs on the cracked gears. The collars are cut about 1/8" long, if memory serves, or the same length as the hubs. One hub on the gear is just a tad smaller diameter than the other hub, and has a very small taper to boot. This hub is pretty easy to press a collar on. The other hub though, is the same O.D. as the aluminum tubing, and needs a little filing on the diameter and a chamfer put on the end, to help facilitate fitting the collar on. In addition, the aluminum collar itself needs a little enlarging by pressing it on tapered mandrel of some sort (like an proper-sized ice pick, for instance). With the collars being a good, tight press fit on the gear hubs, the cracked gears cannot open up and slip on the axle shafts. Also, just like one would with new gears, the fixed gears can be reamed out with a reamer or drill bit, so they're not so blasted tight on the axles.

Here's a picture showing two fixed gears (on a twist-tie for safe keeping). They are ready to install on anything that needs them.
018.JPG

My Life-Like BL-2 has four of my fixed gears installed in it, and it runs smoothly and quietly. One caveat though, you need to make sure the collars will fit in the plastic truck frames without rubbing on the frames (so it doesn't cause friction). Virtually all of mine fit fine (albeit pretty darn close fit!). I did have to do a little filing on one truck frame on one loco, however, to prevent the collar from rubbing on the frame.

Hope this is somewhat useful. All I can say is, if Athearn gears are readily available, go for it! Who in their RIGHT MIND would want to go through all this hassle to replace cracked gears:eek:? I sure wouldn't, and don't if I can avoid it! 🤪👍
 
You need to get one of these

I found the gauge! I misunderstood the nomenclature while researching on the internet, and the indicator is called a Back-to-Back (B-B) gauge, back-of-wheel to back-of-wheel (B-B.) This gauge I found on Ebay and the manufacturer is North West Shore Line (NWSL.)
 

Attachments

  • B to B Guage.jpg
    B to B Guage.jpg
    705 KB · Views: 36
Last edited:


Affiliate Disclosure: We may receive a commision from some of the links and ads shown on this website (Learn More Here)

Back
Top