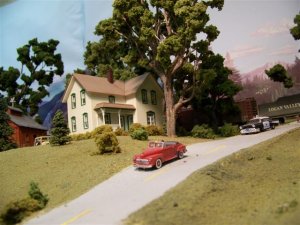
post your model RR tips........


Montanan;

I've seen all types of benchwork that was cantilevered off the wall. My last layout was done like this, except using 1x2's. It is an extremely strong, and light weight method to build a Layout. Since my current one had to have walkways around it, I couldn't do it this time. But it is a method that I have used before and is very strong.
 
When doing scenery, look at all the bushes and shrubs around your own local as often there are dead twigs that either fall of or can be broken off which make nice armatures for trees or as Montanan above said branches of Sage Brush, Oak and others make great trees for for your layout and with either the Oak or Sagebrush the natural bark can't be beat.

Also I've taken smaller sticks of Oak and cut them to length and then split them with an xacto knife and if they don't cut perfectly that added detail at no cost as the real Oak doesn't split perfectly smooth either so enjoy the effect as it as natural as it gets. Also another nice feature of using Oak sticks or others is that you not only get the natural bark but the small growth rings in the wood.

In fact I had Woodland Scenics wondering how I managed to model such great look cord wood, stacked Oak cord wood, till I told the lady there it was real Oak sticks cut and split and she said no wonder.

So remember, you just can't beat the real thing when it comes to realism.

Don't forget to stop at a garden or landscape center where they sell bulk supplies of Redwood bark and other items as they generally have a lot of excess scattered in front of the various piles that they probably just give you as it pretty fine but works just fine for our N, HO, S & O gauge layouts.

As far as dirt again it's readly available at either the landscape center or a field or lot near you or even along the edges of roads where there is a cut as there is most always loose dirt that piles up along the roadway or enough loose dirt in the bank to be had. If it should contain small rocks there is added detail once sifted out. Don't forget to use different fineness of screens such as tea streigners and flower streigners to get different coarseness of dirt and even small rocks.

Sift the dirt etc onto a couple of thicknesses of news paper at the fold area so once done you can easily let your effort slide off into any type of container such as an empty flavored coffee creme container, so it can be easily sprinkled on later or transferred to a container with a number of holes in the top as like seasoning bottles etc.

Also don't overlook dirt that has some different coloration to it as that all ads realism to your layout.


Need some straw to place in and around a farm scene or in cattle cars find a field with the golden oats pick or cut a bunch of the stuff as it crumbles when rubbed between your fingers or hands and make great natural looking straw because it is!

If you have any Ornimental Bamboo/Nandenia bushes, once they flower the stem of the blossoms with all it's little branches dies on the bush and make great looking small trees with some Woodland Scenics lace material added along with some ground foam of your choice.

Another tip is to use Woodland Scenics Hobby tack to place objects to check out the effect. As a suggestion, cut the clear acitate from plastic containers from the bakery section into small 1"x1" squares to hold the armatures of small trees with the Hobby tack after it dry in an upright position so you can get a feel of how you want them arranged on your layout. On hill sides, if the surface is free of loose material the hobby tack with also aid in the placement so you can step back and see if the effect is what you wanted.


If you want to easily make some rock molds get a quart can of liquid latex and once you've found a rock/s you want to make a mold of a portion of it, clean off any loose stuff first and paint that area with the liquid latex being certain to push the bristles into all the cracks and crevices and let it dry and then give it another coat and and let it dry then you can peal the mold off the rock and have a mold to work with. Remember most molds need to lay fairly flat to begin with to allow you to pour the Hydrocal into them so take that into account when making your molds. By not making the molds to thick or stiff it will allow you to let your casting conform to the terrain of your hillside or cliff. Just wait till the Hydrocal is about 80% dry and pre-wet the area with water that has a couple of drops of dish soap added as a wetting agent.

Oh, if you want some great looking HO scale Redwood logs find a bottle brush bush, and if there are any branches that are trimmed off you'll probably have some to use. The Counties often use these bushes for ornamentials shrubs and generally having trimmings.

Hth.

Very informative. Going to out and get me some rocks.
 
Those dead shrubs are a great source of dead trees too. Dig up the rootball. Put it in a wheelbarrow or baby pool and fill it with water. Let the dirt wash off the roots. They will look like dead trees and have those little limbs etc. Spray them with polyurethane flat to seal them and help keep them together.

Remember for east coast forests, you should have 1 dead tree laying down for every 7 standing, and for west coast you'll want 1 dead tree for every 5 standing.

Build your forests from the ground up. Put down your forest floor profile. add in the creeks, deer paths and erosion. add in your dead leaves ( I use pencil shavings), small bushes and clump vegetation. next, drill holes for all your trees. Go from one side to the other putting small and large trees in place. Now would be a good time to add in a "Bare Hunter" a still or 2, and maybe an abandoned car, railroad garbage etc as you fill in the trees.
 
Very informative. Going to out and get me some rocks.

Here are a couple of pictures of trees made from sagebrush. I hope you can see the bark retail.
 

Attachments

  • Picture 071.jpg
    Picture 071.jpg
    69.8 KB · Views: 351
Here are a couple of pictures of trees made from sagebrush. I hope you can see the bark retail.

I think I had some of that sagebrush I friend gave me. Here are some trees I made out of them. Does it look like sagebrush to you?
 
Yes it does. Up here in Montana it is no problem getting sagebrush. I have tried many things over the years and have found that sagebrush is not only the best for trees, but the cheapest. All it takes is a little ground foam and a glue gun. What I do is drill a hole in the bottom and superglue a small brass rod. I them drill a hole in the landscape where I want the tree and planting is easy. The best part is that if you need to get into an area for repairs, or to put in more detail, the trees can be easily removed so working is easy without any possible damage to the trees.
 
Yes it does. Up here in Montana it is no problem getting sagebrush. I have tried many things over the years and have found that sagebrush is not only the best for trees, but the cheapest. All it takes is a little ground foam and a glue gun. What I do is drill a hole in the bottom and superglue a small brass rod. I them drill a hole in the landscape where I want the tree and planting is easy. The best part is that if you need to get into an area for repairs, or to put in more detail, the trees can be easily removed so working is easy without any possible damage to the trees.

I did something similar. I drilled hole a too, but put toothpicks in instead.

I'm told my sagebrush came from the Okanagan Valley in BC. Western Canada's wine country. I'll have to pay the place a visit and get a garbage bag full of the stuff. I'm going to look on the net now to see what it looks like as a plant.
 
Those dead shrubs are a great source of dead trees too. Dig up the rootball. Put it in a wheelbarrow or baby pool and fill it with water. Let the dirt wash off the roots. They will look like dead trees and have those little limbs etc. Spray them with polyurethane flat to seal them and help keep them together.

Remember for east coast forests, you should have 1 dead tree laying down for every 7 standing, and for west coast you'll want 1 dead tree for every 5 standing.

Build your forests from the ground up. Put down your forest floor profile. add in the creeks, deer paths and erosion. add in your dead leaves ( I use pencil shavings), small bushes and clump vegetation. next, drill holes for all your trees. Go from one side to the other putting small and large trees in place. Now would be a good time to add in a "Bare Hunter" a still or 2, and maybe an abandoned car, railroad garbage etc as you fill in the trees.

What kind of dead shrubs?
 
Ooops! Forgot to post my tip.

Never ever leave your soldering iron on when leaving the room. I had a lift out section fall into the door on the inside of the room, closing the door and barricading it. The slamming of the lift cause the soldering iron to fall setting on fire what it came into contact on.
Luckily, I had a small moulding saw in the kitchen's pantry and rammed it into the hollow door and cut out a hole big enough to craw through it and smothered the fire. Phew! Lesson learned.
 
I did something similar. I drilled hole a too, but put toothpicks in instead.

I'm told my sagebrush came from the Okanagan Valley in BC. Western Canada's wine country. I'll have to pay the place a visit and get a garbage bag full of the stuff. I'm going to look on the net now to see what it looks like as a plant.

We got thestuff all over the place out here. I have a bunch in the basement. I should send you some. If you're going to get some, get he dried out sagebrush without any vegetation and have a good set of pruning sheers with you, that stuff is tough.
 
Last edited by a moderator:
We got thestuff all over the place out here. I have a bunch in the basement. I should send you some. If you're going to get some, get he dried out sagebrush without any vegetation and have a good set of pruning sheers with you, that stuff is tough.

So kind of you to offer. Send me a private message if you like.

Cheers
 
A digital camera is a great modeling tool. When you think you're done with a project, take a few pictures of it. The take the camera and hook it up to your computer so you can look at the pictures on much larger screen. It is amazing how something that looks "perfectly done" to the naked eye can show so many flaws when you look at a picture of it. I recall weathering a box car once... took a couple of pictures of it... then when I looked at the pictures I noticed that I had forgot to put the reporting marks on one end of the box car.

I guess my point is that a picture forces you to look at a two-dimensional view of a three-dimensional object -- and in doing so, you can often pick up things you've otherwise missed.

But remember this as well -- you don't have to achieve "perfection". It's easy to obsess on something being not quite perfect, and then spend way too much time and effort to strive for that perfection. If you're not going to enter it in a modeling competition, good enough is exactly that -- good enough.

Regards,
Tom Stockton
 
So true. I learned this back in the late 60's when I was stationed at Mare Island, CA and had the opportunity to attend a few operation sessions at John Allen's famous Gorre & Dapheted RR. He was a professional photographer and he said the best way to find your modeling imperfections were to take pictures. It's so much easier today with the aid of digital photography.
 
Those small pill bottles are also great for storing small parts like screws, coupler springs, etc.

Oh, yeah! You kids will just have to ask your pharmacist if they can spare a few pill bottles, or if they will sell you some. Us, ah, "experienced" (read old pfarts) model railroaders get a new supply available every 30-60-90 days! Whether we want 'em or not! :(
 
QUOTE: "...the best way to find your modeling imperfections were to take pictures".

That sure is true. I especially look for gaps under buildings where they rest on the ground. Nothing can spoil a photo quite like those small gaps. The overhead lighting we tend to use enhances the problem since the high angle exaggerates the effect with harsh shadows - sometimes going in multiple directions :eek:.

Shadows that can go unnoticed from trees and other tall details that cast shadows on the "sky" backdrop show up in photos too.
 
Adding life to Life Like signals

3mm LEDs, will fit perfectly into a Life Like Signal bridge, and I will bet their dwarf signals as well. Bought 100 on the bay for about $5.00
 
I use grape stalks as small trees After eating a bunch of grapes put the whole bunch stalk in the sun to dry for a week then cut the size tree you want from it. I usually poke a hole in the polysyrene base with a nail put a blob of tacky glue over the hole then shove the tree into the hole before glueing foilage to the branches
 
I find that the plastic bottles that dentyne ice come in are perfect for track nails or track connectors. It is a low wide bottle sorta hour glass shaped. The design of the bottle makes it very easy to pull out the smallest of items from the bottom.

Another use for them are glue pots. The lid is designed with a small opening that seals. This opening is perfect size to to accommodate a brush.

Since I'm still laying track on my layout I don't have any tips on scenery yet. But I appreciate some of the ideas others have put forth.
 
When I was ready to start building L-girder benchwork, I found out that I could buy 1x6 pine roof board for about the same price as a spruce 1x2 and 1x3 together.
Ripping them in the table saw was easy, and the pine is less likely to split when driving screws.
I get either a "1x2" and a "1x4" or three "1x2"s out of each board.
One caveat - the thickness isn't consistent, but that doesn't cause any problems with L-girder construction.
Another plus is it comes in 8-, 10-, 12-, 14- and 16-foot lengths. Ideal for building a long peninsula.
 
Last edited by a moderator:


Back
Top