Newbie Here, Need direction on how to get started with HO set-up


dwderricd

New Member
Hey Everyone,

My kids love trains and it would be awesome if I could build something for them. I have some knowledge about trains but there is a lot of gaps. I know there is a certain way of building and if you don't get it right you're going to be redoing your work. I've tried searching the internet on how to build but I can't really find anything and I'm kind of overwhelm at this point.

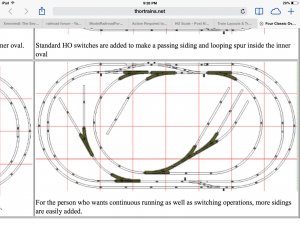
I attached a pic of the layout I would like to build. If someone could help me out I would be very grateful. Couple initial questions I have are below. I like to start ordering parts and get this project rolling.

Questions i have:
What kind of transformer would I need to run this layout? Does running two trains require a different transformer?
Are the curve pieces all the same? Or are there different radii?
What are the y-shaped pieces? Are the y-shaped pieces highlighted in color different from the ones they are left white?
Are the pieces 9"?
What's the most wallet friendly track out there?

Thanks for your help!
Dave
 

Attachments

  • image.jpg
    image.jpg
    177.2 KB · Views: 184
First of you need to make a couple of decisions. What do you want your finished layout to look like ? You could lay all the track right on roadbed on top of plywood , which many people do . It will give you an entirely flat layout . Don't know if that's what you want or not . The layout is pretty busy for a 4x8 layout so "mountains" are probably out . If you wanted a small stream with some type of bridge , you could put 2 inch foam on top of plywood and that would give you some room then to "excavate" . You do have options for which way you want to build your layout but you do have to decide what it will look like finished before you decide which options you want to use . The y-shaped pieces are turnouts . I don't know why your software put different colors on them , it may be to indicate the size of the turnout . Will you build this on a table with rollers? Have any scenic backdrops? The kind of transformer you get will depend on if you are going to run dc or dcc . If you run dcc you can very easily run multiple trains at the same time and wiring is much more simple . As I am sure you guessed by that last statement , yes, it is more expensive . DC can also run multiple trains but you need to wire the layout in blocks ( electrically isolated zones) Many people run these set-ups . Both have their good and bad points. I like flex track for ease of laying and less joints but many use the fixed pieces and they work just fine . It sounds like maybe a little more homework is needed on your part before you break out the credit card :) It will pay dividends if you take a bit more time and research some of your options , then buy the stuff you need only once . There are lots of ways to do the same things in this hobby , a lot just depends on what you want to get out of it . Take some time and read through the different build threads here , you will see some great creativity and see how different people dealt with the issues that come up . Issues will come up , that's a guarantee and ask lots of questions , the board here is full of friendly , knowledgeable people . Good luck on your adventure , you will enjoy it.
 
Last edited by a moderator:
Do you know whose plan that is? Atlas, Kato, Peco are some of the makers who manufacture "Set Track" i.e. preformed into specific lengths for the straights and the same for the radiuses. They all also do plans like this so you can order exactly the track pieces needed to build it. In HO scale I can see 3 radius being employed in this design, most likely 15", 18" and 22" in order to get them onto an 8' x 4' sheet of plywood. The reason for some turnouts being hi-lighted in bold and others not, is that is an expandable design. The non- bold are the basic layout and the turnouts in bold are those, with additional tracks that can be added at the beginning (preferably unless you want to partially dismantle it later to add them in), or later. They say they are "standard" turnouts, that may give a clue to the track brand. They would be replacing "standard" straight tracks in the original plan. The dots or marks you see around the track, indicate where the joints are between each piece of Set Track and if you notice there are a few that are shorter than the standard ones. They are made to fit in places in order to make the plan "work".

Power systems: 12 volt DC (Direct Current) has been around since the year Dot as a control method. In some ways it is the simplest, but only if you plan on running one train at a time on a layout such as this without blocks (as described by Jim) This only needs 1 Power Pack/Controller. To run more than 1 train at the same time with DC, requires a P-Pack/controller for each and every train operating on the layout, and each train must never be in the same block (isolated district) as another, or the controller that is operating that block will control both together i.e. the other controller will lose control of it. If the trains happen to be going in opposite directions, then a short circuit will occur when the additional train enters the other occupied block. Lots of isolating track joiners are required to isolate blocks and lots of electrical switches are required to pass power to where it's required. Basically with DC you control the amount of voltage applied to the track in order to control your train/s.

DCC (Digital Command Control) systems. The big difference from DC control is that all the track is "Live" at maximum voltage/amps, all of the time. The engines are controlled for starting, stopping, speed and direction by 1 or more independent of each other controllers (Cabs). Where more than 1 Cab is involved on a layout it is given it's own unique address number (2-3 digit). Each loco (engine) has a digital decoder inside which interprets signals, sent to it via the powered rails from the Cab controlling it, each loco's decoder also has it's own individual address number, and only responds to commands sent to that number. With this system, as many locos as the power pack can supply power for, can be run on the layout, on any track and in any direction, totally independently of all others.

You'll need a bit of time to absorb this info, so continue to ask questions.
 
Welcome to the forum Dave.
Toot & Jim both elaborated on the DC versus DCC systems. That pretty much answered your first question.
Second question: This layout appears to be made with Atlas track. The curves on the outer loop would be 22" radius curves. The center loop are 18" radius curves and the inner one appears to be 15" radius curves.
It looks like the shaded turnouts (Y-shaped pieces) are #4's (Snap Switches) and the unshaded ones are #6's (Custom Line). Again this is Atlas terminology.
Most of the straight pieces are 9". There are some shorter pieces, probably 3" & 6" incorporated on the center loop on each side (3"), and along the bottom of that same loop to allow proper spacing.
Most $ friendly track will be Atlas code 100 track.

You didn't mention how old the kids are. If they are under 8 or 9, they will discover video and computer games soon and could lose interest. That might determine how much you are willing to spend. If that's the case, you would want to start with the less expensive Atlas line of code 100 track and other supplies. Kids don't care if the track is slightly larger than the real thing. You might also go with DC as it is less expensive. If Dad might become hooked, that's a different story; although you will find a lot of experienced modelers on this forum that still use the "old-fashioned" components.
For more detailed information, use this link to the NMRA site: http://www.nmra.org/beginners-guide
For more information regarding beginners, use Google and enter: beginners guide to model railroading. This will bring up many more sites including YouTube videos.
Most of all look around this site at what others are doing; and have fun!
Willie
 
Hey Jim, thanks for the reply.

Due to lack of time and money, I'm just shooting for track on plywood. The kids want to control the trains so I want to focus on building a track with a bunch of switches.

Yep. Im trying to do my due diligence. I'm reading a bunch. My head hurts. :)
 
Hey tootnkumin. Thanks for the reply.

I've seen on Atlas site where u can order a similar layout but it close to $500. I thought if I learned the basics I could do it for cheaper. I didn't realize how much goes into track building. I'm starting to pick it up.
 
What kind of transformer would I need to run this layout? Does running two trains require a different transformer?
Answer to second question is Yes. Running multiple trains requires multiple transformers and special wiring, or as the others have said, Digital Command Control DCC. DCC is definitely easier but more expensive as it requires locomotives with electronics (called decoders) in them.

Are the curve pieces all the same? Or are there different radii?
No, there are two different sizes. The big loop around the outside is 22" radius, All the others are 18". Notice the middle loop is made wider by the use of a short straight at the ninety degree position.

What are the y-shaped pieces? Are the y-shaped pieces highlighted in color different from the ones they are left white?
They are switch tracks or in model railroad terminology - turnouts. The ones in color are special ones that have a curved extension on them that makes the departing route be 30 degrees. The ones in white don't have this extension. In Atlas brand terms these would be called "snap switches". They come with the little 1/3 curve sections.

Are the pieces 9"?
Yes, 9" is considered a standard straight size.

What's the most wallet friendly track out there?
Hard to beat Atlas for both types of track pieces and value per $. Not the least expensive, but not the "cheapest" quality either.
 
Thanks horseman!

I want to get this done by Xmas. I'm just going to run dc with single train. I have trains that don't have the decoders in them.

Ahhh...I'm getting it. They just left the 1/3 curve piece off.

Would that layout work on a 4'x8' plywood? I thought I read somewhere 22" radius is hard to make work on a 4'.

For the transformer, does that connect to track at multiple locations or just a single track piece?

The only item left I'm not sure about is the control panel. There's about 14 switches in the layout. Do you wire them directly to a toggle switch? I'm just confused on how you would create the control panel for the switches and for accessories. I know how to build the outer part and I'm not sure about the parts that go inside the control panel and the wiring. I think this will be the best part for my kids, besides watching trains go-hitting all the buttons.

Control panel, transformer, and track...what would be a rough estimate for each? I think I'm about to get heartburn. O,well. I'll let my wife know how much I spend after she gets to see kids play with it.
 
Hey willie. Thanks for the reply. That was a great link you included.

Kids are about to be 5 and 7. I really want to build this for them. They love trains. There is a huge model train display set up by a Xmas light display and the 5 year old cried because he wanted to go to train store to build his own and I couldn't take him right then. That's what get this project rolling.

yep. That probably will be in video games soon. I'm thinking this is going to be more money than I expected. I might pick up the hobby eventually though.
 
It is better , performance wise if you attach multiple feeds around the track . If you are using a small transformer , more power feeds at different locations will help . The control panel needs only be large enough to hold your transformer(which could be recessed in on attached to the surface depending on the transformer ) and switch controllers ( Atlas makes these along with several other types of switch controllers that are used for different electrical situations ) and as soon as you decide how many turnouts you want you will know how many controllers you need ( 1 per turnout ) to mount and how much room they will take up . The controllers have electric lugs on the sides so you can connect them all together and just run power supply leads to the first one . That would leave you with having to run 1 pair of wires from each controller to each separate turnout. Your power supply comes off the transformer . It will have 2 lugs for track power and 2 lugs for accessories . Heartburn is just the first step :)
 
By Tootnkumin;

Ah! you're going to join the secretive clan of the married model railroader. There are initiation "ceremonies" to complete :rolleyes:.

There can also be severe penalties to pay if strict adherence to procedure is not observed!!!
 
Yes that layout will fit on a 4' x 8' sheet of plywood. Multiple power feeds are recommended, It doesn't cost much for additional ones. For this type of layout, I would use "terminal rail joiners" instead of soldering power feeders. Those are rail joiners with a wire per-attached to hook to your power supply. I would be putting two on each loop. Be sure that you always keep inner and outer rails separate or a short will result. At that age, I would think that all they want to see is trains going 'round & 'round, and you could save a little by not having all of those extra sidings. Pare it down to one or two just in case the older one wants to do some switching. Each turnout costs about $15+, depending on where you get them. Using only one transformer and just letting one operate at a time would make all wiring easier and be easier on the budget. Of course then you have to deal with the "my turn, your turn" thing. I did it by allocating 15 minute time slots. If using only one transformer, you could "gang-wire" all of the track feeders together, that is hook them all together and make only one connection to the transformer. The Atlas switch controllers can be connected to one another as Jim said. They run off the AC or accessory terminals on the transformer. Atlas used to include a switch motor and controller with every Snap Switch, I don't know if they still do. Wiring instructions were printed on the back of the package. If you actually have access to a real train store, they could be a great source of information.
Good Luck
Willie
 
Ha...you guys are funny.

Hey Willie. Yep you're right. I'm going to pare it down. I did a loop inside a loop with two switches. I have my great grandfathers standard gauge Lionel. I made a loop with that to go around the HO. I think the kids will love it.

I have a problem. Before I nailed down the HO track I wanted to run the train real slow around the track to see how it performed. The train would run two feet then stop. The train and track are old. I'm going to clean both. I also kind of just wrapped the wires around the connections at one spot on the track. I thought that would suffice just for testing purposes. . Some of the rail joiners are corroded- I can't get new ones, everyone is sold out. But I'm calling it quits for the night.

Does my my problem sound like it is related to grime/ bad track connections?
 
Hello Dave,
Does my my problem sound like it is related to grime/ bad track connections?
Yes it does. Use an alcohol soaked paper towel to clean the track, you can use a pencil eraser on tough spots if needed. Clean the loco wheels by using a paper towel soaked in alcohol laid on top of the track. Power up the track and put one set of wheels on the towel and the other on the track. Hold on. Spin the wheels. after you do one set, reverse and do the other. Wire just wrapped around the connections will come loose when the vibrations from running start. The corroded rail joiners are another thing. Additional power connections could be a temporary fix. Cleaning the joiners with a nail file or emery board could help until you can obtain good ones. I will re-recommend multiple power connections, at least two or three on each loop.
Good Luck.
Willie
 
I got some old track and had to hit it with some 320 sandpaper to get down to good metal, runs good now. Multi-meter shows same voltage drop as new track. Don't freak out about wiring every piece of track, I'm running over 300 feet of old and new track with good metal joins with just the ONE power feed! If you are only on a 4x8 go ahead and lay that track and run some trains with one feed, it should be fine. Get a good terminal piece and get those good metal joiners. I have 120 pairs of wired joins that I got when I started because 'everybody told me so' and have NOT used one yet! I'm running up to 9 locos at a time with loads at speed and no problems yet.

Am I that good? NO! WHY can I get away with 300 feet of track and one power hook up and everybody else needs drops every three feet? I DUNNO! My friend in the NMRA just could not believe I had just one power feed, I had to show him and he STILL was shocked! I don't get it. I'm ready and willing to bust this up into three blocks but there has been no need. I am adding and keep adding track and more loco's and have not yet found the limit to this system! (NCE 5 amp PH pro)
 
Cleaned the top of track with sandpaper. I bought a Dremel wire brush to the rail joiners and tips of rail. Dremel didn't last long and had to go ahead with testing. Runs like champ. My kids are going to love this. I got a car with spotlight on it. We can run the trains in the dark.

Im going to nail everything down. I can't wait to build the next track.

Thanks to everybody for your help. I would not have got this done by Xmas without y'all.

I thought I'd asked, but I'm going to head over to the O gauge, I hooked the o rail up. Connected a lead to middle and outside rail. I plugged transformer in. It hums but the train does not move. Anyone know what's up?


Back
Top