ModelRailroadForums.com is a free Model Railroad Discussion Forum and photo gallery. We cover all scales and sizes of model railroads. Online since 2002, it's one of the oldest and largest model railroad forums on the web. Whether you're a master model railroader or just getting started, you'll find something of interest here.
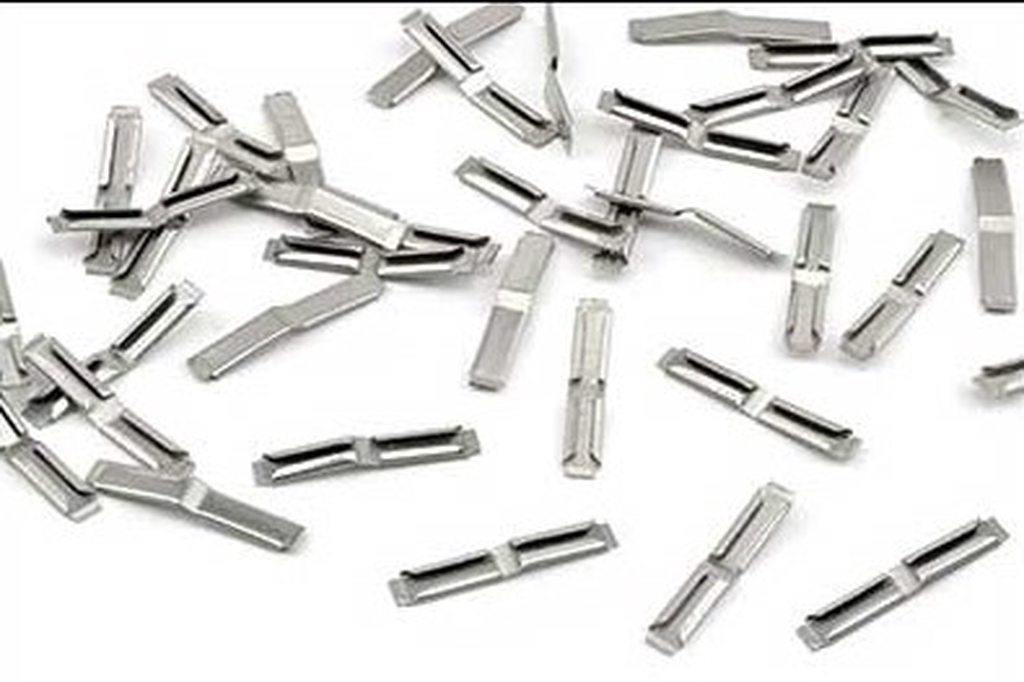
I tried to create a method of joining code 100 to code 83 before that didn't work out very well but after watching a video on the subject this time it works. I just changed a few things in the video. The video says file down the code 100 track until just a small portion is left. Then he says to join the 2 tracks with a code 100 rail joiner. I tried that; it didn't work out very well. What I did was file down the code 100 until a small portion is left then file off the bottom flange off the code 83 track. I then used the new standard Atlas rail joiner for code 100 or code 83. It fit almost perfectly. The video says not to solder but I soldered the two. I would have to say it worked out perfectly.
George
Code 83 and Code 100 Atlas should meet at the same rail heights, or at least they used to. Special joiners could be purchased to join the two codes. Most of us just use 'universal joiners' and kink them a bit. Then, solder them in place with a pair of needle-nosed pliers keeping the two rail heights even. It has worked well for me. Your way sounds effective, but a lot more involved.
The code 100 is Atlas the code 83 is ME Crandell. Thier far from matching up. Take a look in the 2nd photo there's a much different in rail height. I don't have anything but a file at the moment, so if you don't have any of the possibility's you mentioned. It will work out great.
George
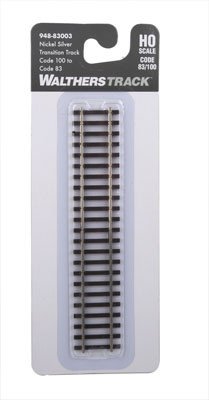
I know James about the Walthers transition track. I have 2 of them but I needed 2 more and the cheapest I found was $9.00 and then the shipping so your talking $30.00. It took me about 15 minutes to make the one pictured that I needed today no waiting for it to come in the mail.
George
I make my transition tracks by cutting a 6" piece of track from each size. Lay rail head down on a piece of glass to keep the rail head even. I cut a 1" piece of multi strand wire and clamp that to the outside of each rail then solder the two rails together including the wire to give the solder joint extra strength.
I bought some used peco code 83 turnouts off Feebay a while back.
Didn’t notice until recently that the previous owner ground down all the railheads to mate with code 70.
They’re useless to me now, your method would have worked well for that situation!
Sorry to hear the switches are no longer of any use to you Rico. It takes me about 15 minutes to make one. On the other site I posted it on a few members said, it takes to long. I say if you can spend 15 minutes of your time on this maybe you should collect coins or stamps or something.
George
Hey, never even thought about that, d'oh!
I think a couple could be done but one for sure was already cut back and another had the rail ripped from the spikes, could be ca'd back on I think.
Thanx Todd I’ll have another look!
You can buy these commercially - they are joiners which you can bend a step in them so the bottom of the rails are a different levels making to top surface flush. Or you can take a dremel and cust out a slot in regular joiners.
An old trick I read about somewhere from the vast multitude of Model Railroader/Kalmbach publications was to take a piece of code 100 track and slide code 100 rail joiners halfway onto each rail on one end. Taking a pair of pliers, squeeze the overhanging joiner ends flat. After which, lay the end of your code 83 track rails on top of the flattened portion of the joiners, and once aligned and straight, go ahead and solder. File the rail tops lightly if required to flush/level them up.
Although I've never actually done this, just eyeballing a code 100 and code 83 sample of track butted up to each other, it looks like this idea should put the rail tops pretty darned flush with each other with little to no filing required.
Two ways to do it, I slide a pair o rail joiners on the larger rail then use a razor saw to cut a slot through the top part of the joiner. I then flatten the free end (the cut makes a nice sharp transition. Solder the smaller rail to the top of rail joiner.
A similar alternative is use a cut off wheel and cut vertically through the head and web of the larger rail about 1/4" from the end, then remove the head and web on the short segment. File the short segment down till it's flat. Then solder the smaller rail on top of the tab.


")