Need paiting help/tips


Skipjacks

Member
Here's the issue....

I need to paint this tiny N scale car....
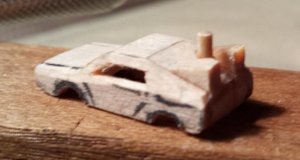
DMC.jpg

So it looks like this....

2710-6.jpg


(Obviously I've still got some more detail prep work to do before its' time to paint...headlights, windows, etc....) I can handle the painting details fine. My hand is steady enough.

The problem I have is getting the paint to adhere. I made the model out of bass wood. Small strips glued together. The vent things in the back and Mr Fusion are all bass wood pieces glued together.

The glue is the problem.

Acrylic paint doesn't like to adhere to it. I've run into this on other larger models I've done of buildings and stuff, and can overcome it by just adding extra paint in the small areas where there is glue. On a model of a building the glue spots are a small percentage of the total and usually are in the corners where the walls meet and stuff. I just easily just apply 3-4 coats until the paint builds up enough to stick.

On this tiny model I suddenly realized that half the car is covered in glue. And the detail is so small that 3 or 4 coats of paint aren't a viable option as that will add too much thickness to it that cover up the details.

The whole car is a little less than an inch long, to give you an idea of scale. It's similar to any normal N scale car.

So how do I paint this?

My first thought was to spray a light coat of normal household white over the whole thing first. That might work to cover the glue so a brushed on acrylic would adhere. But I only get one shot at this so I don't want to take any chances.

Do any of you painting experts have suggestions? Perhaps a different kind of paint?

The glue is Ethyl Cyanoacrylate. (Specifically, EZ Bond brand. This stuff.)

Roughing it up with sandpaper usually helps a lot, but that's not an option here as there is no way to sand the tiny details.

I'm open to any suggestions about how to do this. Primer layers, different paint type, black magic, etc etc etc.

Also any suggestions on how to make the final result look glossy? It's supposed to be a metal car. But the paint is going to show the wood grain. I was thinking an acrylic laquer as a final coat to make it shiny. Specifically glassy nail polish. I'm open to suggestions on that as well.

Thanks to anyone who has a good idea on this. (Heck, thanks for anyone with bad ideas! Half the good ideas in the world come from tweaking bad ideas!!) I'm very used to this wood and this glue and painting it all, but not for this tiny scale. I realized when I got this far that painting would be different than the buildings I'm used to making.
 
Last edited by a moderator:
Not meaning to veer off-topic, but did you ever look into Micro Machines ? A lot of folks use these vehicles on their N scale layouts as they are very close to scale size. They even made a Back to the Future Delorean ! ....

6278157.jpg


Mark.
 
Not meaning to veer off-topic, but did you ever look into Micro Machines ? A lot of folks use these vehicles on their N scale layouts as they are very close to scale size. They even made a Back to the Future Delorean ! ....

6278157.jpg


Mark.

Yeah. But they are $25 on ebay and that skips the whole fun of making them.

Besides I want it to light up (interior, head lights, and the glowing blue things on the sides when it hits 88mph). I need a hollow version to do all that. Mine will be much more detailed when I'm done with it.
 
The problem is, with the car made of wood, it is going to be very difficult for any paint, acrylic or solvent base, not to raise the grain of the wood, and make the car look like a piece of painted wood without sanding. You may be able to avoid this by spraying on multiple light coats of a primer with an airbrush, but it will still not be easy.

Back when I dabbled some in model airplanes, there was a type of paint called dope. Its main advantage was it wouldn't raise the grain of the wood and was not affected by the fuels used in the airplane motors. Is this type of paint even available anymore? I remember that it stunk to high heaven until dry.
 
I don't know how this would work (paint wise), but once completed less the lighting etc - give the model a very very light coating of fibre glass or a crystal clear resin - very light. That will then give you ability to use any paint, seal the wood and provide a very hard shell.

Not suggesting that would be easy - but if you could do it, it would work.
 
I would try a few coats of sanding sealer or as Carey suggested using airplane dope. The clear dope works like sanding sealer does. If weight was an issue I would the dope, but for this sanding sealer is my choice. It is cheaper and doesn't smell as strong. Sand with very fine paper just enough to get rid of the raised grain. Then a coat of primer and your paint. Any silver paint should work, because the original Delorean had no paint. It was basically raw stainless steel. The finish looked like a kitchen sink.
 
I would try a few coats of sanding sealer or as Carey suggested using airplane dope. The clear dope works like sanding sealer does. If weight was an issue I would the dope, but for this sanding sealer is my choice. It is cheaper and doesn't smell as strong. Sand with very fine paper just enough to get rid of the raised grain. Then a coat of primer and your paint. Any silver paint should work, because the original Delorean had no paint. It was basically raw stainless steel. The finish looked like a kitchen sink.

I tried something similar last night with a craft material called Modge Podge. It's designed to be spread over a collage work or something to seal it. But it's runny so it soaks into the porous bass wood and then dries hard and is sandable.

So tonight I'll sand it down and should be left with a smooth coating that is paintable.

We'll see how it works in a few days (I've got some more detail work to do on it before I paint it. Mostly figuring out how to light it up realistically with the blue glue it has in the movies. I also haven't decided if it's doing to have the wheels down like normal or folded down like it's already had the Hover Conversion done. God I'm a nerd....hahaha)
 
Skipjacks,

Why not have the wheels retractable so you can position them anyway you want? Just a thought ;)

Just had a passing thought - sort of surprised none of our 3D printer guys haven't come in on this. Would have thought this would have been right up their ally.
 
Last edited by a moderator:
Skipjacks,

Why not have the wheels retractable so you can position them anyway you want? Just a thought ;)

Just had a passing thought - sort of surprised none of our 3D printer guys haven't come in on this. Would have thought this would have been right up their ally.

Because the whole car is less than an inch long. My eyes and hands are pretty damn good to be able to put this together, but trying to add engineering and pivot points to the wheels might be enough to make me insane.

And the 3D printing thing...I dunno. It kind of takes some of the sport out of it, don't you think? I mean if I was a graphic designer and my joy came from computer modeling the car, then I can see that being fun. But I like building it by hand. That's the whole joy of it to me.


Dammit. Now you've gone and made me want to figure out how to make the wheels retractable even if it drives me crazy. :cool:

I wasn't suggesting that you employ a 3D printer to build thew car, rather that I thought those who did do that sort of thing would have jumped on the idea for themselves.

And here I was thinking to myself "...self, here is a guy who likes a challenge... making the wheels retract will be a piece of cake for him..."

But if you reckon it is just too darn hard to do ....... :rolleyes:

Looking forward to seeing how you do this and the end result - just glad it isn't me doing it ;)
 
Last edited by a moderator:
Since you posted that I've already come up with 3 ways to pivot the wheels.

All 3 are really hard on this scale and will be a severe pain in my posterior to implement....but now that you've planted the idea I'm stuck with it.

Thanks for that. My wife will also thank you for that (sarcastically) when I'm still working on this care next month instead of being done by the weekend. hahahahahahaha
 
Finish the cars details.
Seal with Primer
make mold of car.
cast in clear epoxy.
Use Bare Metal Foil for basic car and paint the other stuff.
 
Hey skipjacks .... GLAD to be off help, says I in my most sincerest voice, while rolling around on the floor in fits of laughter.

Oh, and you can let your wife know that there is no need for her to thank me - I don't need copping it from your wife as well as mine :)

Have fun mate and while you are, I'll try to think of some more useful and helpful tips for you!
 
Finish the cars details.
Seal with Primer
make mold of car.
cast in clear epoxy.
Use Bare Metal Foil for basic car and paint the other stuff.

Great idea Y3a, so long as he leaves room for the retractable wheels :) But seriously, making a mold and then casting it with clear resin is a very good idea.
 
Skip (writing skipjacks takes too darn long),

The stuff I have been using picks up every little thing, every little bump, lump and divot of the thing I am making a mold of. Short answer - if it is on the object to be molded, it'll be in the mold.
 
Skip (writing skipjacks takes too darn long),

The stuff I have been using picks up every little thing, every little bump, lump and divot of the thing I am making a mold of. Short answer - if it is on the object to be molded, it'll be in the mold.

What stuff is that?

And how do you deal with odd shaped? Like this one doesn't has etchings and details that would trap a mold around it once the model hardened.
 
Skip,

I use a product called Smooth On Mold Star 16. It is a two part Silicone Rubber that is pour able over what it is that you want to make a mold of.

When it dries, in roughly 30 or so minutes, it is very flexible but strong as well. I'll do a very quick video so you can see how flexible it is and post it later tonight. The point is that you will be able to remove what you are making a mold of pretty easily.
 
Oh wow...now that you mention that I remember doing molds like that of tunnel entrances with my dad when I was a kid.

I may have to look into this for various applications.
 
Skip,

Not sure if this worked but if it did, sorry for the quality - I'll do another later with a little more care.

th_MVI_0048_zpso3ic4abf.png


As you can see, this stuff is very flexible and soft BUT is also strong as well.


Back
Top